38 - Ring Boxes, страница 14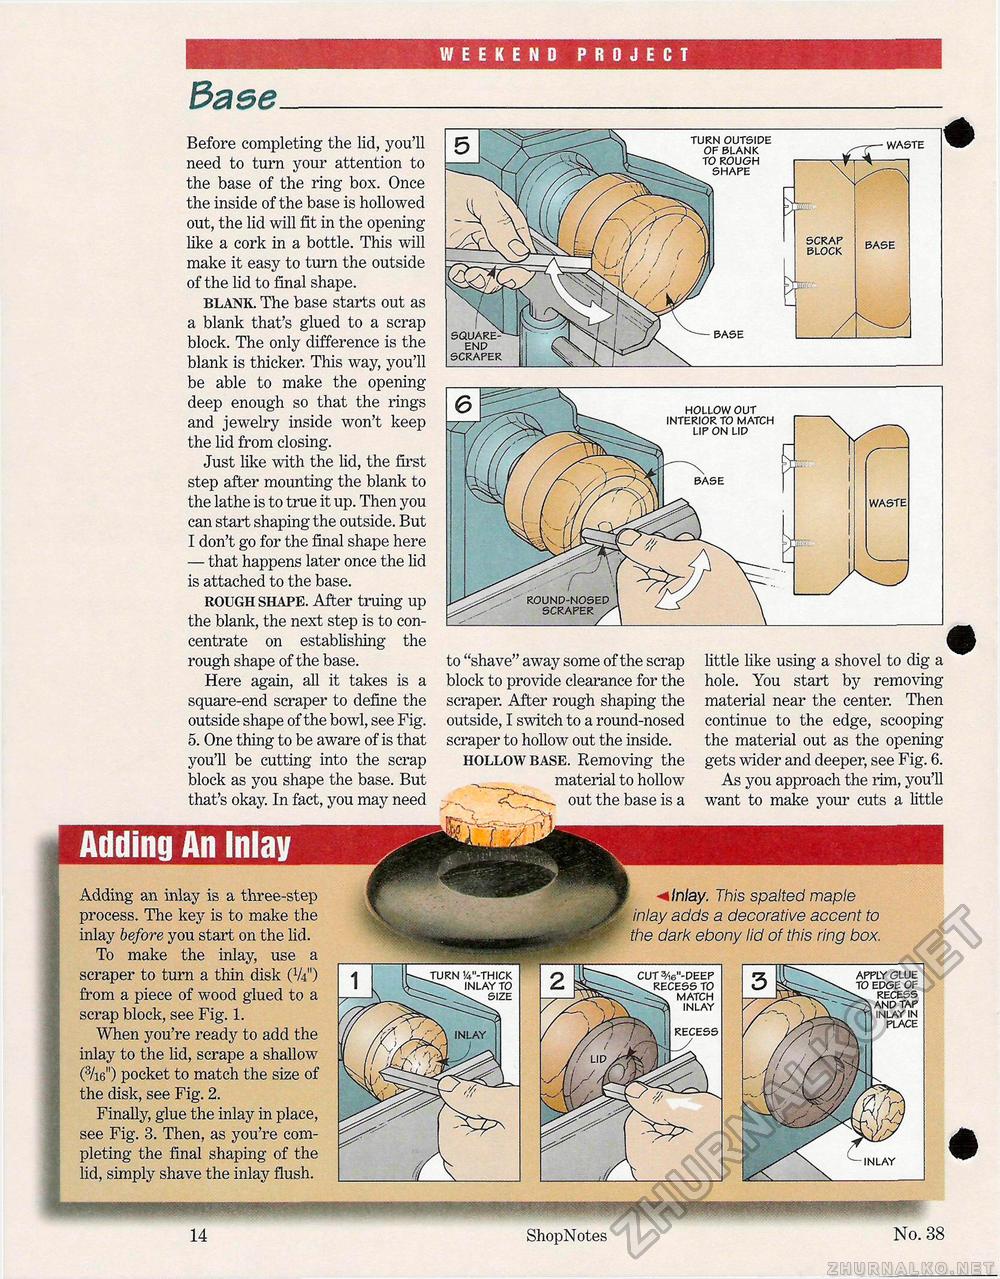
WEEKEND PROJECT 3a ee Before completing the lid, you'll need to turn your attention to the base of the ring box. Once the inside of the base is hollowed out, the lid will fit in the opening like a cork in a bottle. This will make it easy to turn the outside of the lid to final shape. blank. The base starts out as a blank that's glued to a scrap block. The only difference is the blank is thicker. This way, you'll be able to make the opening deep enough so that the rings and jewelry inside won't keep the lid from closing. Just like with the lid, the first step after mounting the blank to the lathe is to true it up. Then you can start shaping the outside. But I don't go for the final shape here — that happens later once the lid is attached to the base. rough shape. After truing up the blank, the next step is to concentrate on establishing the rough shape of the base. Here again, all it takes is a square-end scraper to define the outside shape of the bowl, see Fig. 5. One thing to be aware of is that you'll be cutting into the scrap block as you shape the base. But that's okay. In fact, you may need to "shave" away some of the scrap block to provide clearance for the scraper. After rough shaping the outside, I switch to a round-nosed scraper to hollow out the inside. hollow base. Removing the material to hollow out the base is a little like using a shovel to dig a hole. You start by removing material near the center. Then continue to the edge, scooping the material out as the opening gets wider and deeper, see Fig. 6. As you approach the rim, you'll want to make your cuts a little Adding an inlay is a three-step process. The key is to make the inlay before you start on the lid. To make the inlay, use a scraper to turn a thin disk (%") from a piece of wood glued to a scrap block, see Fig. 1. When you're ready to add the inlay to the lid, scrape a shallow (3/i6") pocket to match the size of the disk, see Fig. 2. Finally, glue the inlay in place, see Fig. 3. Then, as you're completing the final shaping of the lid, simply shave the inlay flush. < Inlay. This spalted maple inlay adds a decorative accent to the dark ebony lid of this ring box. APPLY GLUE TO EPGE OF RECESS AND TAP INLAY IN PLACE INLAY MHKIKMRHMil 14 ShopNotes No. 38 |


