38 - Ring Boxes, страница 13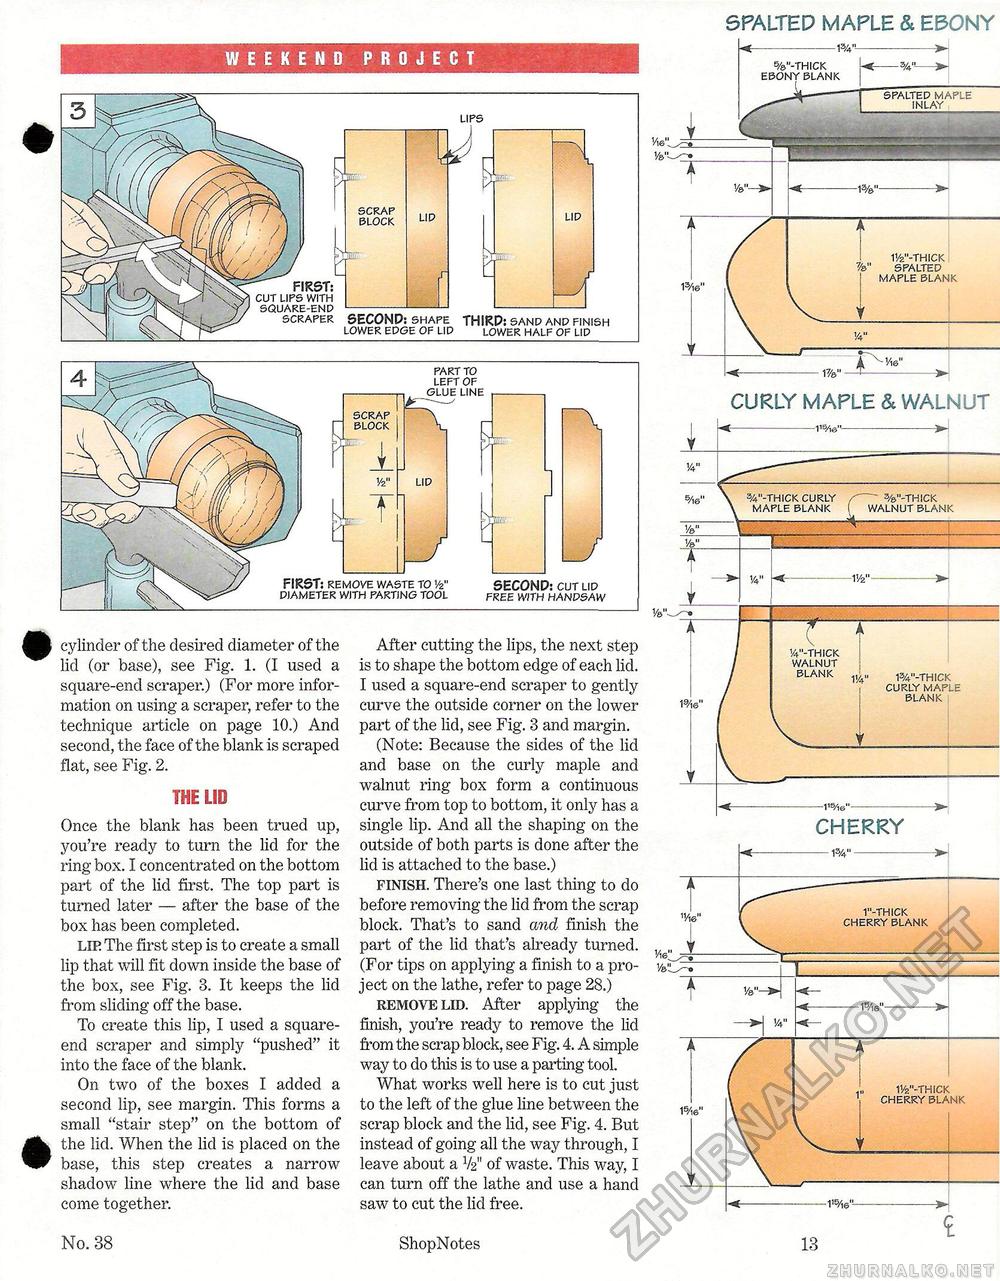
5PALTED MAPLE & EE50NY WEEKEND PROJECT lips scrap block Ef FIRST; cut lips with square-end scraper SECOND: shape lower edge of lid THIRD: sand and finish lower half of lid FIRST: remove waste to 1/2" SECOND: cut lid diameter wjth parting tool free WITH HANPSAW block part to left of glue line cylinder of the desired diameter of the lid (or base), see Fig. 1. (I used a square-end scraper.) (For more information on using a scraper, refer to the technique article on page 10.) And second, the face of the blank is scraped flat, see Fig. 2. THE LIOOnce the blank has been trued up, you're ready to turn the lid for the ring box. I concentrated on the bottom part of the lid first. The top part is turned later — after the base of the box has been completed. lir The first step is to create a small lip that will fit down inside the base of the box, see Fig. 3. It keeps the lid from sliding off the base. To create this lip, I used a square-end scraper and simply "pushed" it into the face of the blank. On two of the boxes I added a second lip, see margin. This forms a small "stair step" on the bottom of the lid. When the lid is placed on the base, this step creates a narrow shadow line where the lid and base come together. After cutting the lips, the next step is to shape the bottom edge of each lid. I used a square-end scraper to gently curve the outside corner on the lower part of the lid, see Fig. 3 and margin. (Note: Because the sides of the lid and base on the curly maple and walnut ring box form a continuous curve from top to bottom, it only has a single lip. And all the shaping on the outside of both parts is done after the lid is attached to the base.) finish. There's one last thing to do before removing the lid from the scrap block. That's to sand and finish the part of the lid that's already turned. (For tips on applying a finish to a project on the lathe, refer to page 28.) remove lid. After applying the finish, you're ready to remove the lid from the scrap block, see Fig. 4. A simple way to do this is to use a parting tool. What works well here is to cut just to the left of the glue line between the scrap block and the lid, see Fig. 4. But instead of going all the way through, I leave about a V2'1 of waste. This way, I can turn off the lathe and use a hand saw to cut the lid free. —115/W'- CHERRY Vie' 1/s" 11/16" ..1 • 1%" 1"-thick cherry blank ->j V4" -1sAe"~ 11/2"-thick cherry blank I'S/W- No. 38 ShopNotes 13 1/4"-thick WALNUT blank w-thick curly maple blank --1%' "-thick blank i 11/2"-thick spalted ! maple blank CURLY MAPLE & WALNUT %"-thick curly maple blank 3/a"-THICK WALNUT blank maple |


