38 - Ring Boxes, страница 23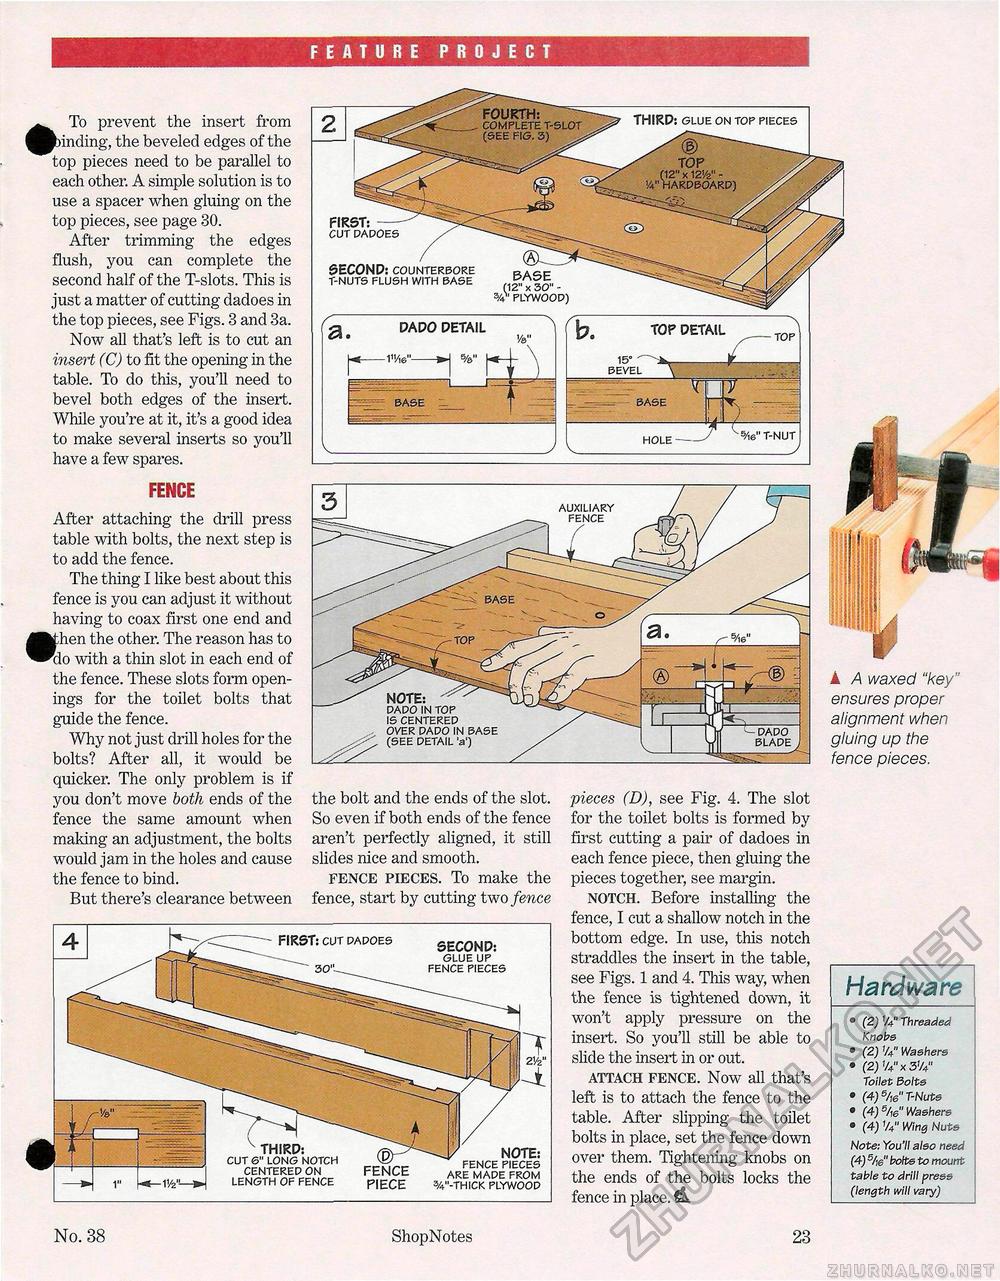
FEATURE PROJECT To prevent the insert from rinding, the beveled edges of the top pieces need to be parallel to each other. A simple solution is to use a spacer when gluing on the top pieces, see page 30. After trimming the edges flush, you can complete the second half of the T-slots. This is just a matter of cutting dadoes in the top pieces, see Figs. 3 and 3a. Now all that's left is to cut an insert (C) to fit the opening in the table. To do this, you'll need to bevel both edges of the insert. While you're at it, it's a good idea to make several inserts so you'll have a few spares. FENCE After attaching the drill press table with bolts, the next step is to add the fence. The thing I like best about this fence is you can adjust it without having to coax first one end and Fthen the other. The reason has to do with a thin slot in each end of the fence. These slots form openings for the toilet bolts that guide the fence. Why not just drill holes for the bolts? After all, it would be quicker. The only problem is if you don't move both ends of the fence the same amount when making an adjustment, the bolts would jam in the holes and cause the fence to bind. But there's clearance between the bolt and the ends of the slot. So even if both ends of the fence aren't perfectly aligned, it still slides nice and smooth. fence pieces. To make the fence, start by cutting two fence pieces (D), see Fig. 4. The slot for the toilet bolts is formed by first cutting a pair of dadoes in each fence piece, then gluing the pieces together, see margin. notch. Before installing the fence, I cut a shallow notch in the bottom edge. In use, this notch straddles the insert in the table, see Figs. 1 and 4. This way, when the fence is tightened down, it won't apply pressure on the insert. So you'll still be able to slide the insert in or out. attach fence. Now all that's left is to attach the fence to the table. After slipping the toilet bolts in place, set the fence down over them. Tightening knobs on the ends of the bolts locks the fence in place. & A A waxed "key" ensures proper alignment when gluing up the fence pieces. Hardware • (2) %" Threaded Knobs • (2) V4" Washers • (2) V4" x 3'U" Toilet Bolts • (4)5/w"T-Nuts • (4) 5/16" Washers • (4) Wing Nuts Note: You'll also need (4) 5he bolts to mount table to drill press (length will vary) No. 38 ShopNotes 23 BASE (12" x 30" -3/4 PLYWOOD) FIRST: CUT DADOES SECOND: counterbore T-NUTS FLUSH WITH BASE AUXILIARY FENCE NOTE: DADO IN TOP IS CENTERED OVER DADO IN BASE (SEE DETAIL 'a') -DADO BLADE FIRST: CUT DADOES SECOND: GLUE UP FENCE PIECES CUT 6" LONG NOTCH CENTERED ON LENGTH OF FENCE FENCE PIECE NOTE: FENCE PIECES ARE MADE FROM W-THICK PLYWOOD |


