38 - Ring Boxes, страница 21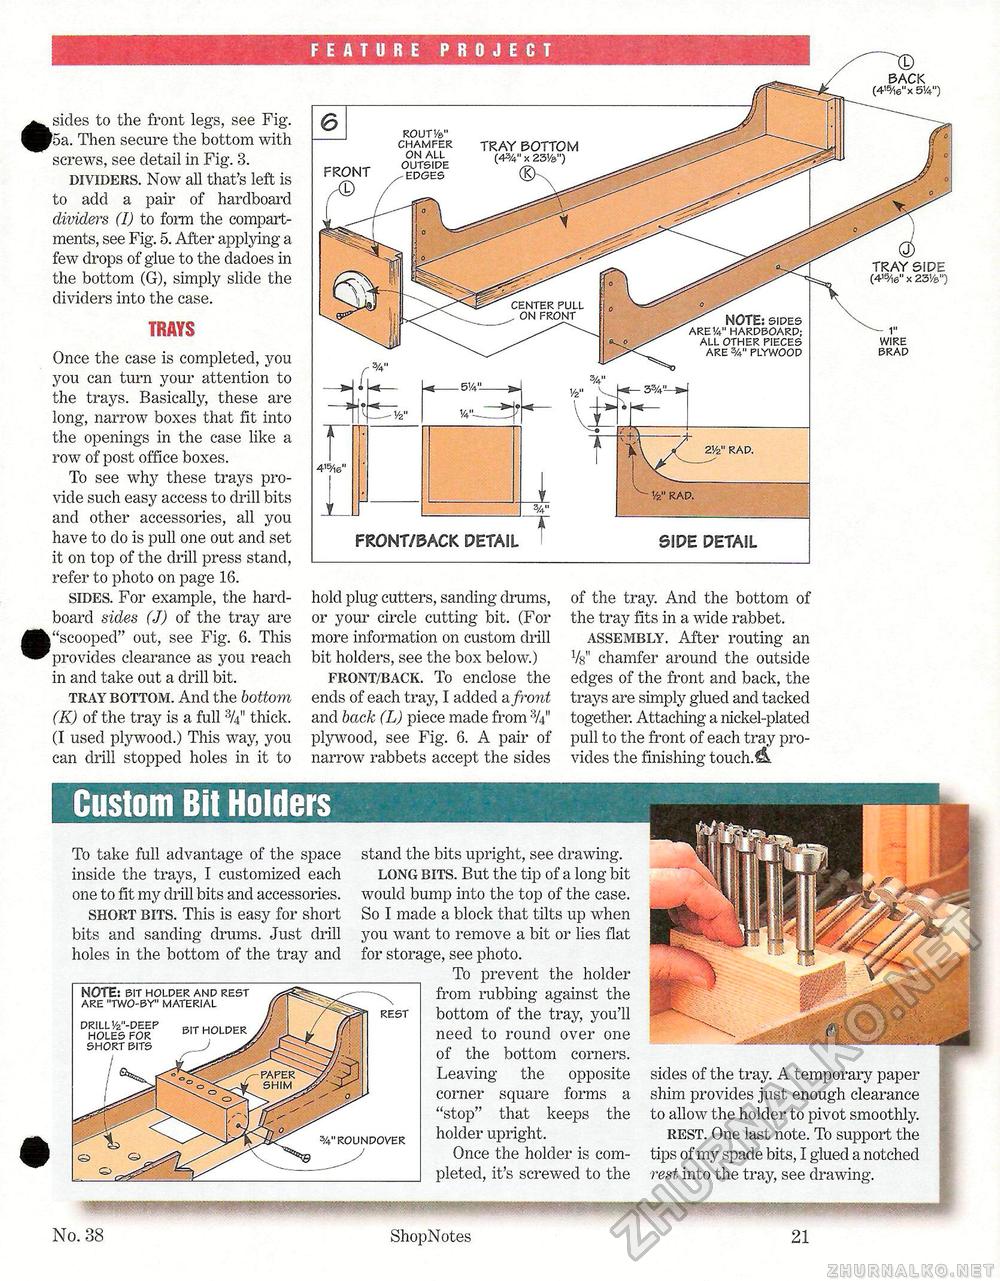
FEATURE PROJECT # sides to the front legs, see Fig. 5a. Then secure the bottom with screws, see detail in Fig. 3. dividers. Now all that's left is to add a pair of hardboard dividers (I) to form the compartments, see Fig. 5. After applying a few drops of glue to the dadoes in the bottom (G), simply slide the dividers into the case. TRAYSOnce the case is completed, you you can turn your attention to the trays. Basically, these are long, narrow boxes that fit into the openings in the case like a row of post office boxes. To see why these trays provide such easy access to drill bits and other accessories, all you have to do is pull one out and set it on top of the drill press stand, refer to photo on page 16. sides. For example, the hard-board sides (J) of the tray are •"scooped" out, see Fig. 6. This provides clearance as you reach in and take out a drill bit. tray bottom. And the bottom (K) of the tray is a full :V4" thick. (I used plywood.) This way, you can drill stopped holes in it to hold plug cutters, sanding drums, or your circle cutting bit. (For more information on custom drill bit holders, see the box below.) front/back. To enclose the ends of each tray, I added a front and back (L) piece made from plywood, see Fig. 6. A pair of narrow rabbets accept the sides of the tray. And the bottom of the tray fits in a wide rabbet. assembly. After routing an Vs" chamfer around the outside edges of the front and back, the trays are simply glued and tacked together. Attaching a nickel-plated pull to the front of each tray provides the finishing touch.^L NOTE: BIT HOLDER AND REST ARE "TWO-BY" MATERIAL DRILL y2"-DEEP HOLES FOR SHORT BITS REST BTjr; r • ^mbmh^.W ■ 'JIBilHW1-' C'MBBI'■'■■'■1 IMS- WROUNDOVER sides of the tray. A temporary paper shim provides just enough clearance to allow the holder to pivot smoothly. rest. One last note. To support the tips of my spade bits, I glued a notched rest into the tray, see drawing. stand the bits upright, see drawing. long bits. But the tip of a long bit would bump into the top of the case. So I made a block that tilts up when you want to remove a bit or lies flat for storage, see photo. To prevent the holder from rubbing against the bottom of the tray, you'll need to round over one of the bottom corners. Leaving the opposite corner square forms a "stop" that keeps the holder upright, Once the holder is completed, it's screwed to the To take full advantage of the space inside the trays, I customized each one to fit my drill bits and accessories. short bits. This is easy for short bits and sanding drums. Just drill holes in the bottom of the tray and No. 38 ShopNotes 21 |


