40 - Vacuum Clamping System, страница 25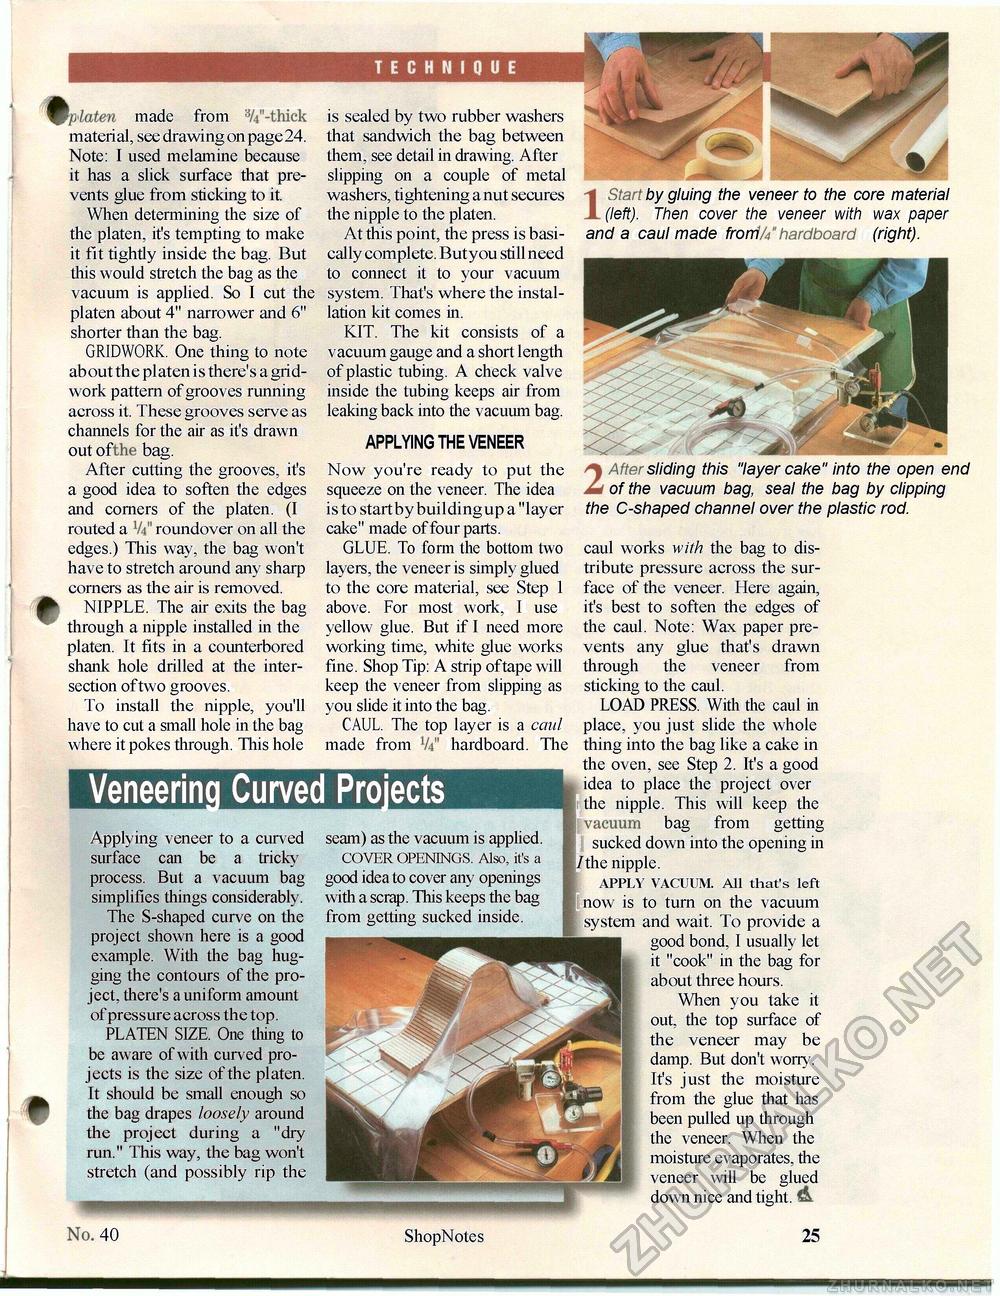
'■fdnten made from -thick material, see drawing on page 24. Note: I used melamine because it has a slick surface that prevents glue from sticking to it. When determining the size of the platen, it's tempting to make it fit tightly inside the bag. But this would stretch the bag as the vacuum is applied. So I cut the platen about 4" narrower and 6" shorter than the bag. GRIDWORK. One thing to note about the platen is there's a grid-work pattern of grooves running across it. These grooves serve as channels for the air as it's drawn out ofthe bag. After cutting the grooves, it's a good idea to soften the edges and corners of the platen. (I routed a V4" roundover on all the edges.) This way, the bag won't have to stretch around any sharp corners as the air is removed. NIPPLE. The air exits the bag through a nipple installed in the platen. It fits in a counterbored shank hole drilled at the intersection oftwo grooves. To install the nipple, you'll have to cut a small hole in the bag where it pokes through. This hole TECHNIQUE is sealed by two rubber washers that sandwich the bag between them, see detail in drawing. After slipping on a couple of metal washers, tightening a nut secures the nipple to the platen. At this point, the press is basically complete. But you still need to connect it to your vacuum system. That's where the installation kit comes in. KIT. The kit consists of a vacuum gauge and a short length of plastic tubing. A check valve inside the tubing keeps air from leaking back into the vacuum bag. APPLYING THE VENEER Now you're ready to put the squeeze on the veneer. The idea is to start by building up a "layer cake" made of four parts. GLUE. To form the bottom two layers, the veneer is simply glued to the core material, see Step 1 above. For most work, I use yellow glue. But if I need more working time, white glue works fine. Shop Tip: A strip oftape will keep the veneer from slipping as you slide it into the bag. CAUL. The top layer is a caul made from V4" hardboard. The Veneering Curved Projects Applying veneer to a curved surface can be a tricky process. But a vacuum bag simplifies things considerably. The S-shaped curve on the project shown here is a good example. With the bag hugging the contours of the project, there's a uniform amount of pressure across the top. PLATEN SIZE. One thing to be aware of with curved projects is the size of the platen. It should be small enough so the bag drapes loosely around the project during a "dry run." This way, the bag won't stretch (and possibly rip the seam) as the vacuum is applied. COVER OPENINGS. Also, it's a good idea to cover any openings with a scrap. This keeps the bag from getting sucked inside. IStan by gluing the veneer to the core material (left). Then cover the veneer with wax paper and a caul made frorri//hardboard (right). 2 Alter sliding this "layer cake" into the open end of the vacuum bag, seal the bag by clipping the C-shaped channel over the plastic rod. caul works with the bag to distribute pressure across the surface of the veneer. Here again, it's best to soften the edges of the caul. Note: Wax paper prevents any glue that's drawn through the veneer from sticking to the caul. LOAD PRESS. With the caul in place, you just slide the whole thing into the bag like a cake in the oven, see Step 2. It's a good idea to place the project over the nipple. This will keep the vacuum bag from getting sucked down into the opening in the nipple. APPLY VACUUM. All that's left now is to turn on the vacuum system and wait. To provide a good bond, I usually let it "cook" in the bag for about three hours. When you take it out, the top surface of the veneer may be damp. But don't worry. It's just the moisture from the glue that has been pulled up through the veneer. When the moisture evaporates, the veneer will be glued down nice and tight. A 40 ShopNotes 25 |


