40 - Vacuum Clamping System, страница 22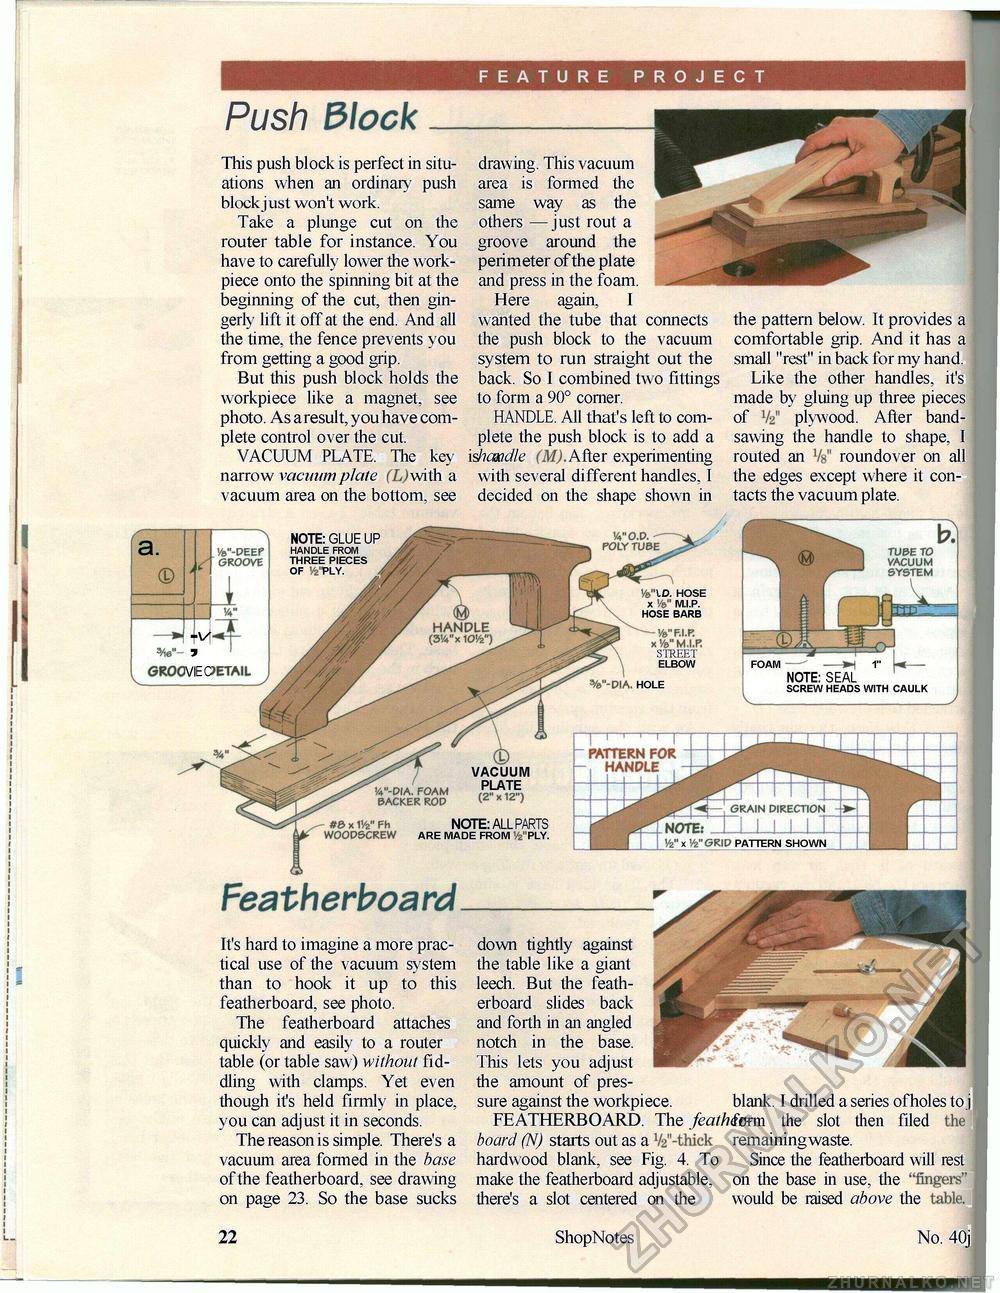
FEATURE PROJECT Push 3\ock This push block is perfect in situations when an ordinary push block just won't work. Take a plunge cut on the router table for instance. You have to carefully lower the work-piece onto the spinning bit at the beginning of the cut, then gingerly lift it off at the end. And all the time, the fence prevents you from getting a good grip. But this push block holds the workpiece like a magnet, see photo. As a result, you have complete control over the cut. VACUUM PLATE. The key narrow vacuum plate (X)with a vacuum area on the bottom, see drawing. This vacuum area is formed the same way as the others — just rout a groove around the perimeter of the plate and press in the foam. Here again, I wanted the tube that connects the push block to the vacuum system to run straight out the back. So I combined two fittings to form a 90° corner. HANDLE. All that's left to complete the push block is to add a vshcmdle (M). After experimenting with several different handles, I decided on the shape shown in the pattern below. It provides a comfortable grip. And it has a small "rest" in back for my hand. Like the other handles, it's made by gluing up three pieces of V2" plywood. After band-sawing the handle to shape, I routed an Vs" roundover on all the edges except where it contacts the vacuum plate. '/a" F.I. P. xW MJ.fi STREET ELBOW FOAM >h 1" NOTE: SEAL SCREW HEADS WITH CAULK 1 1 ' 1 I pattern for handle '4"-DIA. FOAM ,,„ „ ,„„. BACKER ROD ^ * > NOTE: ALL PARTS ARE MADE FROM Vz'VLY. Featherboard It's hard to imagine a more practical use of the vacuum system than to hook it up to this featherboard, see photo. The featherboard attaches quickly and easily to a router table (or table saw) without fiddling with clamps. Yet even though it's held firmly in place, you can adjust it in seconds. The reason is simple. There's a vacuum area formed in the base of the featherboard, see drawing on page 23. So the base sucks down tightly against the table like a giant leech. But the feath-erboard slides back and forth in an angled notch in the base. This lets you adjust the amount of pressure against the workpiece. blank. I drilled a series ofholes to j FEATHERBOARD. The feathima the slot then filed the board (N) starts out as a Va'-thick remainingwaste. hardwood blank, see Fig. 4. To Since the featherboard will rest make the featherboard adjustable, on the base in use, the "fingers" there's a slot centered on the would be raised above the table. 22 ShopNotes No. 40j |


