40 - Vacuum Clamping System, страница 19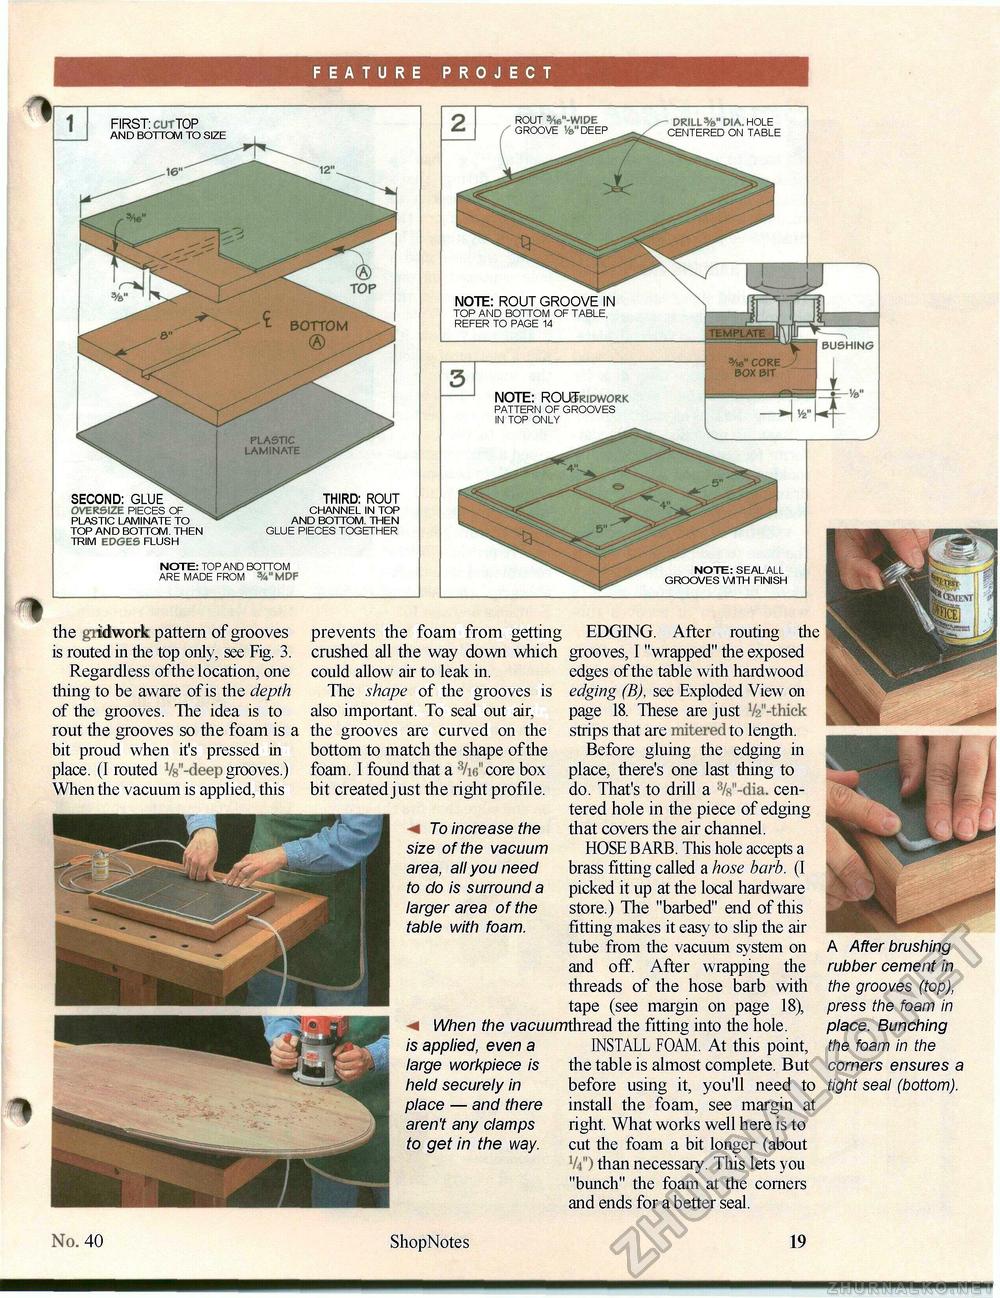
FEATURE PROJECT SECOND: GLUE OVERSIZE PIECES PLASTIC LAMINATE TO TOP AND BOTTOM. THEN TRIM EDGES FLUSH THIRD: ROUT CHANNEL IN TOP AND BOTTOM. THEN GLUE PIECES TOGETHER NOTE: TOP AND BOTTOM ARE MADE FROM 3A"MDF 1 BUSHING the idwork pattern of grooves is routed in the top only, see Fig. 3. Regardless ofthe location, one thing to be aware of is the depth of the grooves. The idea is to rout the grooves so the foam is a bit proud when it's pressed in place. (I routed Vs'-deepgrooves.) When the vacuum is applied, this prevents the foam from getting EDGING. After routing the crushed all the way down which grooves, I "wrapped" the exposed could allow air to leak in. The shape of the grooves is also important. To seal out air, the grooves are curved on the bottom to match the shape ofthe foam. I found that a 3/i6"core box bit created just the right profile. To increase the size of the vacuum area, all you need to do is surround a larger area of the table with foam. edges ofthe table with hardwood edging (B), see Exploded View on page 18. These are just V2"-thick strips that are mitered to length. Before gluing the edging in place, there's one last thing to do. That's to drill a %"-dia. centered hole in the piece of edging that covers the air channel. HOSE BARB. This hole accepts a brass fitting called a hose barb. (I picked it up at the local hardware store.) The "barbed" end of this fitting makes it easy to slip the air tube from the vacuum system on and off. After wrapping the threads of the hose barb with tape (see margin on page 18), When the vacuumthread the fitting into the hole. is applied, even a large workpiece is held securely in place — and there aren't any clamps to get in the way. INSTALL FOAM. At this point, the table is almost complete. But before using it, you'll need to install the foam, see margin at right. What works well here is to cut the foam a bit longer (about V4") than necessary. This lets you "bunch" the foam at the corners and ends for a better seal. A After brushing rubber cement in the grooves (top), press the foam in place. Bunching the foam in the corners ensures a tight seal (bottom). 18 ShopNotes 40 |


