40 - Vacuum Clamping System, страница 18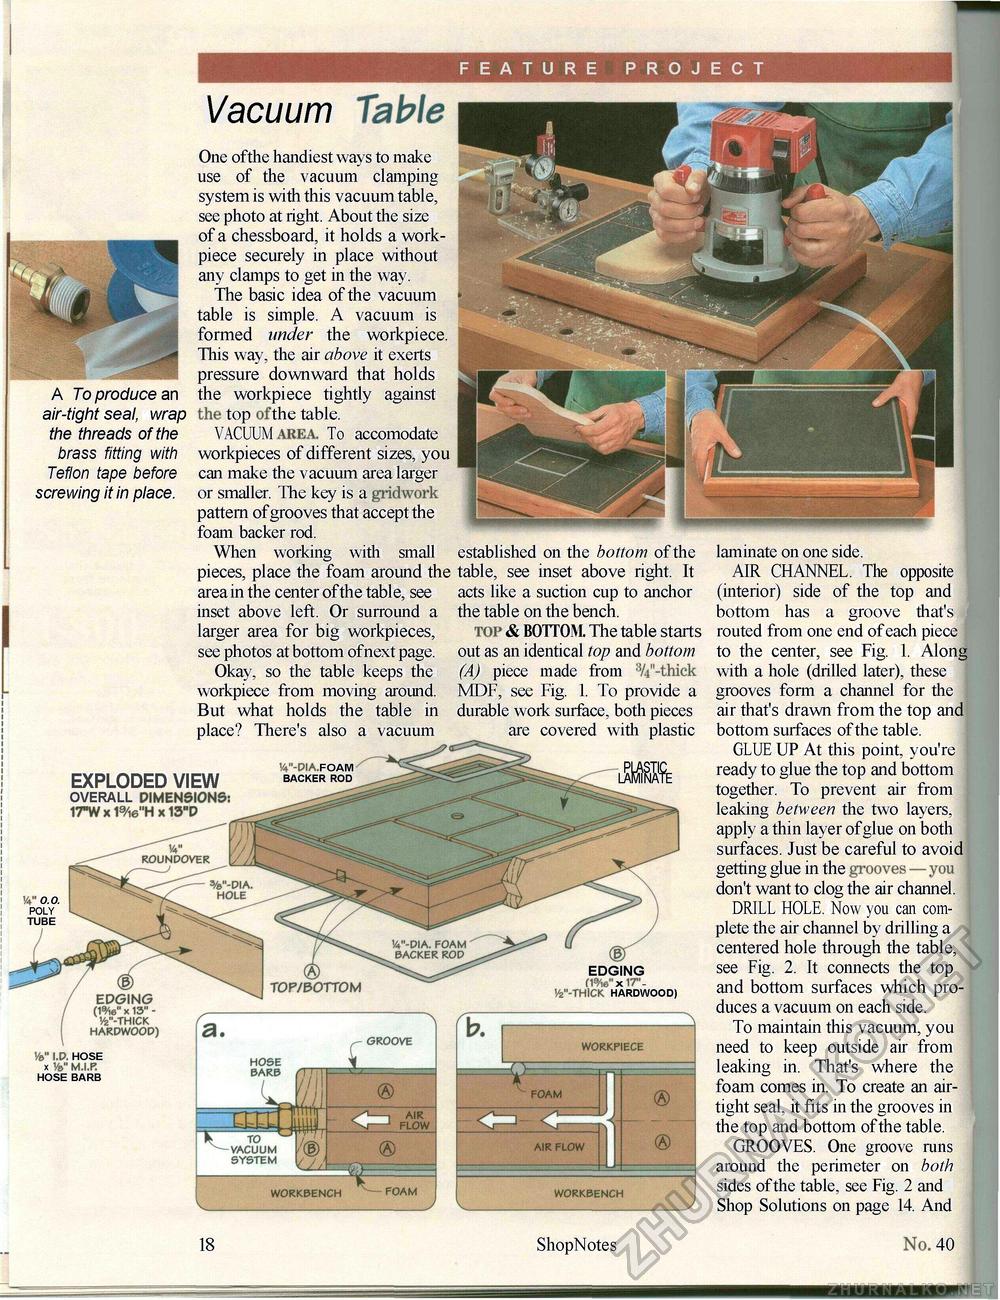
FEATURE PROJECT A To produce an air-tight seal, wrap the threads of the brass fitting with Teflon tape before screwing it in place. Vacuum Table One ofthe handiest ways to make use of the vacuum clamping system is with this vacuum table, see photo at right. About the size of a chessboard, it holds a work-piece securely in place without any clamps to get in the way. The basic idea of the vacuum table is simple. A vacuum is formed under the workpiece. This way, the air above it exerts pressure downward that holds the workpiece tightly against the top ofthe table. VACUUM AREA. To accomodate workpieces of different sizes, you can make the vacuum area larger or smaller. The key is a gridwork pattern of grooves that accept the foam backer rod. When working with small pieces, place the foam around the area in the center ofthe table, see inset above left. Or surround a larger area for big workpieces, see photos at bottom of next page. Okay, so the table keeps the workpiece from moving around. But what holds the table in place? There's also a vacuum established on the bottom of the table, see inset above right. It acts like a suction cup to anchor the table on the bench. top & BOTTOM The table starts out as an identical top and bottom (A) piece made from 3/i"-thick MDF, see Fig. 1. To provide a durable work surface, both pieces are covered with plastic EXPLODED VIEW overall dimensions 17"Wx19/i6"HX13"D W'-DIA FOAM BACKER ROD 8) edging rnvxir1-te"-THlCK HARDWOOD) 8) edging rnvxir1-te"-THlCK HARDWOOD)
18 ShopNotes laminate on one side. AIR CHANNEL. The opposite (interior) side of the top and bottom has a groove that's routed from one end of each piece to the center, see Fig. 1. Along with a hole (drilled later), these grooves form a channel for the air that's drawn from the top and bottom surfaces of the table. GLUE UP At this point, you're ready to glue the top and bottom together. To prevent air from leaking between the two layers, apply a thin layer of glue on both surfaces. Just be careful to avoid getting glue in the grooves—you i don't want to clog the air channel. DRILL HOLE. Now you can complete the air channel by drilling a centered hole through the table, see Fig. 2. It connects the top and bottom surfaces which produces a vacuum on each side. To maintain this vacuum, you need to keep outside air from leaking in. That's where the foam comes in. To create an airtight seal, it fits in the grooves in the top and bottom of the table. GROOVES. One groove runs around the perimeter on both sides ofthe table, see Fig. 2 and Shop Solutions on page 14. And 40 |
|||||||||||||


