44 - Grinding Station, страница 29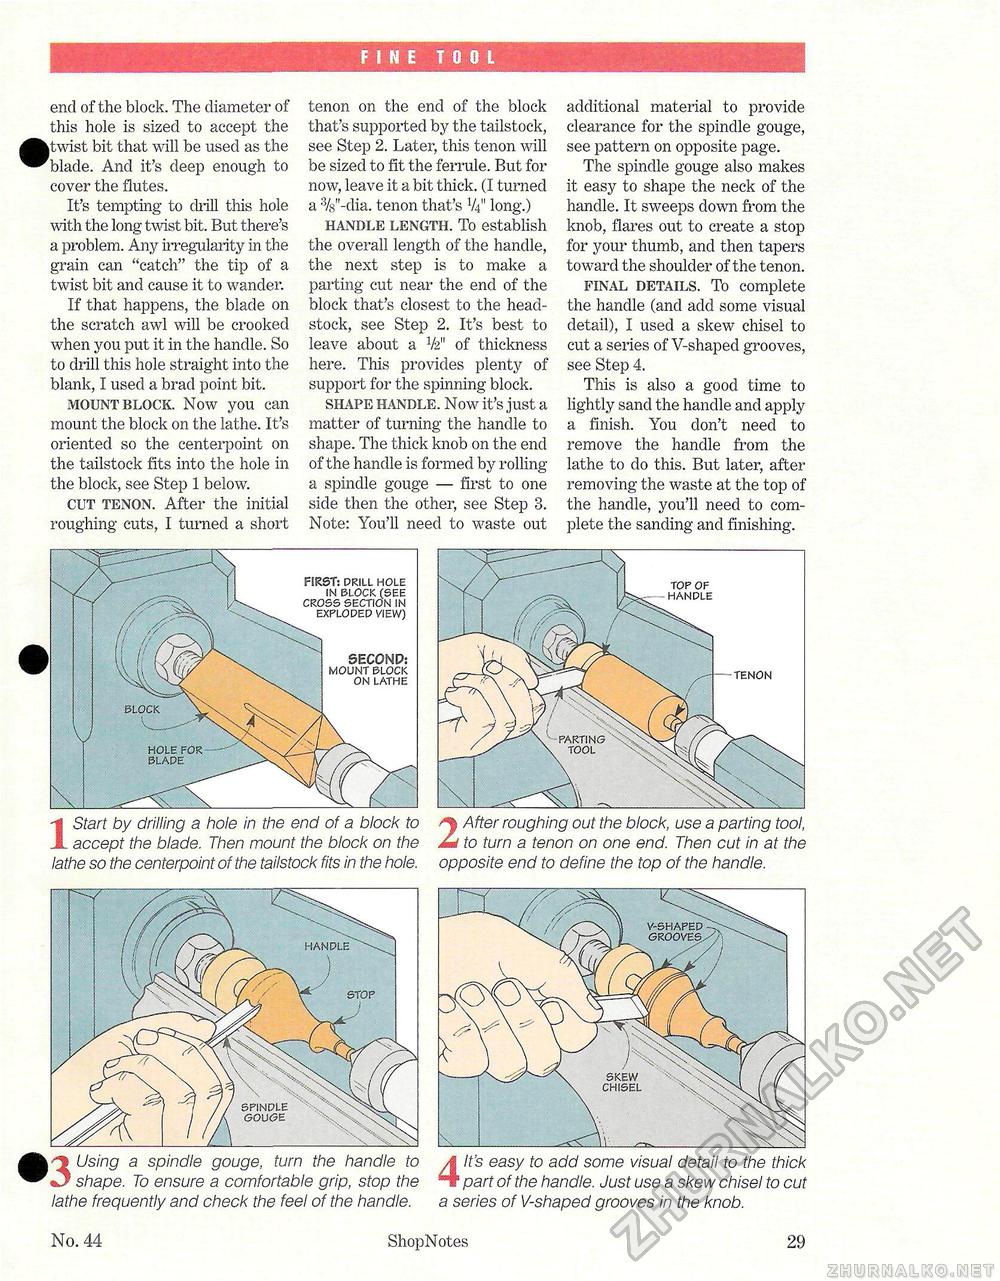
FINE TOOL end of the block. The diameter of this hole is sized to accept the •twist bit that will be used as the blade. And it's deep enough to cover the flutes. It's tempting to drill this hole with the long twist bit. But there's a problem. Any irregularity in the grain can "catch" the tip of a twist bit and cause it to wander. If that happens, the blade on the scratch awl will be crooked when you put it in the handle. So to drill this hole straight into the blank, I used a brad point bit. mount block. Now you can mount the block on the lathe. It's oriented so the centerpoint on the tailstock fits into the hole in the block, see Step 1 below. cut tenon. After the initial roughing cuts, I turned a short tenon on the end of the block that's supported by the tailstock, see Step 2. Later, this tenon will be sized to fit the ferrule. But for now, leave it a bit thick. (I turned a %"-dia. tenon that's V4" long.) handle length. To establish the overall length of the handle, the next step is to make a parting cut near the end of the block that's closest to the head-stock, see Step 2. It's best to leave about a V2" of thickness here. This provides plenty of support for the spinning block. shape handle. Now it's just a matter of turning the handle to shape. The thick knob on the end of the handle is formed by rolling a spindle gouge — first to one side then the other, see Step 3. Note: You'll need to waste out additional material to provide clearance for the spindle gouge, see pattern on opposite page. The spindle gouge also makes it easy to shape the neck of the handle. It sweeps down from the knob, flares out to create a stop for your thumb, and then tapers toward the shoulder of the tenon. final details. To complete the handle (and add some visual detail), I used a skew chisel to cut a series of V-shaped grooves, see Step 4. This is also a good time to lightly sand the handle and apply a finish. You don't need to remove the handle from the lathe to do this. But later, after removing the waste at the top of the handle, you'll need to complete the sanding and finishing. SECOND: MOUNT BLOCK ON LATHE FIRST: DRILL HOLE IN BLOCK(SEE CROSS SECTION IN EXPLODED VIEW) HOLE BLADE TENON TOP OF HANDLE 1 Start by drilling a hole in the end of a block to accept the blade. Then mount the block on the lathe so the centerpoint of the tailstock fits in the hole. 2 After roughing out the block, use a parting tool, to turn a tenon on one end. Then cut in at the opposite end to define the top of the handle. HANDLE SPINDLE GOUGE SKEW CHISEL '3 Using a spindle gouge, turn the handle to shape. To ensure a comfortable grip, stop the 4 lathe frequently and check the feel of the handle No. 44 ShopNotes It's easy to add some visual detail to the thick part of the handle. Just use a skew chisel to cut a series of V-shaped grooves in the knob. 29 |


