47 - Build Your Own Mortising Machine , страница 6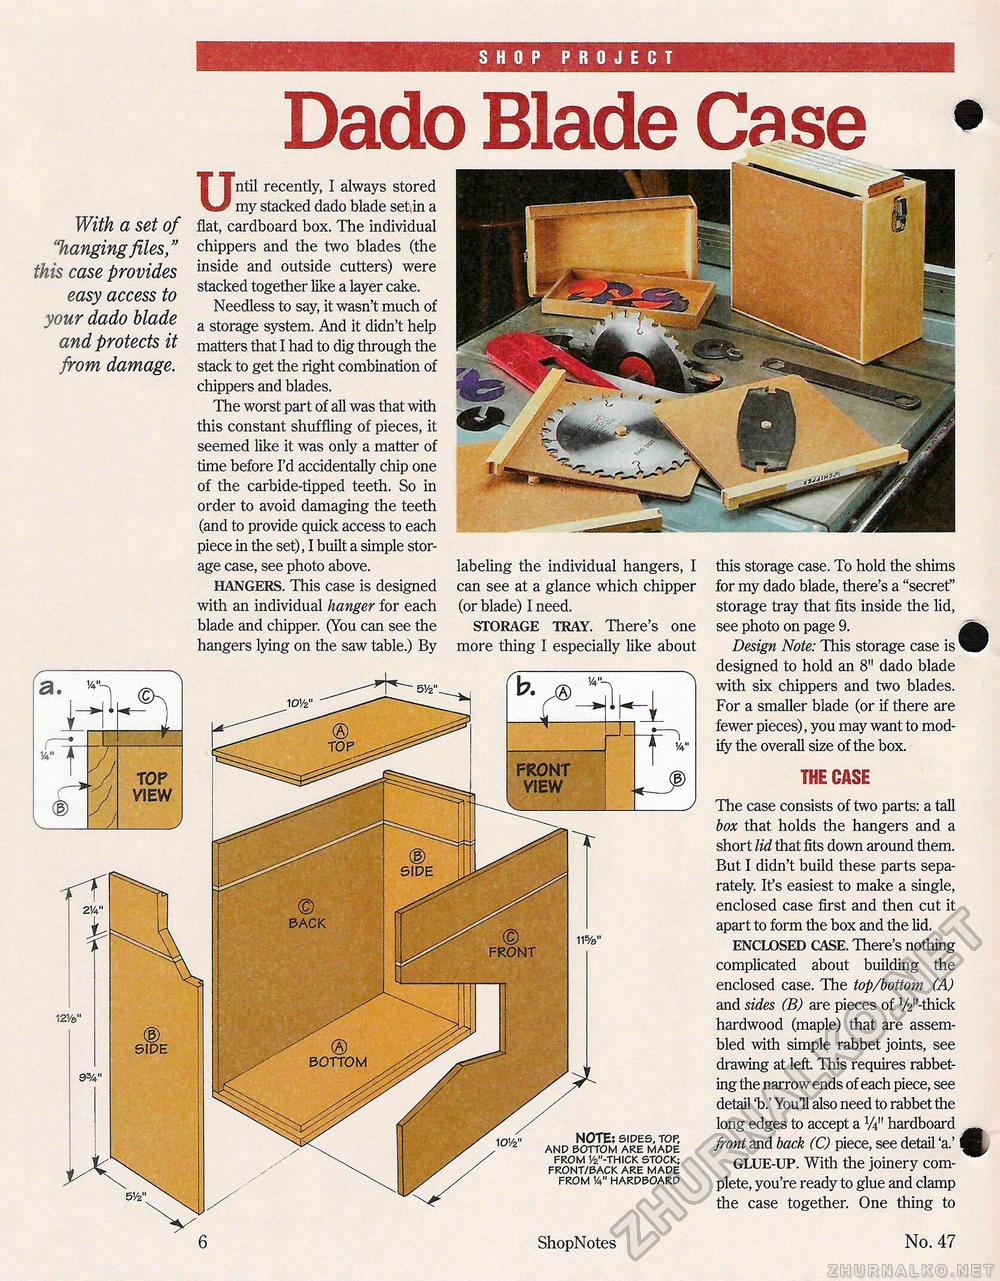
SHOP PROJECT With a set of "hanging files," this case provides easy access to your dado blade and protects it from damage. FRONT VIEW Dado Blade CaseUntil recently, I always stored my stacked dado blade setin a flat, cardboard box. The individual chippers and the two blades (the inside and outside cutters) were stacked together like a layer cake. Needless to say, it wasn't much of a storage system. And it didn't help matters that I had to dig through the stack to get the right combination of chippers and blades. The worst part of all was that with this constant shuffling of pieces, it seemed like it was only a matter of time before I'd accidentally chip one of the carbide-tipped teeth. So in order to avoid damaging the teeth (and to provide quick access to each piece in the set), I built a simple storage case, see photo above. HANGERS. This case is designed with an individual hanger for each blade and chipper. (You can see the hangers lying on the saw table.) By © BACK labeling the individual hangers, I can see at a glance which chipper (or blade) I need. STORAGE TRAY. There's one more thing I especially like about this storage case. To hold the shims for my dado blade, there's a "secret" storage tray that fits inside the lid, see photo on page 9. Design Note: This storage case is designed to hold an 8" dado blade with six chippers and two blades. For a smaller blade (or if there are fewer pieces), you may want to modify the overall size of the box. nute: sides, TOP, and bottom are made from 1/2"-thick stock; front/back are made from 1/4" hardboard 6 ShopNotes THE CASE The case consists of two parts: a tall box that holds the hangers and a short lid that fits down around them. But I didn't build these parts separately. It's easiest to make a single, enclosed case first and then cut it apart to form the box and the lid. ENCLOSED CASE. There's nothing complicated about building the enclosed case. The top/bottom (A) and sides (B) are pieces of V2"'-thick hardwood (maple) that are assembled with simple rabbet joints, see drawing at left This requires rabbeting the narrow ends of each piece, see detail V YouH also need to rabbet the long edges to accept a V4" hardboard front and back (C) piece, see detail 'a.' GLUE-UP. With the joinery complete, you're ready to glue and clamp the case together. One thing to No. 47 |


