47 - Build Your Own Mortising Machine , страница 7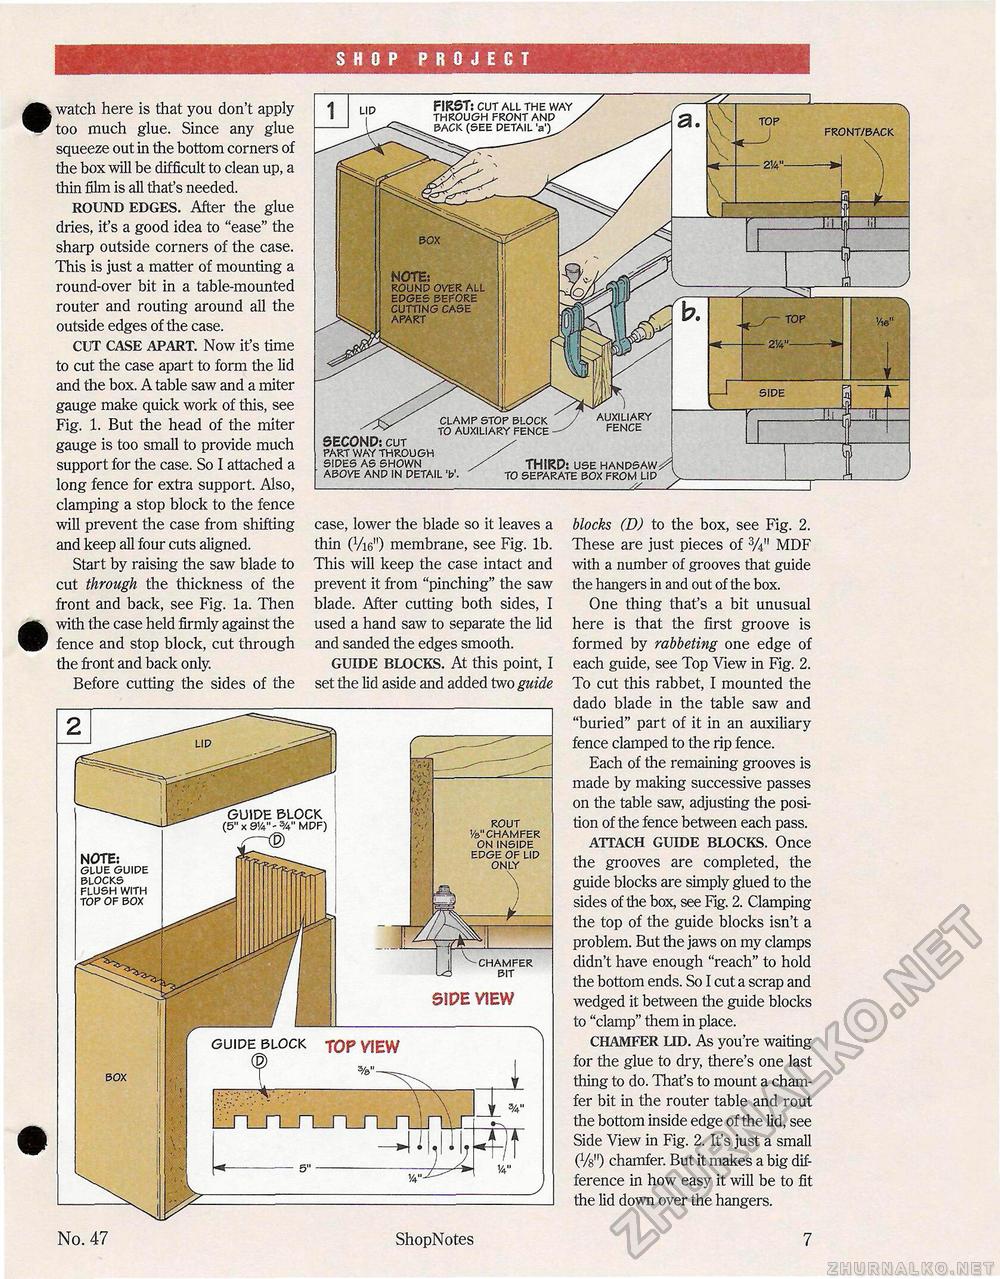
SHOP PROJECT watch here is that you don't apply too much glue. Since any glue squeeze out in the bottom corners of the box will be difficult to clean up, a thin film is all that's needed. ROUND EDGES. After the glue dries, it's a good idea to "ease" the sharp outside corners of the case. This is just a matter of mounting a round-over bit in a table-mounted router and routing around all the outside edges of the case. CUT CASE APART. Now it's time to cut the case apart to form the lid and the box. A table saw and a miter gauge make quick work of this, see Fig. 1. But the head of the miter gauge is too small to provide much support for the case. So I attached a long fence for extra support. Also, clamping a stop block to the fence will prevent the case from shifting and keep all four cuts aligned. Start by raising the saw blade to cut through the thickness of the front and back, see Fig. la. Then with the case held firmly against the fence and stop block, cut through the front and back only. Before cutting the sides of the SECOND: cur part way through sides as shown above and in detail v THIRD: use handsaw^ to separate box from lid v _^_Z case, lower the blade so it leaves a thin (VW) membrane, see Fig. lb. This will keep the case intact and prevent it from "pinching" the saw blade. After cutting both sides, I used a hand saw to separate the lid and sanded the edges smooth. GUIDE BLOCKS. At this point, I set the lid aside and added two guide No. 47 ShopNotes blocks (D) to the box, see Fig. 2. These are just pieces of 3A" MDF with a number of grooves that guide the hangers in and out of the box. One thing that's a bit unusual here is that the first groove is formed by rabbeting one edge of each guide, see Top View in Fig. 2. To cut this rabbet, I mounted the dado blade in the table saw and "buried" part of it in an auxiliary fence clamped to the rip fence. Each of the remaining grooves is made by making successive passes on the table saw, adjusting the position of the fence between each pass. ATTACH GUIDE BLOCKS. Once the grooves are completed, the guide blocks are simply glued to the sides of the box, see Fig. 2. Clamping the top of the guide blocks isn't a problem. But the jaws on my clamps didn't have enough "reach" to hold the bottom ends. So I cut a scrap and wedged it between the guide blocks to "clamp" them in place. CHAMFER LID. As you're waiting for the glue to dry, there's one last thing to do. That's to mount a chamfer bit in the router table and rout the bottom inside edge of the lid, see Side View in Fig. 2. It's just a small (Vg") chamfer. But it makes a big difference in how easy it will be to fit the lid down over the hangers. 7 |


