47 - Build Your Own Mortising Machine , страница 9
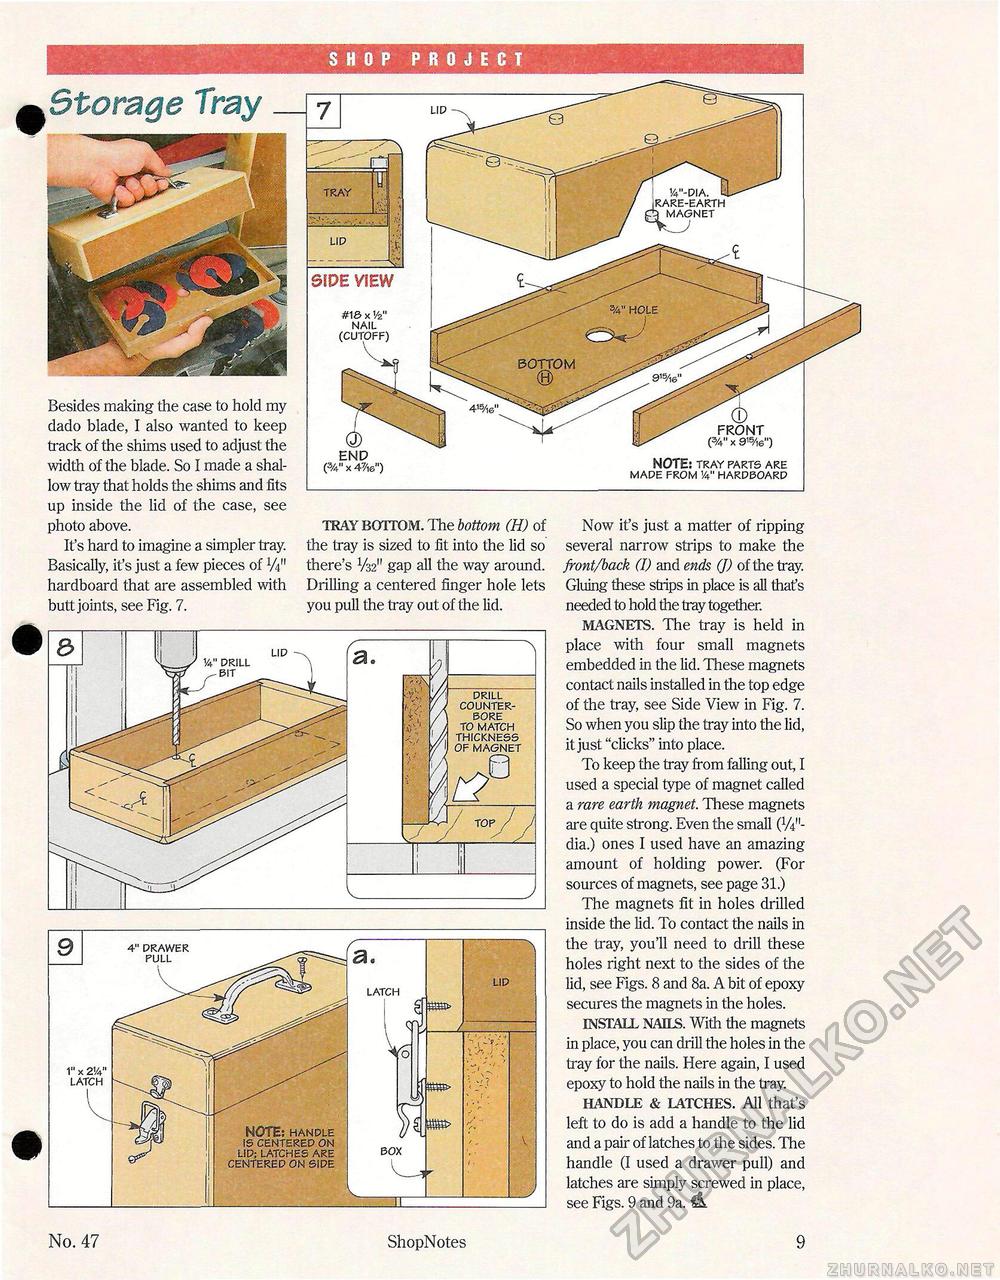
ihhhhmhm ■m SHOP PROJECT 1/4"-PIA. I ,RARE-EARTH t) MAGNET TRAY W HOLE me x v2n NAIL (CUTOFF) BOTTOM Besides making the case to hold my dado blade, I also wanted to keep track of the shims used to adjust the width of the blade. So I made a shallow tray that holds the shims and fits , front (%" x 915/i6") NOTE: TRAY PARTS ARE MAPE FROM 1/4" HARDBOARD up inside the lid of the case, see photo above. It's hard to imagine a simpler tray. Basically, it's just a few pieces of W hardboard that are assembled with butt joints, see Fig. 7. TRAY BOTTOM. The bottom (H) of the tray is sized to fit into the lid so there's V32" gap all the way around. Drilling a centered finger hole lets you pull the tray out of the lid. Now it's just a matter of ripping several narrow strips to make the front/back (I) and ends (J) of the tray. Gluing these strips in place is all that's needed to hold the tray together. MAGNETS. The tray is held in place with four small magnets embedded in the lid. These magnets contact nails installed in the top edge of the tray, see Side View in Fig. 7. So when you slip the tray into the lid, it just "clicks" into place. To keep the tray from falling out, I used a special type of magnet called a rare earth magnet. These magnets are quite strong. Even the small (WL dia.) ones I used have an amazing amount of holding power. (For sources of magnets, see page 31.) The magnets fit in holes drilled inside the lid. To contact the nails in the tray, you'll need to drill these holes right next to the sides of the lid, see Figs. 8 and 8a. A bit of epoxy secures the magnets in the holes. INSTALL NAILS. With the magnets in place, you can drill the holes in the tray for the nails. Here again, I used epoxy to hold the nails in the tray. HANDLE & LATCHES. All that's left to do is add a handle to the lid and a pair of latches to the sides. The handle (I used a drawer pull) and latches are simply screwed in place, see Figs. 9 and 9a. & DRILL COUNTER- BORE TO MATCH THICKNESS OF MAGNET 4" DRAWER PULL LATCH 1" x 2!4" LATCH note: HANDLE IS CENTERED ON LID; LATCHES ARE CENTERED ON SIDE No. 47 ShopNotes 9 |


