47 - Build Your Own Mortising Machine , страница 12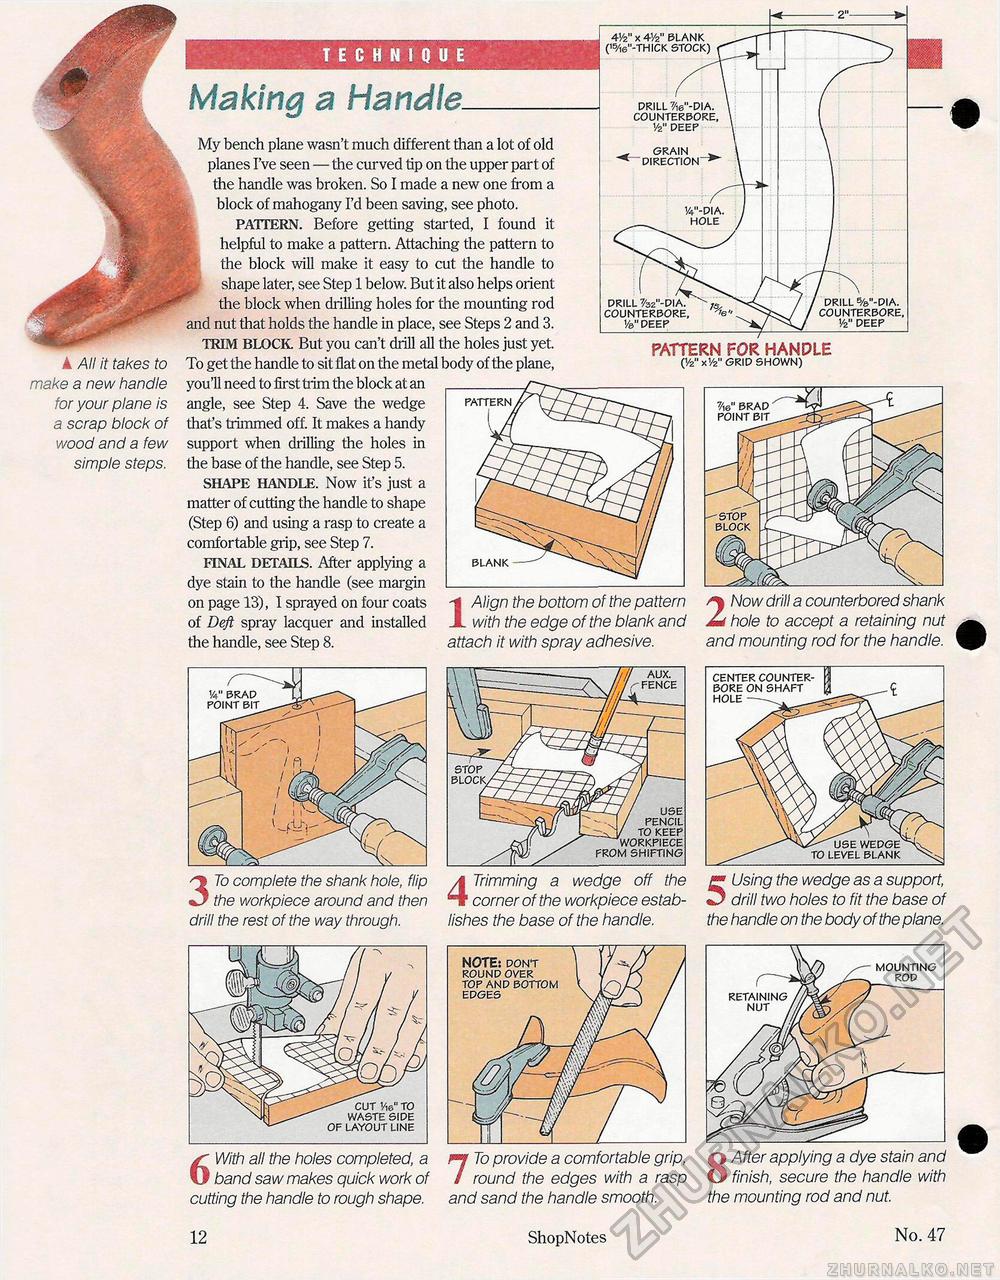
TECHNIQUE < k All it takes to make a new handle for your plane is a scrap block of wood and a few simple steps. ■■■ 41/2" x 41/2" BLANK C5/,6"-THICK STOCK) Making a Handle. My bench plane wasn't much different than a lot of old planes I've seen — the curved tip on the upper part of the handle was broken. So I made a new one from a block of mahogany I'd been saving, see photo. PATTERN. Before getting started, I found it helpful to make a pattern. Attaching the pattern to the block will make it easy to cut the handle to shape later, see Step 1 below. But it also helps orient the block when drilling holes for the mounting rod and nut that holds the handle in place, see Steps 2 and 3. TRIM BLOCK But you can't drill all the holes just yet. To get the handle to sit flat on the metal body of the plane, you'll need to first trim the block at an angle, see Step 4. Save the wedge that's trimmed off. It makes a handy support when drilling the holes in the base of the handle, see Step 5. SHAPE HANDLE. Now it's just a matter of cutting the handle to shape (Step 6) and using a rasp to create a comfortable grip, see Step 7. FINAL DETAILS. After applying a dye stain to the handle (see margin on page 13), I sprayed on four coats of Deft spray lacquer and installed the handle, see Step 8. DRILL fW-DIA. COUNTERBORE, 1/2" DEEP GRAIN DIRECTION 1/4"-DIA. DRILL %"-DIA. COUNTERBORE, 1/2" DEEP DRILL %2"-DIA. COUNTERBORE, Va" DEEP PATTERN FOR HANDLE Q/z" x1/2" GRID SHOWN) PATTERN BLANK 1 Align the bottom of the pattern with the edge of the blank and attach it with spray adhesive. 2 Now drill a counterbored shank hole to accept a retaining nut and mounting rod for the handle. 3 To complete the shank hole, flip the workpiece around and then drill the rest of the way through. 4 Trimming a wedge off the corner of the workpiece establishes the base of the handle. Using the wedge as a support, drill two holes to fit the base of the handle on the body of the plane. 6 With all the holes completed, a band saw makes quick work of cutting the handle to rough shape. 7 To provide a comfortable grip, round the edges with a rasp and sand the handle smooth. 8 After applying a dye stain and finish, secure the handle with the mounting rod and nut. STOP BLOCK. —LJ / USE - - J / PENCIL ^J/ TO KEEP ^^WORKPIECE FROM SHIFTING CENTER COUNTERBORE ON SHAFT HOLE CUT Vie" TO WASTE SIDE OF LAYOUT LINE 12 ShopNotes No. 47 |


