47 - Build Your Own Mortising Machine , страница 13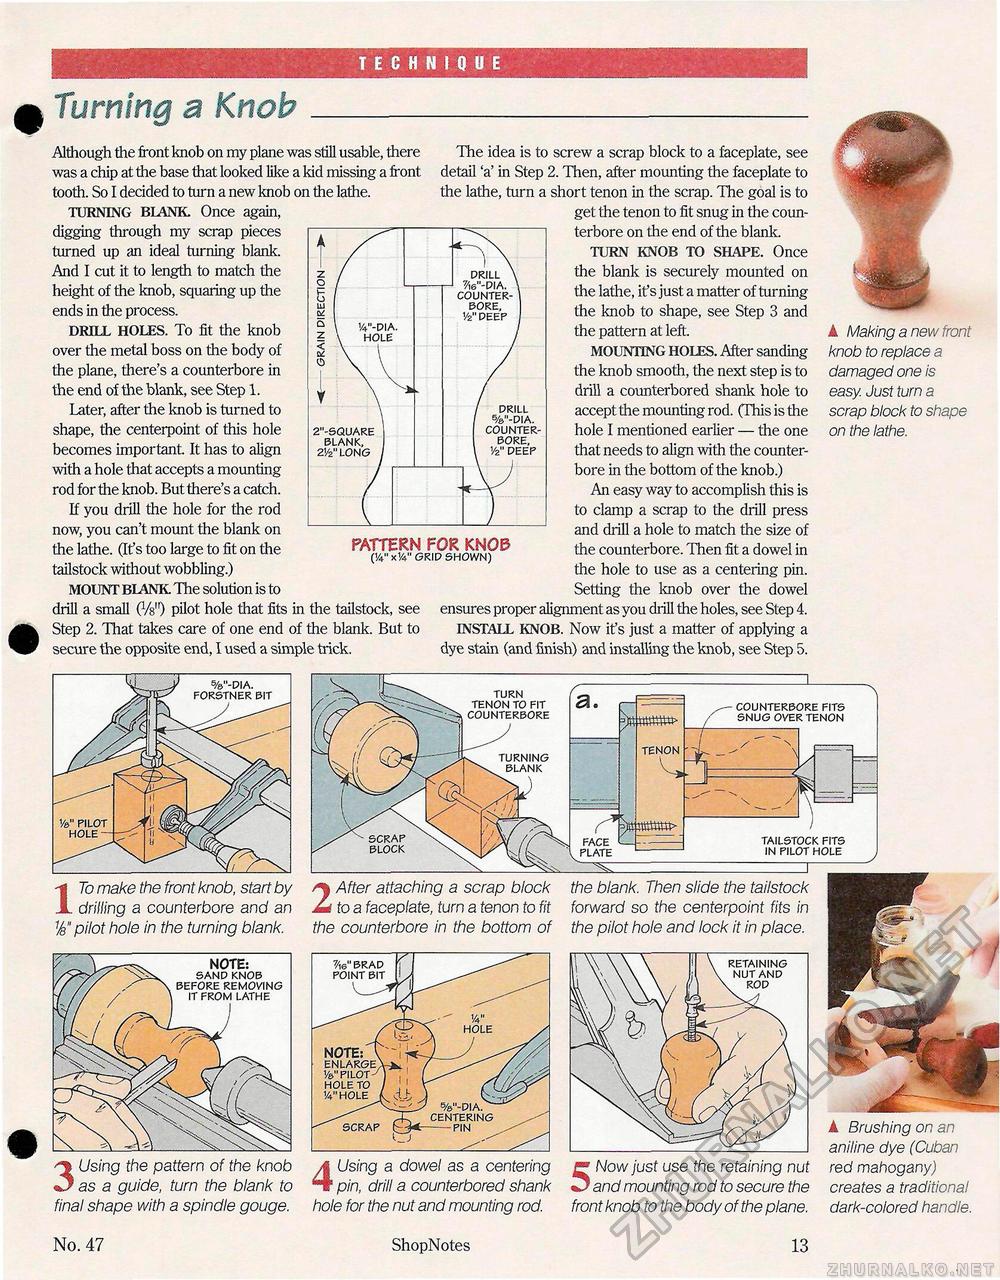
TECHNIQUE Although the front knob on my plane was still usable, there was a chip at the base that looked like a kid missing a front tooth. So I decided to turn a new knob on the lathe. TURNING BLANK. Once again, digging through my scrap pieces turned up an ideal turning blank. And I cut it to length to match the height of the knob, squaring up the ends in the process. DRILL HOLES. To fit the knob over the metal boss on the body of the plane, there's a counterbore in the end of the blank, see Step 1. Later, after the knob is turned to shape, the centerpoint of this hole becomes important It has to align with a hole that accepts a mounting rod for the knob. But there's a catch. If you drill the hole for the rod now, you can't mount the blank on the lathe. (It's too large to fit on the tailstock without wobbling.) MOUNT BLANK The solution is to drill a small (Vs") pilot hole that fits in the tailstock, see Step 2. That takes care of one end of the blank. But to secure the opposite end, I used a simple trick. PATTERN FOR KN05 (y4"x!4" GRID SHOWN) The idea is to screw a scrap block to a faceplate, see detail 'a' in Step 2. Then, after mounting the faceplate to the lathe, turn a short tenon in the scrap. The goal is to get the tenon to fit snug in the counterbore on the end of the blank. TURN KNOB TO SHAPE. Once the blank is securely mounted on the lathe, it's just a matter of turning the knob to shape, see Step 3 and the pattern at left. MOUNTING HOLES. After sanding the knob smooth, the next step is to drill a counterbored shank hole to accept the mounting rod. (This is the hole I mentioned earlier — the one that needs to align with the counter-bore in the bottom of the knob.) An easy way to accomplish this is to clamp a scrap to the drill press and drill a hole to match the size of the counterbore. Then fit a dowel in the hole to use as a centering pin. Setting the knob over the dowel ensures proper alignment as you drill the holes, see Step 4. INSTALL KNOB. Now it's just a matter of applying a dye stain (and finish) and installing the knob, see Step 5. A Making a new front knob to replace a damaged one is easy. Just turn a scrap block to shape on the lathe. 17o make the front knob, start by drilling a counterbore and an Vs pilot hole in the turning blank. 2 After attaching a scrap block to a faceplate, turn a tenon to fit the counterbore in the bottom of the blank. Then slide the tailstock forward so the centerpoint fits in the pilot hole and lock it in place. 3 Using the pattern of the knob as a guide, turn the blank to final shape with a spindle gouge. 4 Using a dowel as a centering pin, drill a counterbored shank hole for the nut and mounting rod. 5 Now just use the retaining nut and mounting rod to secure the front knob to the body of the plane. A Brushing on an aniline dye (Cuban red mahogany) creates a traditional dark-colored handle. No. 47 ShopNotes 13 |


