49 - Cabinet Maker's Tool Chest, страница 30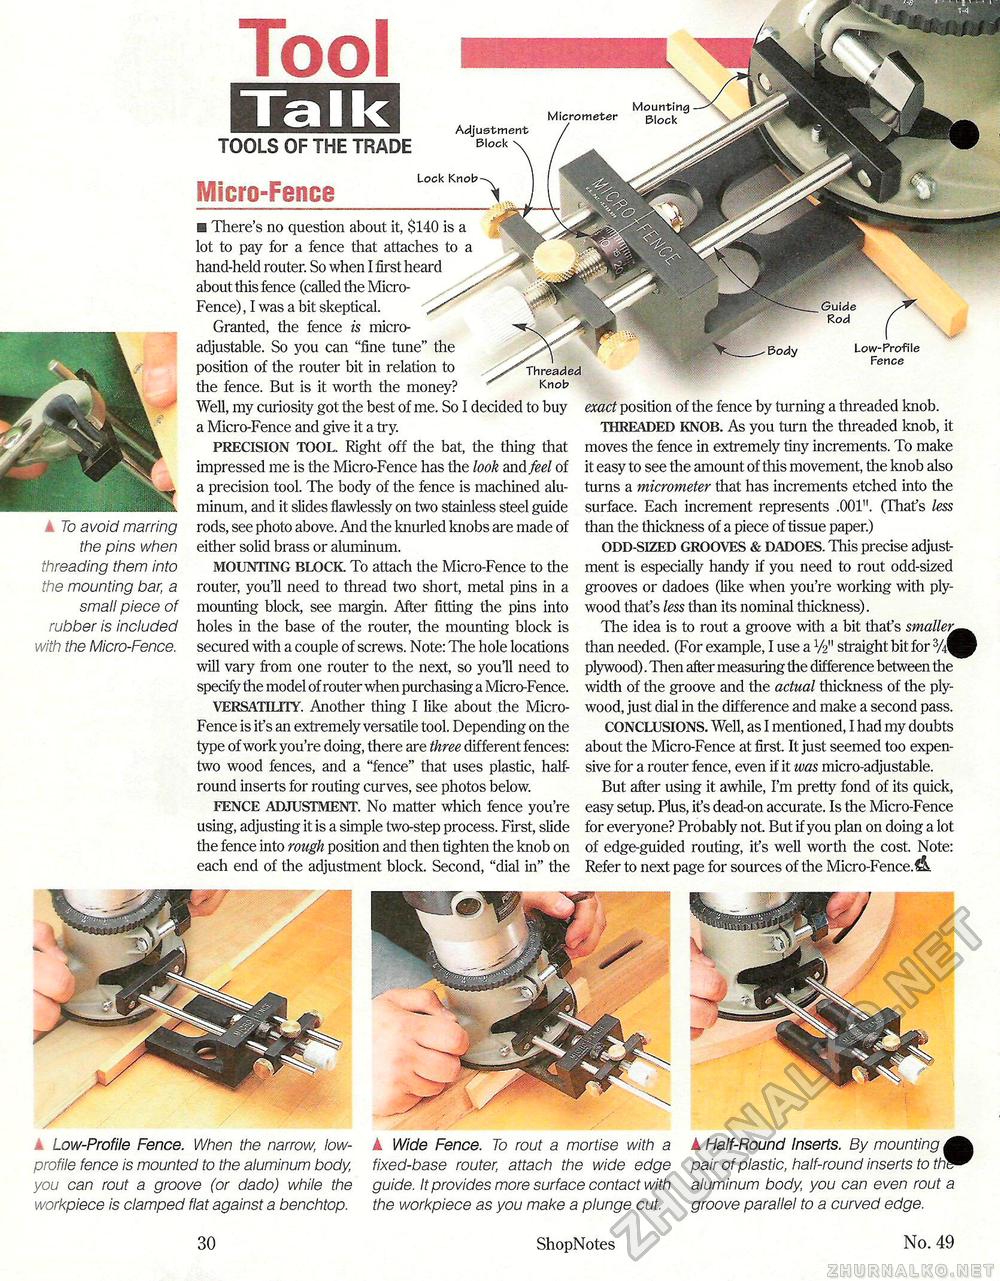
To avoid marring the pins when threading them into the mounting bar, a small piece of rubber is included with the Micro-Fence. k Wide Fence. To rout a mortise with a fixed-base router, attach the wide edge guide. It provides more surface contact with the workpiece as you make a plunge cut. k Half-Round Inserts. By mounting Jfe pair of plastic, half-round inserts to tn^* aluminum body, you can even rout a groove parallel to a curved edge. Low-Profile Fence. When the narrow, low-profile fence is mounted to the aluminum body you can rout a groove (or dado) while the workpiece is clamped flat against a benchtop. Ta I kMicro-Fence Lock Knob Knob El There's no question about it, $140 is a lot to pay for a fence that attaches to a hand-held router. So when I first heard about this fence (called the Micro-Fence), I was a bit skeptical. Granted, the fence is micro-adjustable. So you can "fine tune" t position of the router bit in relation to the fence. But is it worth the money? Well, my curiosity got the best of me. So I decided to buy a Micro-Fence and give it a try. PRECISION TOOL. Right off the bat, the thing that impressed me is the Micro-Fence has the look and feel of a precision tool. The body of the fence is machined aluminum, and it slides flawlessly on two stainless steel guide rods, see photo above. And the knurled knobs are made of either solid brass or aluminum. MOUNTING BLOCK To attach the Micro-Fence to the router, you'll need to thread two short, metal pins in a mounting block, see margin. After fitting the pins into holes in the base of the router, the mounting block is secured with a couple of screws. Note: The hole locations will vary from one router to the next, so you'll need to specify the model of router when purchasing a Micro-Fence. VERSATILITY. Another thing I like about the Micro-Fence is it's an extremely versatile tool. Depending on the type of work you're doing, there are three different fences: two wood fences, and a "fence" that uses plastic, half-round inserts for routing curves, see photos below. FENCE ADJUSTMENT. No matter which fence you're using, adjusting it is a simple two-step process. First, slide the fence into rough position and then tighten the knob on each end of the adjustment block. Second, "dial in" the Low-Profile Fence exact position of the fence by turning a threaded knob. THREADED KNOB. As you turn the threaded knob, it moves the fence in extremely tiny increments. To make it easy to see the amount of this movement, the knob also turns a micrometer that has increments etched into the surface. Each increment represents .001". (That's less than the thickness of a piece of tissue paper.) ODD-SIZED GROOVES & DADOES. This precise adjustment is especially handy if you need to rout odd-sized grooves or dadoes (like when you're working with plywood that's less than its nominal thickness). The idea is to rout a groove with a bit that's smaller^ than needed. (For example, I use a V2" straight bit for 3/4 plywood). Then after measuring the difference between the width of the groove and the actual thickness of the plywood, just dial in the difference and make a second pass. CONCLUSIONS. Well, as I mentioned, I had my doubts about the Micro-Fence at first. It just seemed too expensive for a router fence, even if it was micro-adjustable. But after using it awhile, I'm pretty fond of its quick, easy setup. Plus, it's dead-on accurate. Is the Micro-Fence for everyone? Probably not. But if you plan on doing a lot of edge-guided routing, it's well worth the cost. Note: Refer to next page for sources of the Micro-Fence.^ tools of the trade Mounting Micrometer Adjustment Block 30 ShopNotes No. 49 |


