49 - Cabinet Maker's Tool Chest, страница 27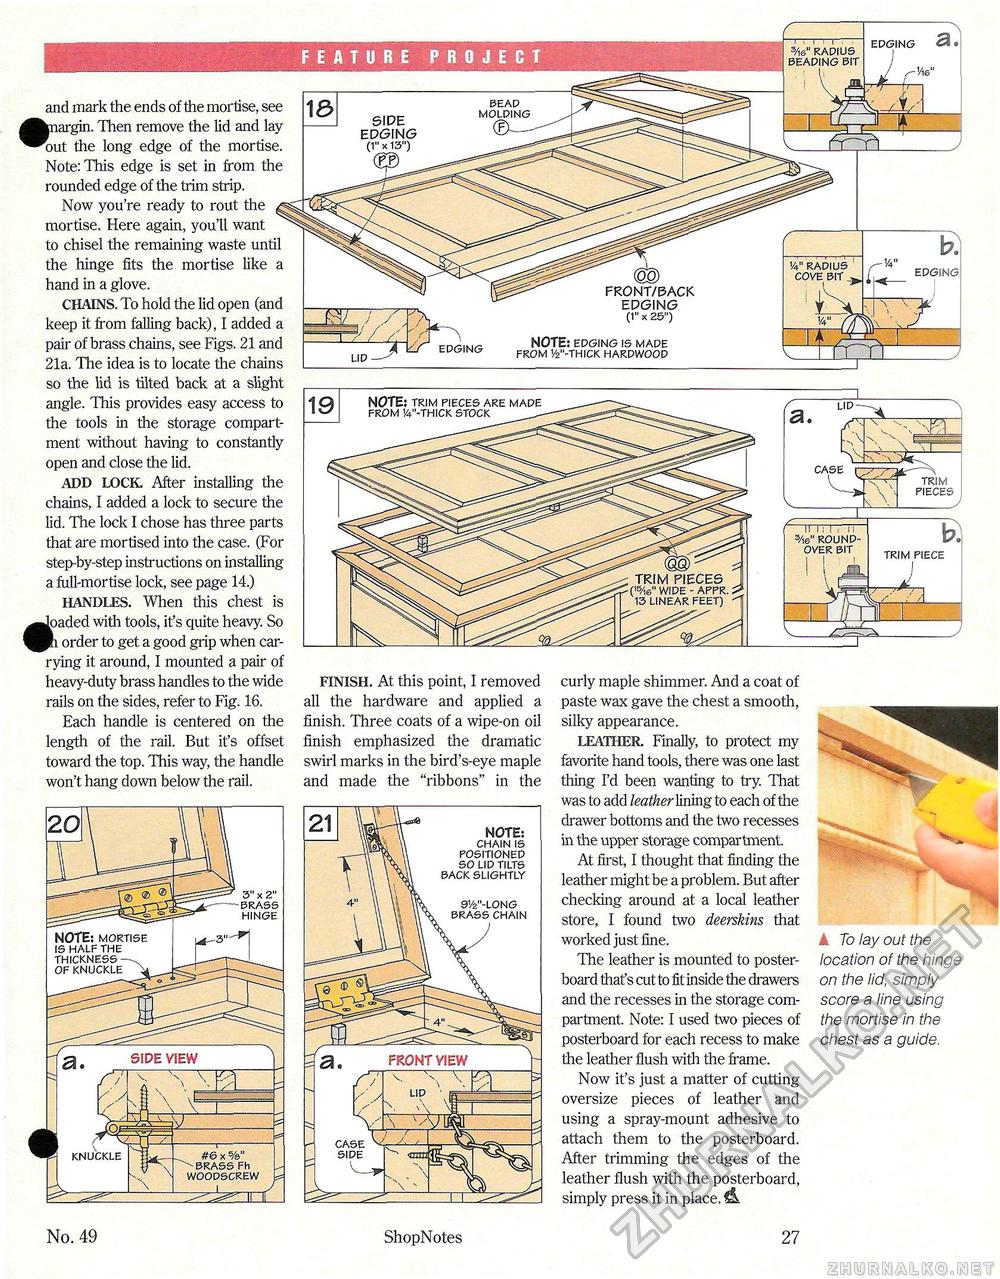
FEATURE PROJECT edging 3/i6" radius beading bit bead molding and mark the ends of the mortise, see I margin. Then remove the lid and lay out the long edge of the mortise. Note: This edge is set in from the rounded edge of the trim strip. Now you're ready to rout the ^ mortise. Here again, you'll want to chisel the remaining waste until the hinge fits the mortise like a hand in a glove. chains. To hold the lid open (and keep it from falling back), I added a pair of brass chains, see Figs. 21 and 21a. The idea is to locate the chains so the lid is tilted back at a slight angle. This provides easy access to the tools in the storage compartment without having to constantly open and close the lid. ADD LOCK After installing the chains, I added a lock to secure the lid. The lock I chose has three parts that are mortised into the case. (For step-by-step instructions on installing a full-mortise lock, see page 14.) HANDLES. When this chest is Joaded with tools, it's quite heavy. So Ph order to get a good grip when carrying it around, I mounted a pair of heavy-duty brass handles to the wide rails on the sides, refer to Fig. 16. Each handle is centered on the length of the rail. But it's offset toward the top. This way, the handle won't hang down below the rail. SIDE EDGING (1" X 13") v4" radius cove bit edgingI FRONT/BACK EDGING (1" x 25") NOTE: edging is made from 1/2"-thick hardwood edging FINISH. At this point, I removed all the hardware and applied a finish. Three coats of a wipe-on oil finish emphasized the dramatic swirl marks in the bird's-eye maple and made the "ribbons" in the curly maple shimmer. And a coat of paste wax gave the chest a smooth, silky appearance. LEATHER. Finally, to protect my favorite hand tools, there was one last thing I'd been wanting to try. That was to add leather lining to each of the drawer bottoms and the two recesses in the upper storage compartment At first, I thought that finding the leather might be a problem. But after checking around at a local leather store, I found two deerskins that worked just fine. The leather is mounted to poster-board thaf s cut to fit inside the drawers and the recesses in the storage compartment. Note: I used two pieces of posterboard for each recess to make the leather flush with the frame. Now it's just a matter of cutting oversize pieces of leather and using a spray-mount adhesive to attach them to the posterboard. After trimming the edges of the leather flush with the posterboard, simply press it in place. NOTE: chain is positioned so lid tilts back slightly 3" x 2" brass hinge 91/2"-long brass chain NOTE: mortise is half the thickness —\ of knuckle ^ A To lay out the location of the hinge on the lid, simply score a line using the mortise in the chest as a guide. SIDE VIEW FRONT VIEW #6 x %" brass Fh woodscrew knuckle NOTE: trim pieces are made from '/4"-thick stock 3/i6" round-over bit b. trim piece No. 49 ShopNotes 27 |


