49 - Cabinet Maker's Tool Chest, страница 25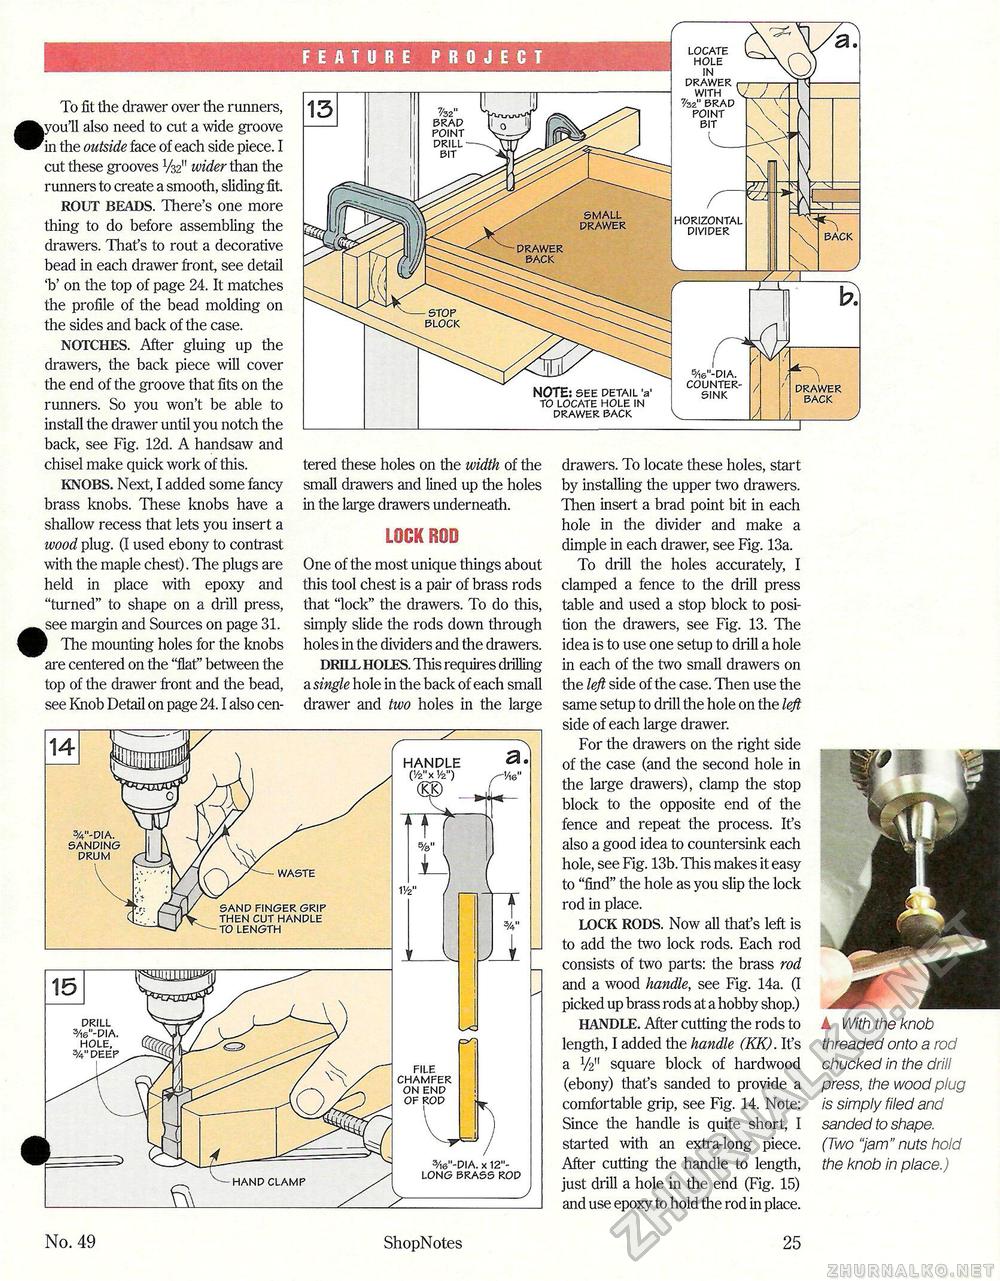
To fit the drawer over the runners, •youH also need to cut a wide groove in the outside face of each side piece. I cut these grooves V32" wider than the runners to create a smooth, sliding fit ROUT BEADS. There's one more thing to do before assembling the drawers. That's to rout a decorative bead in each drawer front, see detail 'b' on the top of page 24. It matches the profile of the bead molding on the sides and back of the case. NOTCHES. After gluing up the drawers, the back piece will cover the end of the groove that fits on the runners. So you won't be able to install the drawer until you notch the back, see Fig. 12d. A handsaw and chisel make quick work of this. KNOBS. Next, I added some fancy brass knobs. These knobs have a shallow recess that lets you insert a wood plug. (I used ebony to contrast with the maple chest). The plugs are held in place with epoxy and "turned" to shape on a drill press, •see margin and Sources on page 31. I The mounting holes for the knobs are centered on the "flat" between the top of the drawer front and the bead, see Knob Detail on page 24.1 also cen tered these holes on the width of the small drawers and lined up the holes in the large drawers underneath. LOOK BOD One of the most unique things about this tool chest is a pair of brass rods that "lock" the drawers. To do this, simply slide the rods down through holes in the dividers and the drawers. DRILL HOLES. This requires drilling a single hole in the back of each small drawer and two holes in the large drawers. To locate these holes, start by installing the upper two drawers. Then insert a brad point bit in each hole in the divider and make a dimple in each drawer, see Fig. 13a. To drill the holes accurately, I clamped a fence to the drill press table and used a stop block to position the drawers, see Fig. 13. The idea is to use one setup to drill a hole in each of the two small drawers on the left side of the case. Then use the same setup to drill the hole on the left side of each large drawer. For the drawers on the right side of the case (and the second hole in the large drawers), clamp the stop block to the opposite end of the fence and repeat the process. It's also a good idea to countersink each hole, see Fig. 13b. This makes it easy to "find" the hole as you slip the lock rod in place. LOCK RODS. Now all that's left is to add the two lock rods. Each rod consists of two parts: the brass rod and a wood handle, see Fig. 14a. (I picked up brass rods at a hobby shop.) HANDLE. After cutting the rods to length, I added the handle (KK). It's a V2" square block of hardwood (ebony) that's sanded to provide a comfortable grip, see Fig. 14. Note: Since the handle is quite short, I started with an extra-long piece. After cutting the handle to length, just drill a hole in the end (Fig. 15) and use epoxy to hold the rod in place. k With the knob threaded onto a rod chucked in the drill press, the wood plug is simply filed and sanded to shape. (Two "jam" nuts hold the knob in place.) FEATURE PROJECT NOTE: SEE DETAIL 'a1 TO LOCATE HOLE IN DRAWER BACK SMALL DRAWER DRAWER BACK ( LOCATE HOLE IN DRAWER WITH %2" BRAD POINT BIT HORIZONTAL DIVIDER 5/i6"-DIA. COUNTERSINK DRAWER BACK No. 49 ShopNotes 25 |


