49 - Cabinet Maker's Tool Chest, страница 7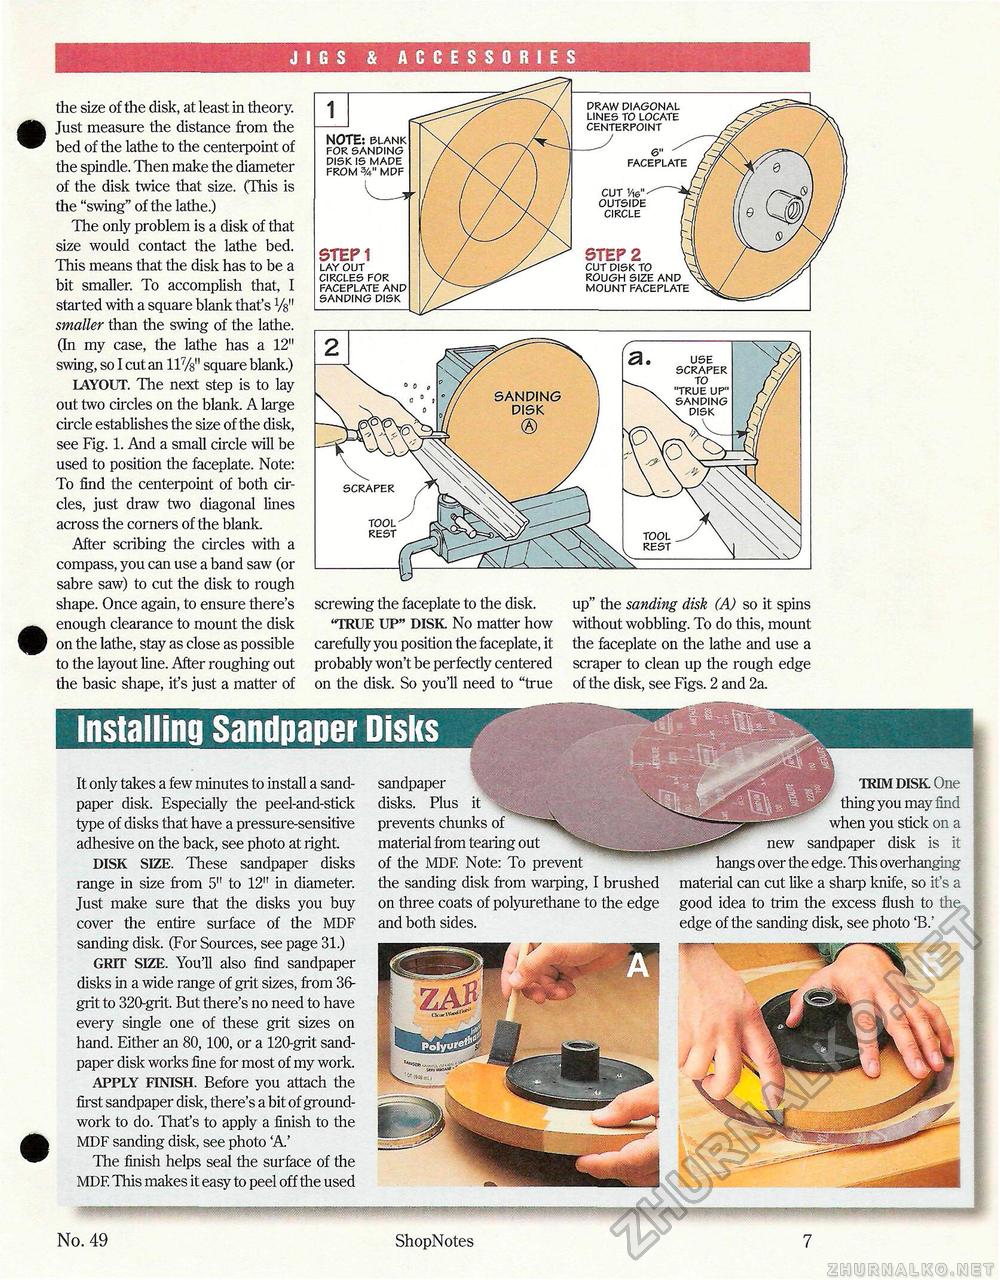
JIGS & ACCESSORIES the size of the disk, at least in theory. Just measure the distance from the bed of the lathe to the centerpoint of the spindle. Then make the diameter of the disk twice that size. (This is the "swing" of the lathe.) The only problem is a disk of that size would contact the lathe bed. This means that the disk has to be a bit smaller. To accomplish that, I started with a square blank that's W smaller than the swing of the lathe. (In my case, the lathe has a 12" swing, so I cut an 117/b" square blank.) LAYOUT. The next step is to lay out two circles on the blank. A large circle establishes the size of the disk, see Fig. 1. And a small circle will be used to position the faceplate. Note: To find the centerpoint of both circles, just draw two diagonal lines across the corners of the blank. After scribing the circles with a compass, you can use a band saw (or sabre saw) to cut the disk to rough shape. Once again, to ensure there's enough clearance to mount the disk on the lathe, stay as close as possible to the layout line. After roughing out the basic shape, it's just a matter of screwing the faceplate to the disk. "TRUE UP" DISK No matter how carefully you position the faceplate, it probably won't be perfectly centered on the disk. So you'll need to "true up" the sanding disk (A) so it spins without wobbling. To do this, mount the faceplate on the lathe and use a scraper to clean up the rough edge of the disk, see Figs. 2 and 2a. NOTE: blank for sanding disk is made from mdf draw diagonal lines to locate centerpoint 6" faceplate cut vie" outside circle STEP 1 lay out circles for faceplate and sanding disk STEP 2 cut disk to rough size and mount faceplate scraper tool rest tool rest It only takes a few minutes to install a sandpaper disk. Especially the peel-and-stick type of disks that have a pressure-sensitive adhesive on the back, see photo at right DISK SIZE. These sandpaper disks range in size from 5" to 12" in diameter. Just make sure that the disks you buy cover the entire surface of the MDF sanding disk. (For Sources, see page 31.) GRIT SIZE. You'll also find sandpaper disks in a wide range of grit sizes, from 36-grit to 320-grit But there's no need to have every single one of these grit sizes on hand. Either an 80,100, or a 120-grit sandpaper disk works fine for most of my work. APPLY FINISH. Before you attach the first sandpaper disk, there's a bit of groundwork to do. That's to apply a finish to the MDF sanding disk, see photo 'A.' The finish helps seal the surface of the MDF This makes it easy to peel off the used sandpaper disks. Plus prevents chunks of material from tearing out of the MDF Note: To prevent the sanding disk from warping, I brushed on three coats of polyurethane to the edge and both sides. TRIM DISK One thing you may find when you stick on a new sandpaper disk is it hangs over the edge. This overhanging material can cut like a sharp knife, so it's a good idea to trim the excess flush to the edge of the sanding disk, see photo 'B.' No. 49 ShopNotes 7 |


