49 - Cabinet Maker's Tool Chest, страница 9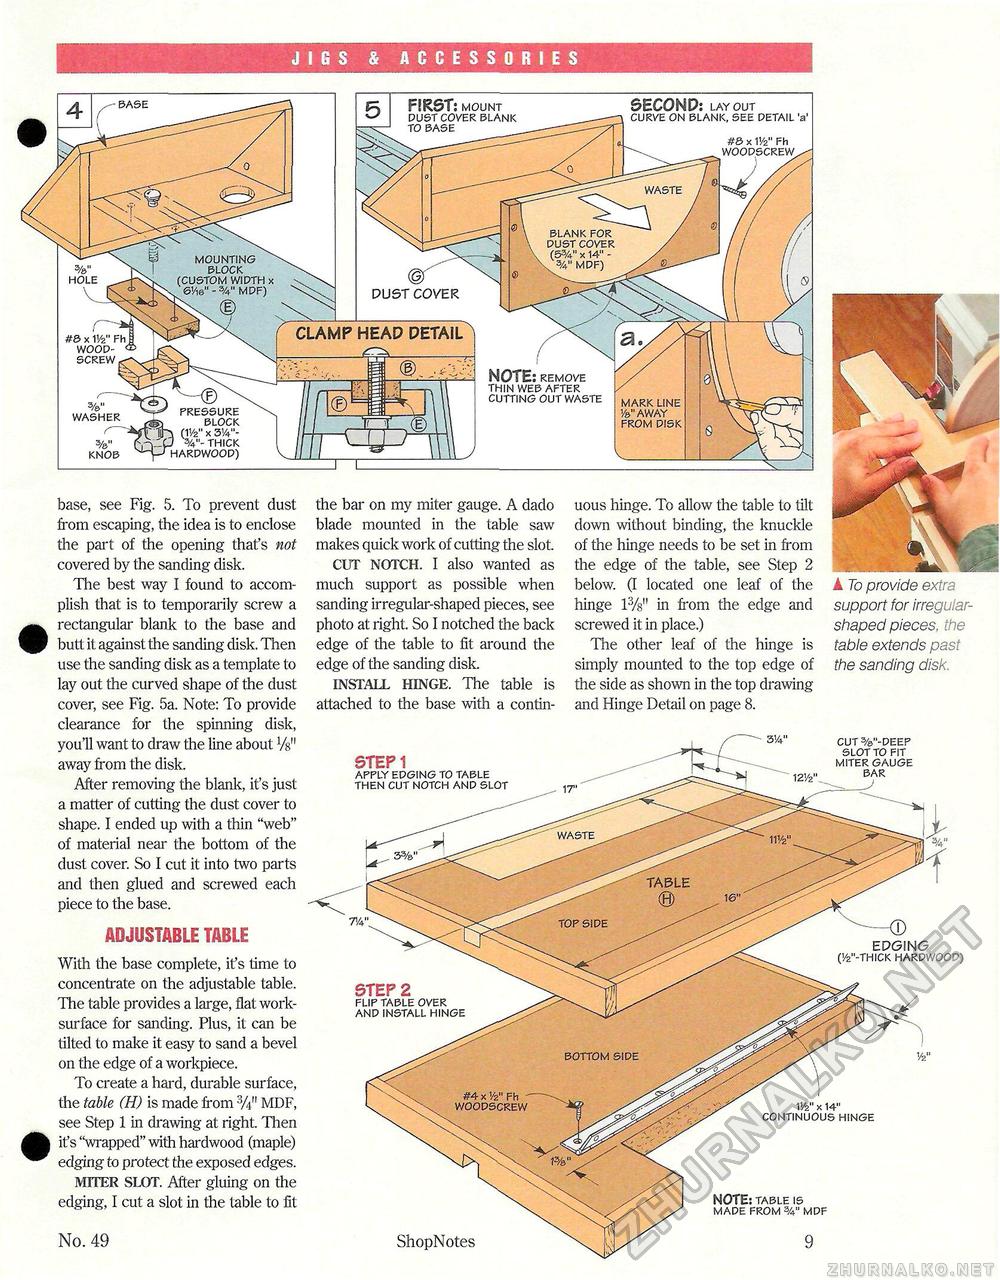
JIGS & ACCESSORIES MOUNTING BLOCK (CUSTOM WIDTH x 6V16" - %" MDF) HOLE PRESSURE BLOCK } (11/2" x 3V4"-J THICK HARDWOOD) SECOND-. LAYOUT CURVE ON BLANK, SEE DETAIL 'a' #e> x V/2" Fh MARK LINE Va" AWAY FROM DISK 5 FIRST: mount NOTE: remove thin web after cutting out waste #& x 11/2" Fh wood- screw DUST COVER CLAMP HEAD DETAIL^ _^_ r ■ WASHER KNOB base, see Fig. 5. To prevent dust from escaping, the idea is to enclose the part of the opening that's not covered by the sanding disk. The best way I found to accomplish that is to temporarily screw a rectangular blank to the base and butt it against the sanding disk. Then use the sanding disk as a template to lay out the curved shape of the dust cover, see Fig. 5a. Note: To provide clearance for the spinning disk, you'll want to draw the line about Vg" away from the disk. After removing the blank, it's just a matter of cutting the dust cover to shape. I ended up with a thin "web" of material near the bottom of the dust cover. So I cut it into two parts and then glued and screwed each piece to the base. ADJUSTABLE TABLE With the base complete, it's time to concentrate on the adjustable table. The table provides a large, flat work-surface for sanding. Plus, it can be tilted to make it easy to sand a bevel on the edge of a workpiece. To create a hard, durable surface, the table (H) is made from MDF, see Step 1 in drawing at right. Then it's "wrapped" with hardwood (maple) edging to protect the exposed edges. MITER SIXJT. After gluing on the edging, I cut a slot in the table to fit No. 49 the bar on my miter gauge. A dado blade mounted in the table saw makes quick work of cutting the slot. CUT NOTCH. I also wanted as much support as possible when sanding irregular-shaped pieces, see photo at right. So I notched the back edge of the table to fit around the edge of the sanding disk. INSTALL HINGE. The table is attached to the base with a contin- STEP1 APPLY EDGING TO TABLE THEN CUT NOTCH AND SLOT k To provide extra support for irregular-shaped pieces, the table extends past the sanding disk. CUT %"-DEEP SLOT TO FIT MITER GAUGE BAR 11/2" x 14" CONTINUOUS HINGE NOTE: TABLE IS MADE FROM %" MDF ShopNotes 9 uous hinge. To allow the table to tilt down without binding, the knuckle of the hinge needs to be set in from the edge of the table, see Step 2 below. (I located one leaf of the hinge l3/s" in from the edge and screwed it in place.) The other leaf of the hinge is simply mounted to the top edge of the side as shown in the top drawing and Hinge Detail on page 8. STEP 2 FLIP TABLE OVER AND INSTALL HINGE EDGING (1/z"-THICK HARDWOOD) |


