50 - Table Saw Workstation, страница 29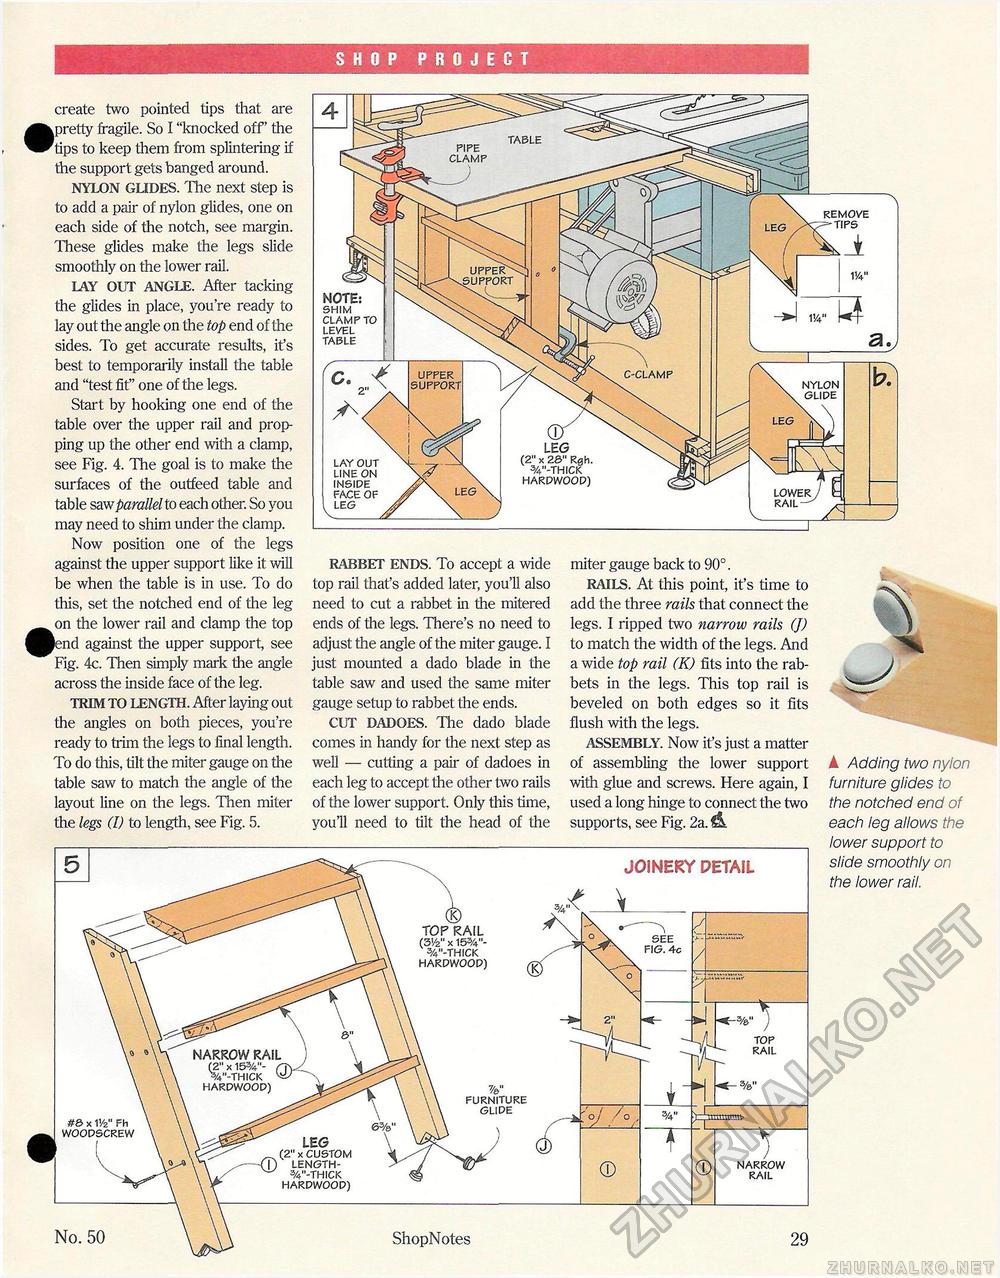
SHOP PROJECT create two pointed tips that are •pretty fragile. So I "knocked off' the tips to keep them from splintering if the support gets banged around. NYLON GLIDES. The next step is to add a pair of nylon glides, one on each side of the notch, see margin. These glides make the legs slide smoothly on the lower rail. LAY OUT ANGLE. After tacking the glides in place, you're ready to lay out the angle on the top end of the sides. To get accurate results, it's best to temporarily install the table and "test fit" one of the legs. Start by hooking one end of the table over the upper rail and propping up the other end with a clamp, see Fig. 4. The goal is to make the surfaces of the outfeed table and table saw parallel to each other. So you may need to shim under the clamp. Now position one of the legs against the upper support like it will be when the table is in use. To do this, set the notched end of the leg •on the lower rail and clamp the top end against the upper support, see Fig. 4c. Then simply mark the angle across the inside face of the leg. TRIM TO LENGTH. After laying out the angles on both pieces, you're ready to trim the legs to final length. To do this, tilt the miter gauge on the table saw to match the angle of the layout line on the legs. Then miter the legs (I) to length, see Fig. 5. RABBET ENDS. To accept a wide top rail that's added later, you'll also need to cut a rabbet in the mitered ends of the legs. There's no need to adjust the angle of the miter gauge. I just mounted a dado blade in the table saw and used the same miter gauge setup to rabbet the ends. CUT DADOES. The dado blade comes in handy for the next step as well — cutting a pair of dadoes in each leg to accept the other two rails of the lower support. Only this time, you'll need to tilt the head of the miter gauge back to 90°. RAILS. At this point, it's time to add the three rails that connect the legs. I ripped two narrow rails (J) to match the width of the legs. And a wide top rail (K) fits into the rabbets in the legs. This top rail is beveled on both edges so it fits flush with the legs. ASSEMBLY. Now it's just a matter of assembling the lower support with glue and screws. Here again, I used a long hinge to connect the two supports, see Fig. 2a. ^L ▲ Adding two nylon furniture glides to the notched end of each leg allows the lower support to slide smoothly on the lower rail. LEG (2" x 26" Rgh. %"-THICK HARPWOOP) NOTE: SHIM CLAMPTO LEVEL TABLE \ REMOVE TIPS nylon glide LAY OUT LINE ON INSIPE FACE OF LEG JOINERY DETAIL TOP RAIL (3'/2" x 153/4"- 3/4m-THICK HARPWOOP) NARROW RAIL f2" x 15%"- C %"-THICK ^ HARPWOOP) FURNITURE GLIPE ) iin'nin'ft #6 x 11/2" Fh WOOPSCREW LEG (2" x CUSTOM LENGTH-%"-THICK HARPWOOP) NARROW RAIL ShopNotes |


