50 - Table Saw Workstation, страница 27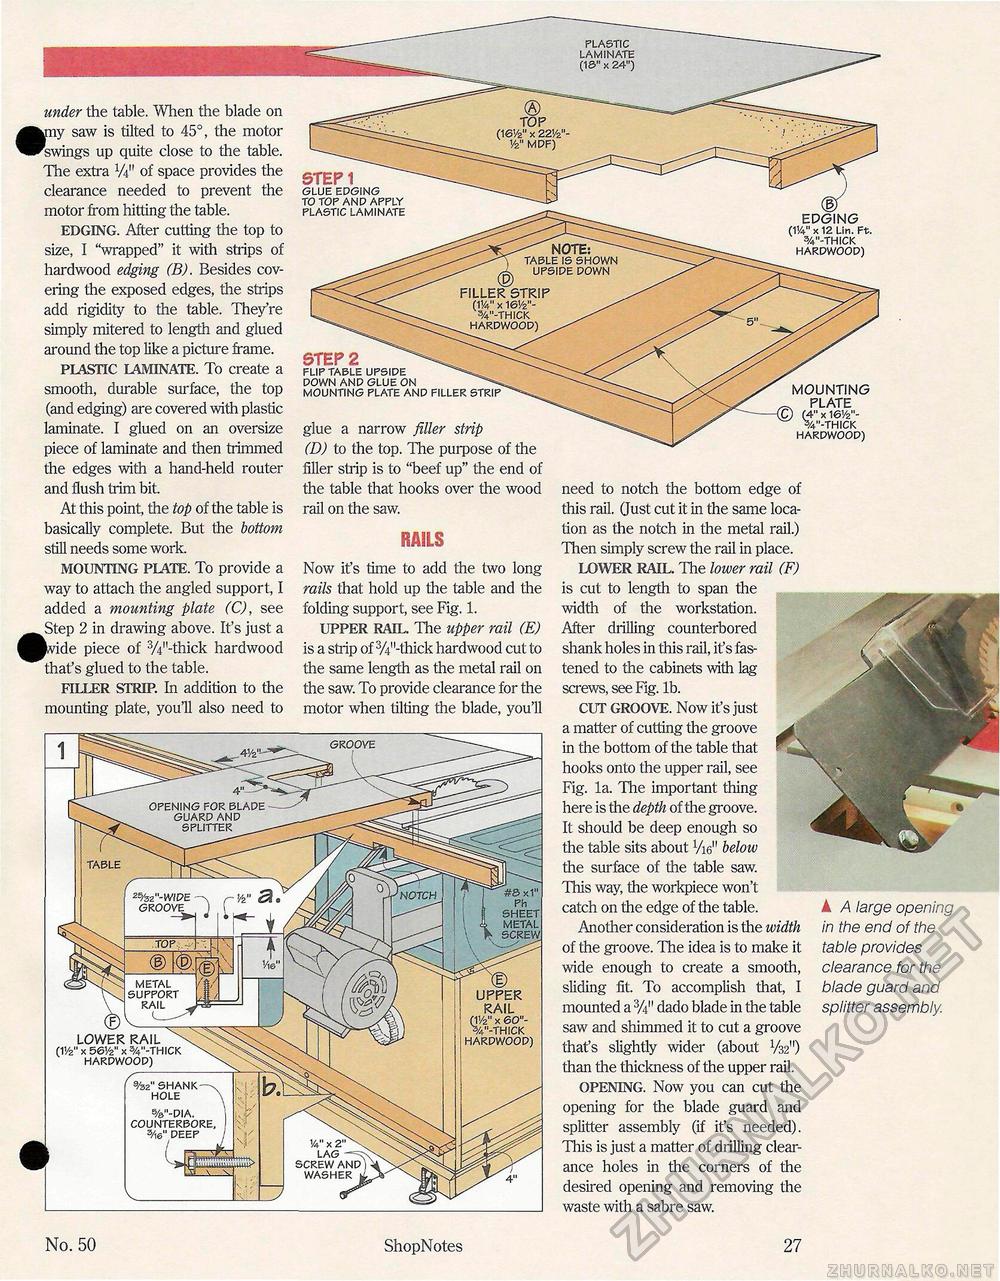
under the table. When the blade on Fiy saw is tilted to 45°, the motor swings up quite close to the table. The extra W of space provides the clearance needed to prevent the motor from hitting the table. EDGING. After cutting the top to size, I "wrapped" it with strips of hardwood edging (B). Besides covering the exposed edges, the strips add rigidity to the table. They're simply mitered to length and glued around the top like a picture frame. PLASTIC LAMINATE. To create a smooth, durable surface, the top (and edging) are covered with plastic laminate. I glued on an oversize piece of laminate and then trimmed the edges with a hand-held router and flush trim bit At this point, the top of the table is basically complete. But the bottom still needs some work. MOUNTING PLATE. To provide a way to attach the angled support, I added a mounting plate (C), see kStep 2 in drawing above. It's just a ride piece of W-thick hardwood that's glued to the table. FILLER STRIP. In addition to the mounting plate, you'll also need to STEP 1 GLUE EDGING TO TOP AND APPLY PLASTIC LAMINATE §) EDGING (W x 12 Lin. Ft. 3/4"-THICK HARDWOOD) STEP 2 FLIP TABLE UPSIDE DOWN AND GLUE ON MOUNTING PLATE AND FILLER STRIP glue a narrow filler strip (D) to the top. The purpose of the filler strip is to "beef up" the end of the table that hooks over the wood rail on the saw. RAILS Now it's time to add the two long rails that hold up the table and the folding support, see Fig. 1. UPPER RAIL. The upper rail (E) is a ship of 3/4"-thick hardwood cut to the same length as the metal rail on the saw. To provide clearance for the motor when tilting the blade, you'll MOUNTING ~ PLATE ---(Q (4" x 16'/2"- W'-THICK HARDWOOD) need to notch the bottom edge of this rail. Gust cut it in the same location as the notch in the metal rail.) Then simply screw the rail in place. LOWER RAIL. The lower rail (F) is cut to length to span the width of the workstation. After drilling counterbored shank holes in this rail, it's fastened to the cabinets with lag screws, see Fig. lb. CUT GROOVE. Now it's just a matter of cutting the groove in the bottom of the table that hooks onto the upper rail, see Fig. la. The important thing here is the depth of the groove. It should be deep enough so the table sits about Vie" below the surface of the table saw. This way, the workpiece won't catch on the edge of the table. Another consideration is the width of the groove. The idea is to make it wide enough to create a smooth, sliding fit. To accomplish that, I mounted a 3/i" dado blade in the table saw and shimmed it to cut a groove that's slightly wider (about V32") than the thickness of the upper rail. OPENING. Now you can cut the opening for the blade guard and splitter assembly (if it's needed). This is just a matter of drilling clearance holes in the corners of the desired opening and removing the waste with a sabre saw. A /\ targe opening in the end of the table provides clearance for the blade guard and splitter assembly. GROOVE OPENING FOR BLADE GUARD AND SPLITTER #8 x1" Ph SHEET METAL SCREW NOTCH 2%2 "-WIPE GROOVE METAL SUPPORT RAIL LOWER RAIL ^ (1'/2" X 5&V2" X W-THICK HARDWOOD) %2" SHANK—s HOLE %"-DIA. COUNTERBORE, 3/i6" DEEP Va" x 2" ' LAG SCREW AND WASHER k UPPER RAIL ri1/2" x 60"-%"-THICK HARDWOOD) No. 50 ShopNotes 27 |


