50 - Table Saw Workstation, страница 25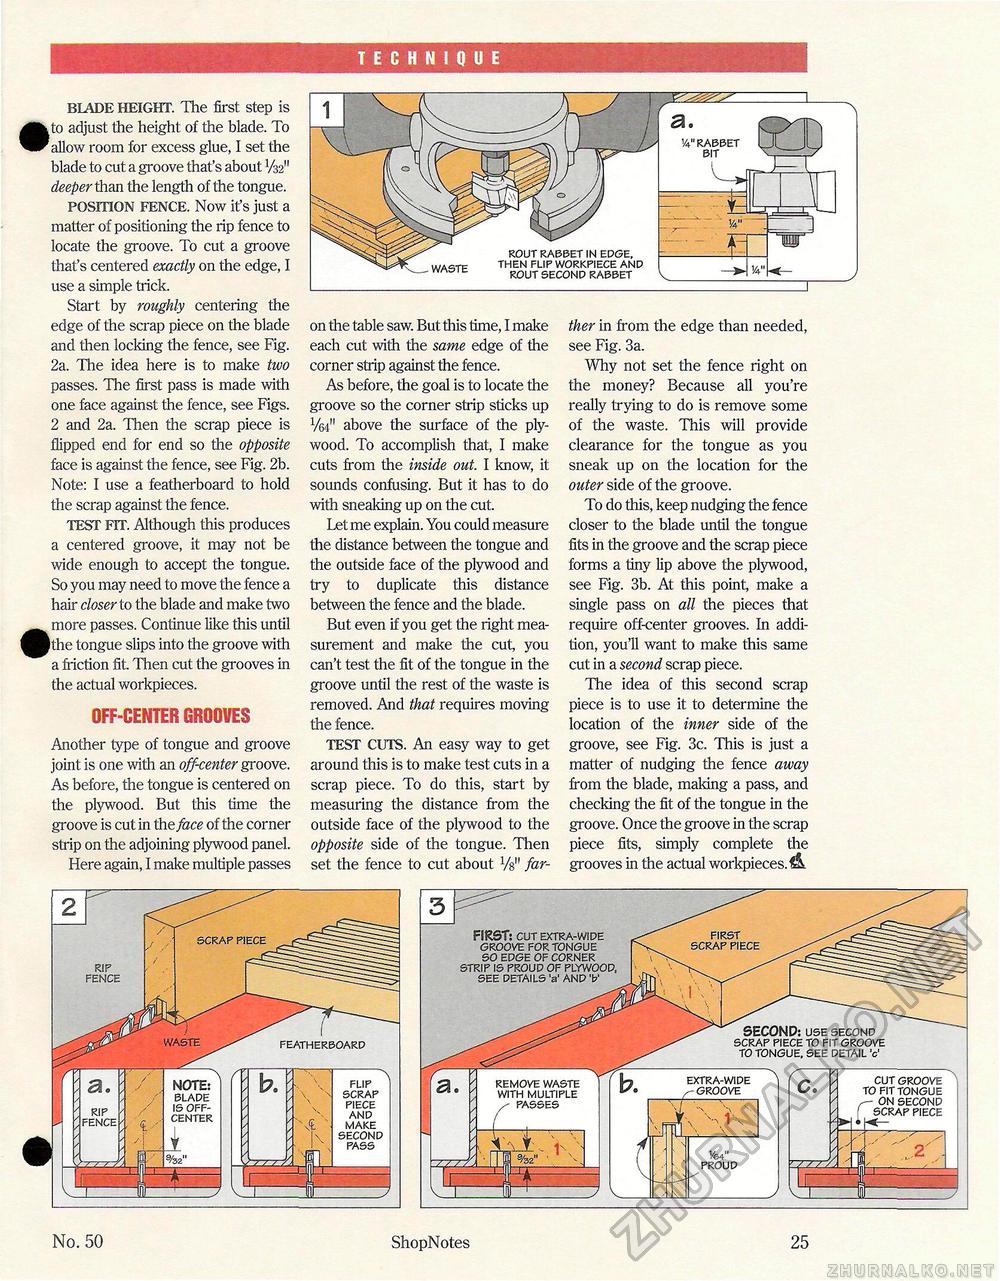
TECHNIQUE BLADE HEIGHT. The first step is 1 to adjust the height of the blade. To allow room for excess glue, I set the blade to cut a groove that's about 1/3211 deeper than the length of the tongue. POSITION FENCE. Now it's just a matter of positioning the rip fence to locate the groove. To cut a groove that's centered exactly on the edge, I use a simple trick. Start by roughly centering the edge of the scrap piece on the blade and then locking the fence, see Fig. 2a. The idea here is to make two passes. The first pass is made with one face against the fence, see Figs. 2 and 2a. Then the scrap piece is flipped end for end so the opposite face is against the fence, see Fig. 2b. Note: I use a featherboard to hold the scrap against the fence. TEST FIT. Although this produces a centered groove, it may not be wide enough to accept the tongue. So you may need to move the fence a hair closer to the blade and make two more passes. Continue like this until fthe tongue slips into the groove with a friction fit. Then cut the grooves in the actual workpieces. OFF-CENTER GROOVES Another type of tongue and groove joint is one with an off-center groove. As before, the tongue is centered on the plywood. But this time the groove is cut in the face of the corner strip on the adjoining plywood panel. Here again, I make multiple passes on the table saw. But this time, I make each cut with the same edge of the corner strip against the fence. As before, the goal is to locate the groove so the corner strip sticks up Vk" above the surface of the plywood. To accomplish that, I make cuts from the inside out. I know, it sounds confusing. But it has to do with sneaking up on the cut. Let me explain. You could measure the distance between the tongue and the outside face of the plywood and try to duplicate this distance between the fence and the blade. But even if you get the right measurement and make the cut, you can't test the fit of the tongue in the groove until the rest of the waste is removed. And that requires moving the fence. TEST CUTS. An easy way to get around this is to make test cuts in a scrap piece. To do this, start by measuring the distance from the outside face of the plywood to the opposite side of the tongue. Then set the fence to cut about Vs" far ther in from the edge than needed, see Fig. 3a. Why not set the fence right on the money? Because all you're really trying to do is remove some of the waste. This will provide clearance for the tongue as you sneak up on the location for the outer side of the groove. To do this, keep nudging the fence closer to the blade until the tongue fits in the groove and the scrap piece forms a tiny lip above the plywood, see Fig. 3b. At this point, make a single pass on all the pieces that require off-center grooves. In addition, you'll want to make this same cut in a second scrap piece. The idea of this second scrap piece is to use it to determine the location of the inner side of the groove, see Fig. 3c. This is just a matter of nudging the fence away from the blade, making a pass, and checking the fit of the tongue in the groove. Once the groove in the scrap piece fits, simply complete the grooves in the actual workpieces. & No. 50 ShopNotes 25 |


