50 - Table Saw Workstation, страница 24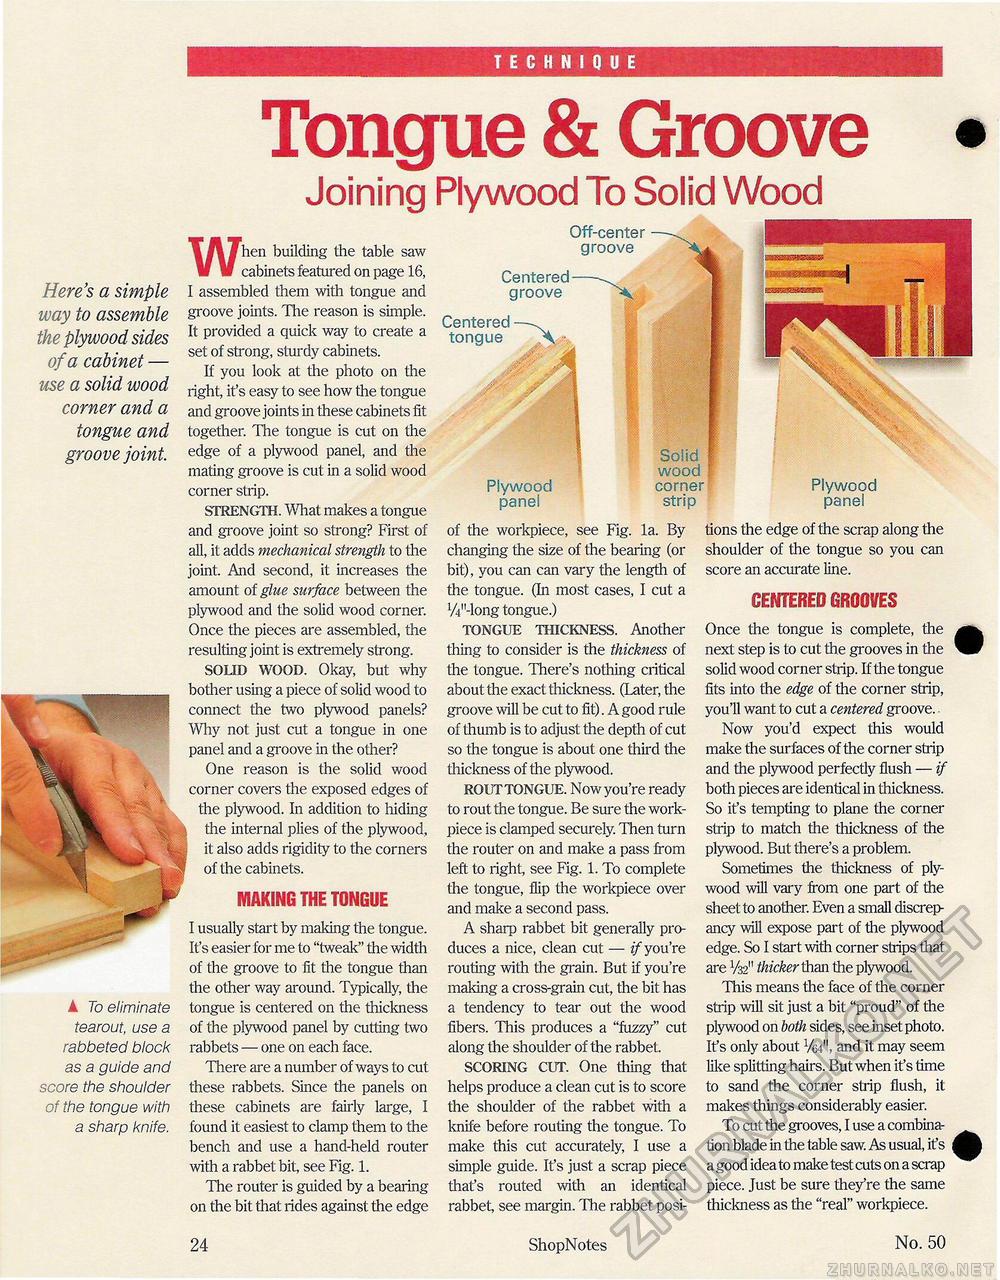
TECHNIQUE Here's a simple way to assemble the plywood sides of a cabinet — use a solid wood corner and a tongue and groove joint. Tongue & GrooveJoining Plywood To Solid Wood ▲ To eliminate tearout, use a rabbeted block as a guide and score the shoulder of the tongue with a sharp knife. When building the table saw cabinets featured on page 16, I assembled them with tongue and groove joints. The reason is simple. It provided a quick way to create a set of strong, sturdy cabinets. If you look at the photo on the right, it's easy to see how the tongue and groove joints in these cabinets fit together. The tongue is cut on the edge of a plywood panel, and the mating groove is cut in a solid wood corner strip. STRENGTH. What makes a tongue and groove joint so strong? First of all, it adds mechanical strength to the joint. And second, it increases the amount of glue surface between the plywood and the solid wood corner. Once the pieces are assembled, the resulting joint is extremely strong. SOLID WOOD. Okay, but why bother using a piece of solid wood to connect the two plywood panels? Why not just cut a tongue in one panel and a groove in the other? One reason is the solid wood corner covers the exposed edges of the plywood. In addition to hiding the internal plies of the plywood, it also adds rigidity to the corners of the cabinets. MAKING THE TONGUE I usually start by making the tongue. It's easier for me to "tweak" the width of the groove to fit the tongue than the other way around. Typically, the tongue is centered on the thickness of the plywood panel by cutting two rabbets — one on each face. There are a number of ways to cut these rabbets. Since the panels on these cabinets are fairly large, I found it easiest to clamp them to the bench and use a hand-held router with a rabbet bit, see Fig. 1. The router is guided by a bearing on the bit that rides against the edge Off-center groove Centered groove Centered tongue Plywood panei Solid ! wood ■ corner strip of the workpiece, see Fig. la. By changing the size of the bearing (or bit), you can can vary the length of the tongue. (In most cases, I cut a W'-long tongue.) TONGUE THICKNESS. Another thing to consider is the thickness of the tongue. There's nothing critical about the exact thickness. (Later, the groove will be cut to fit). A good rule of thumb is to adjust the depth of cut so the tongue is about one third the thickness of the plywood. ROUTTONGUE. Now you're ready to rout the tongue. Be sure the work-piece is clamped securely. Then turn the router on and make a pass from left to right, see Fig. 1. To complete the tongue, flip the workpiece over and make a second pass. A sharp rabbet bit generally produces a nice, clean cut — if you're routing with the grain. But if you're making a cross-grain cut, the bit has a tendency to tear out the wood fibers. This produces a "fuzzy" cut along the shoulder of the rabbet. SCORING CUT. One thing that helps produce a clean cut is to score the shoulder of the rabbet with a knife before routing the tongue. To make this cut accurately, I use a simple guide. It's just a scrap piece that's routed with an identical rabbet, see margin. The rabbet posi- Plywood panei tions the edge of the scrap along the shoulder of the tongue so you can score an accurate line. CENTERED GROOVES Once the tongue is complete, the g^ next step is to cut the grooves in the ^^ solid wood corner strip. If the tongue fits into the edge of the corner strip, you'll want to cut a centered groove. Now you'd expect this would make the surfaces of the corner strip and the plywood perfectly flush — if both pieces are identical in thickness. So ifs tempting to plane the corner ship to match the thickness of the plywood. But there's a problem. Sometimes the thickness of plywood will vary from one part of the sheet to another. Even a small discrepancy will expose part of the plywood edge. So I start with corner strips that are 1/32n thicker than the plywood. This means the face of the corner strip will sit just a bit "proud" of the plywood on both sides, see inset photo. It's only about VW1, and it may seem like splitting hairs. But when it's time to sand the corner strip flush, it makes things considerably easier. To cut the grooves, I use a combina-tion blade in the table saw. As usual, ifs a good idea to make test cuts on a scrap piece. Just be sure they're the same thickness as the "real" workpiece. 24 ShopNotes No. 50 |


