57 - A Shop-Built Pin Router, страница 7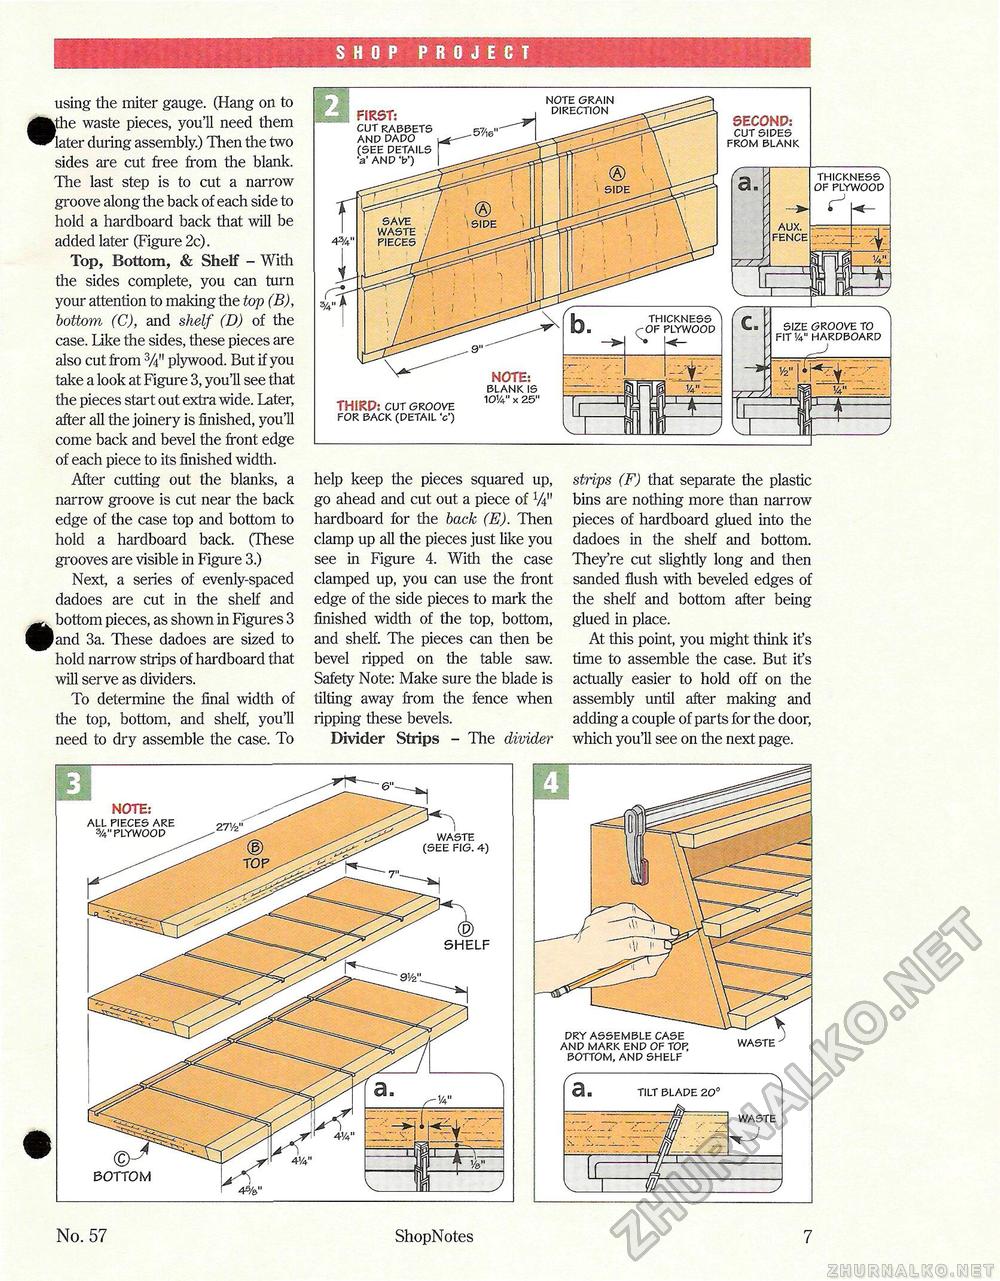
SHOP PROJECT using the miter gauge. (Hang on to •Jhe waste pieces, you'll need them later during assembly.) Then the two sides are cut free from the blank. The last step is to cut a narrow groove along the back of each side to hold a hardboard back that will be added later (Figure 2c). Top, Bottom, & Shelf - With the sides complete, you can turn your attention to making the top (B), bottom (C), and shelf (D) of the case. Like the sides, these pieces are also cut from3A" plywood. But if you take a look at Figure 3, you'll see that the pieces start out extra wide. Later, after all the joinery is finished, you'll come back and bevel the front edge of each piece to its finished width. After cutting out the blanks, a narrow groove is cut near the back edge of the case top and bottom to hold a hardboard back. (These grooves are visible in Figure 3.) Next, a series of evenly-spaced dadoes are cut in the shelf and ^^ bottom pieces, as shown in Figures 3 ^Jand 3a. These dadoes are sized to hold narrow strips of hardboard that will serve as dividers. To determine the final width of the top, bottom, and shelf, you'll need to dry assemble the case. To help keep the pieces squared up, go ahead and cut out a piece of V4" hardboard for the back (E). Then clamp up all the pieces just like you see in Figure 4. With the case clamped up, you can use the front edge of the side pieces to mark the finished width of the top, bottom, and shelf. The pieces can then be bevel ripped on the table saw. Safety Note: Make sure the blade is tilting away from the fence when ripping these bevels. Divider Strips - The divider strips (F) that separate the plastic bins are nothing more than narrow pieces of hardboard glued into the dadoes in the shelf and bottom. They're cut slightly long and then sanded flush with beveled edges of the shelf and bottom after being glued in place. At this point, you might think it's time to assemble the case. But it's actually easier to hold off on the assembly until after making and adding a couple of parts for the door, which you'll see on the next page. SHELF SST NOTE: all pieces are 3/4" plywood waste (see FIG. 4) BOTTOM dry assemble case and mark end of top, waste bottom, and shelf 3 . tilt blade 20° waste No. 57 ShopNotes 7 |


