57 - A Shop-Built Pin Router, страница 8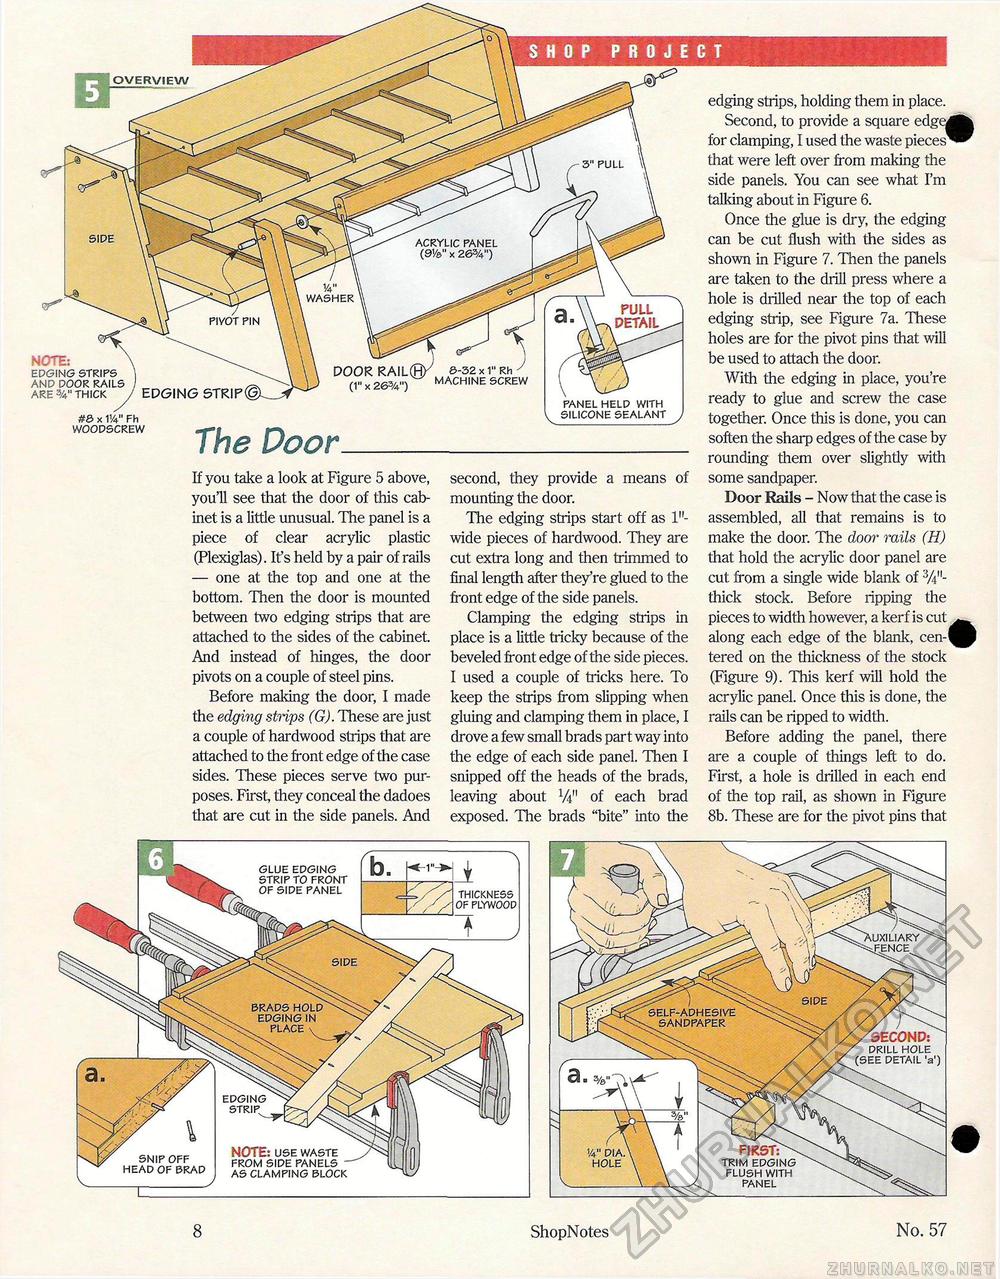
3" PULL ACRYLIC PANEL (9V&" x 26%") WASHER PULL DETAIL PIVOT PIN DOORRAILtfV &-32 x 1" Rh rv „ MACHINE SCREW EDGING STRIP PANEL HELP WITH SILICONE SEALANT OVERVIEW S DE NOTE: EDGING STRIPS ANP POOR RAILS ARE %" THICK #& x VA" Fh WOOPSCREW The Poor I SHOP PROJECT edging strips, holding them in place. Second, to provide a square edge* for clamping, I used the waste pieces that were left over from making the side panels. You can see what I'm talking about in Figure 6. Once the glue is dry, the edging can be cut flush with the sides as shown in Figure 7. Then the panels are taken to the drill press where a hole is drilled near the top of each edging strip, see Figure 7a. These holes are for the pivot pins that will be used to attach the door. With the edging in place, you're ready to glue and screw the case together. Once this is done, you can soften the sharp edges of the case by rounding them over slightly with some sandpaper. Door Rails - Now that the case is assembled, all that remains is to make the door. The door rails (H) that hold the acrylic door panel are cut from a single wide blank of 3/4M-thick stock. Before ripping the pieces to width however, a kerf is cut along each edge of the blank, cen-1 tered on the thickness of the stock (Figure 9). This kerf will hold the acrylic panel. Once this is done, the rails can be ripped to width. Before adding the panel, there are a couple of things left to do. First, a hole is drilled in each end of the top rail, as shown in Figure 8b. These are for the pivot pins that If you take a look at Figure 5 above, you'll see that the door of this cabinet is a little unusual. The panel is a piece of clear acrylic plastic (Plexiglas). If s held by a pair of rails — one at the top and one at the bottom. Then the door is mounted between two edging strips that are attached to the sides of the cabinet. And instead of hinges, the door pivots on a couple of steel pins. Before making the door, I made the edging strips (G). These are just a couple of hardwood strips that are attached to the front edge of the case sides. These pieces serve two purposes. First, they conceal the dadoes that are cut in the side panels. And second, they provide a means of mounting the door. Hie edging strips start off as 1"-wide pieces of hardwood. They are cut extra long and then trimmed to final length after they're glued to the front edge of the side panels. Clamping the edging strips in place is a little tricky because of the beveled front edge of the side pieces. I used a couple of tricks here. To keep the strips from slipping when gluing and clamping them in place, I drove a few small brads part way into the edge of each side panel. Then I snipped off the heads of the brads, leaving about 1AM of each brad exposed. The brads "bite" into the BRADS HOLP EDGING IN . PLACE \ GLUE EPGING STRIP TO FRONT OF SIPE PANEL THICKNESS OF PLYWOOD EPGING STRIP SNIP OFF HEAD OF BRAD NOTE: USE WASTE FROM SIDE PANELS AS CLAMPING BLOCK AUXILIARY ^FENCE SELF-ADHESIVE . SANDPAPER /SECOND: DRILLHOLE (SEE DETAIL 'a') FIRSTS TRIM EDGING FLUSH WITH PANEL V4" DIA. HOLE 8 ShopNotes No. 57 |


