57 - A Shop-Built Pin Router, страница 11
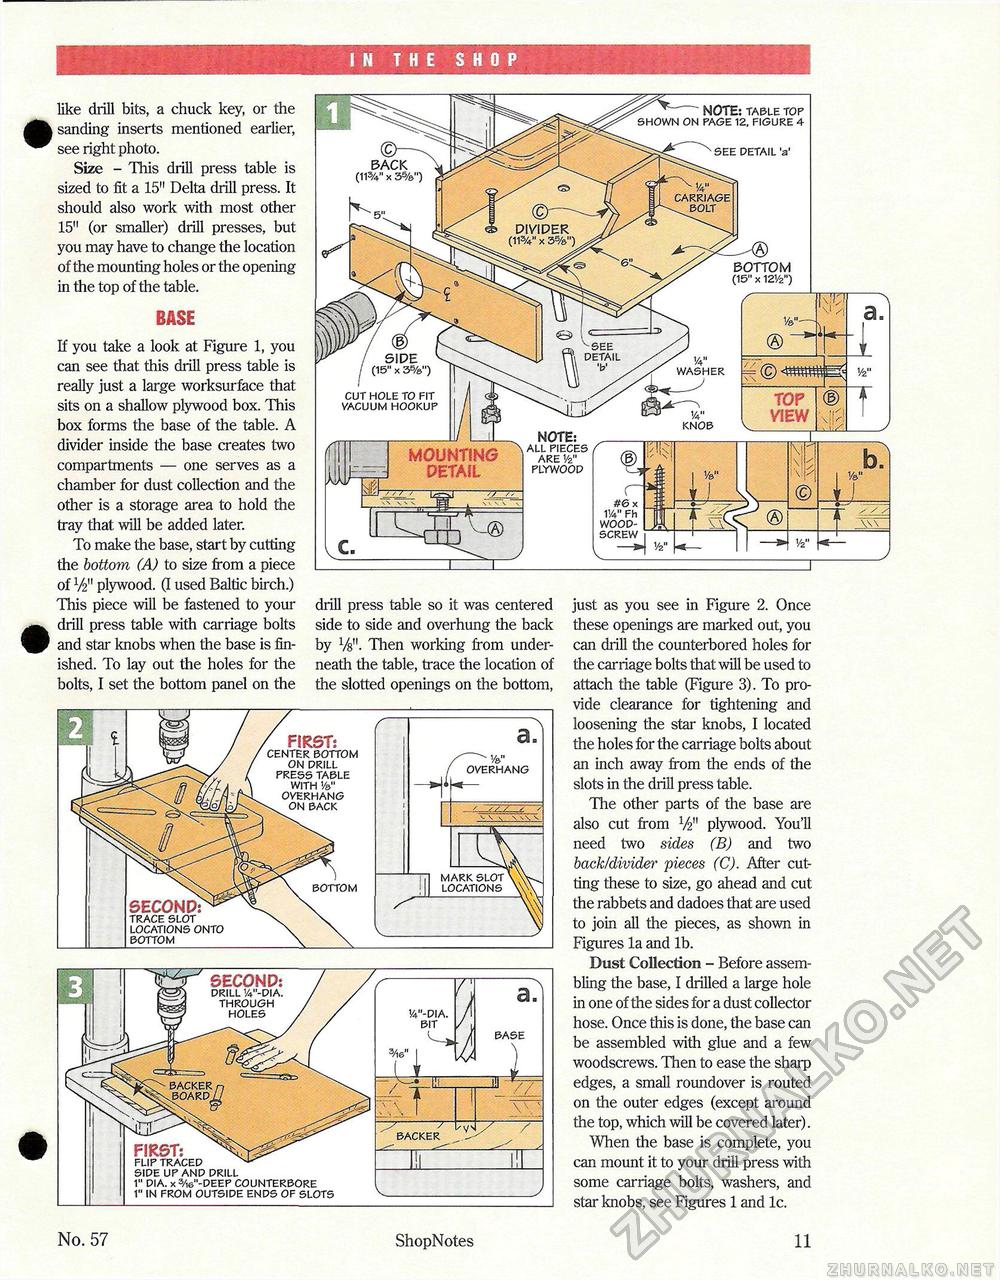
! N THE SHOP like drill bits, a chuck key, or the sanding inserts mentioned earlier, see right photo. Size - This drill press table is sized to fit a 15" Delta drill press. It should also work with most other 15" (or smaller) drill presses, but you may have to change the location of the mounting holes or the opening in the top of the table. BASE If you take a look at Figure 1, you can see that this drill press table is really just a large worksurface that sits on a shallow plywood box. This box forms the base of the table. A divider inside the base creates two compartments — one serves as a chamber for dust collection and the other is a storage area to hold the tray that will be added later. To make the base, start by cutting the bottom (A) to size from a piece of V2'1 plywood. (I used Baltic birch.) This piece will be fastened to your drill press table with carriage bolts and star knobs when the base is finished. To lay out the holes for the bolts, I set the bottom panel on the drill press table so it was centered side to side and overhung the back by V&". Then working from underneath the table, trace the location of the slotted openings on the bottom, just as you see in Figure 2. Once these openings are marked out, you can drill the counterbored holes for the carriage bolts that will be used to attach the table (Figure 3). To provide clearance for tightening and loosening the star knobs, I located the holes for the carriage bolts about an inch away from the ends of the slots in the drill press table. The other parts of the base are also cut from V2" plywood. You'll need two sides (B) and two back/divider pieces (C). After cutting these to size, go ahead and cut the rabbets and dadoes that are used to join all the pieces, as shown in Figures la and lb. Dust Collection - Before assembling the base, I drilled a large hole in one of the sides for a dust collector hose. Once this is done, the base can be assembled with glue and a few woodscrews. Then to ease the sharp edges, a small roundover is routed on the outer edges (except around the top, which will be covered later). When the base is complete, you can mount it to your drill press with some carriage bolts, washers, and star knobs, see Figures 1 and lc. CUT HOLE TO FIT VACUUM HOOKUP NOTE: TABLE TOP SHOWN ON PAGE 12, FIGURE 4 SEE DETAIL 'a' BOTTOM (15" x 12V2") 1/4" kSHER KNOB TOP VIEW NOTE: ALL PIECES ARE Vz" PLYWOOP SECOND: DRILL V-DIA. THROUGH HOLES BACKER .BOARD/ FIRST; FLIP TRACED SIDE UP AND DRILL 1" DIA. x3/I6"-DEEP COUNTERBORE 1" IN FROM OUTSIDE ENDS OF SLOTS
BACKER No. 57 ShopNotes 11 |


