57 - A Shop-Built Pin Router, страница 14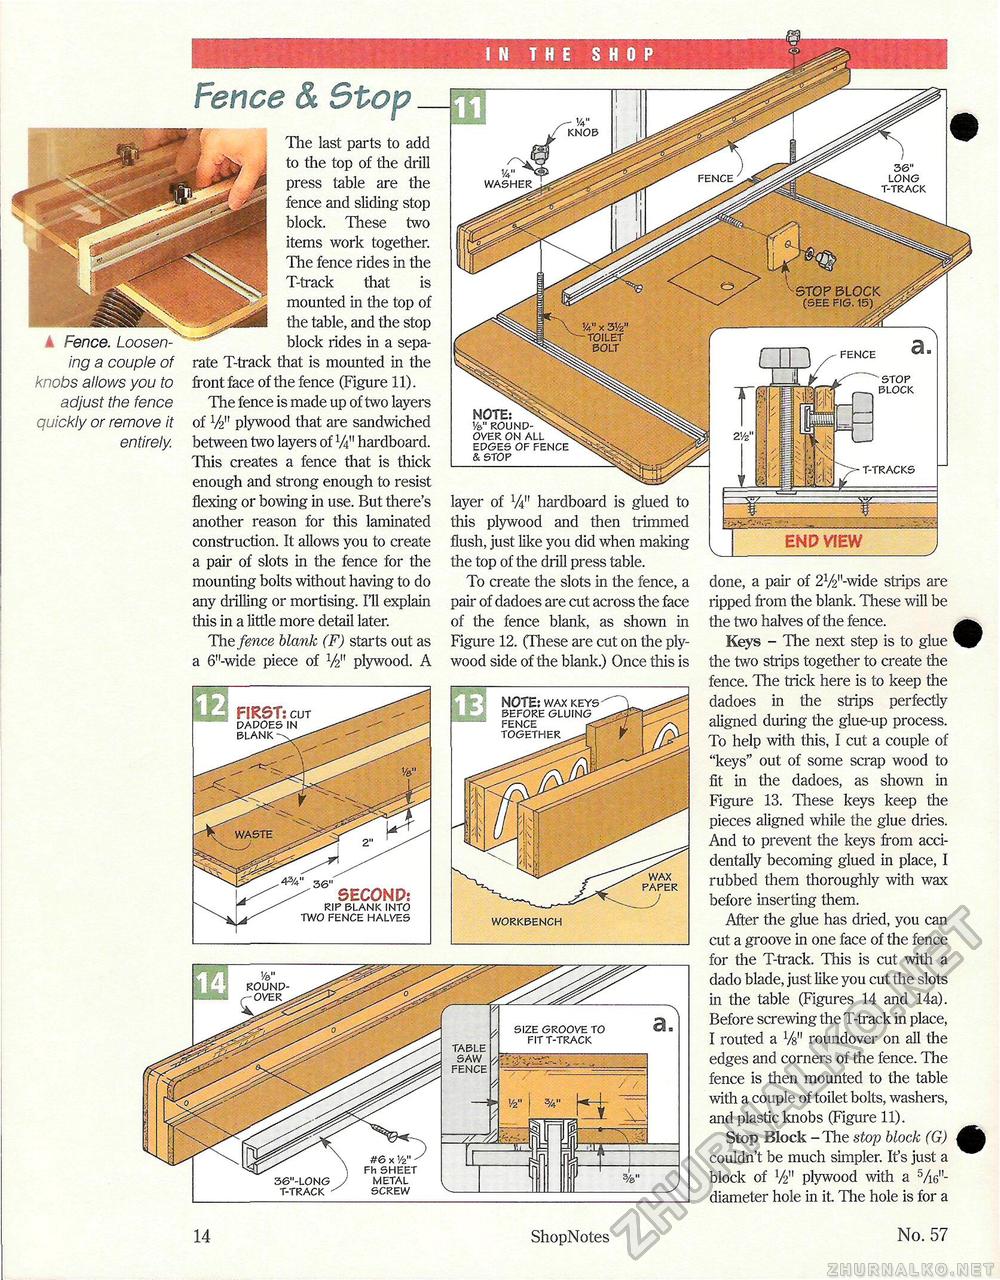
- w knob STOP BLOCK (SEE FIG. 15) ... x 3V2' -TOILET BOLT stop block ■Fence & Stop Fence. Loosening a couple of knobs allows you to adjust the fence quickly or remove it entirely. The last parts to add to the top of the drill press table are the fence and sliding stop block. These two items work together. The fence rides in the T-track that is mounted in the top of the table, and the stop block rides in a separate T-track that is mounted in the front face of the fence (Figure 11). The fence is made up of two layers of V2" plywood that are sandwiched between two layers of V4" hardboard. This creates a fence that is thick enough and strong enough to resist flexing or bowing in use. But there's another reason for this laminated construction. It allows you to create a pair of slots in the fence for the mounting bolts without having to do any drilling or mortising. Ill explain this in a little more detail later. The fence blank (F) starts out as a 6"-wide piece of V2" plywood. A END VIEW layer of W hardboard is glued to this plywood and then trimmed flush, just like you did when making the top of the drill press table. To create the slots in the fence, a pair of dadoes are cut across the face of the fence blank, as shown in Figure 12. (These are cut on the plywood side of the blank.) Once this is done, a pair of 21/2l'-wide strips are ripped from the blank. These will be the two halves of the fence. Keys - The next step is to glue the two strips together to create the fence. The trick here is to keep the dadoes in the strips perfectly aligned during the glue-up process. To help with this, I cut a couple of "keys" out of some scrap wood to fit in the dadoes, as shown in Figure 13. These keys keep the pieces aligned while the glue dries. And to prevent the keys from accidentally becoming glued in place, I rubbed them thoroughly with wax before inserting them. After the glue has dried, you can cut a groove in one face of the fence for the T-track. This is cut with a dado blade, just like you cut the slots in the table (Figures 14 and 14a). Before screwing the T-track in place, I routed a W rounclover on all the edges and corners of the fence. The fence is then mounted to the table with a couple of toilet bolts, washers, and plastic knobs (Figure 11). Stop Block - The stop block (G) couldn't be much simpler. It's just a block of V2" plywood with a Vie"-diameter hole in it. The hole is for a long ■track washer - t-tracks NOTE ve>" round over on all edges of fence & stop 3&' SECOND? rip blank into two fence halves FIRST? cut dadoes in blank i-■- m NOTE; wax key before gluing ................ fence together wax paper workbench size groove to fit t-track 14 ShopNotes No. 57 |


