57 - A Shop-Built Pin Router, страница 12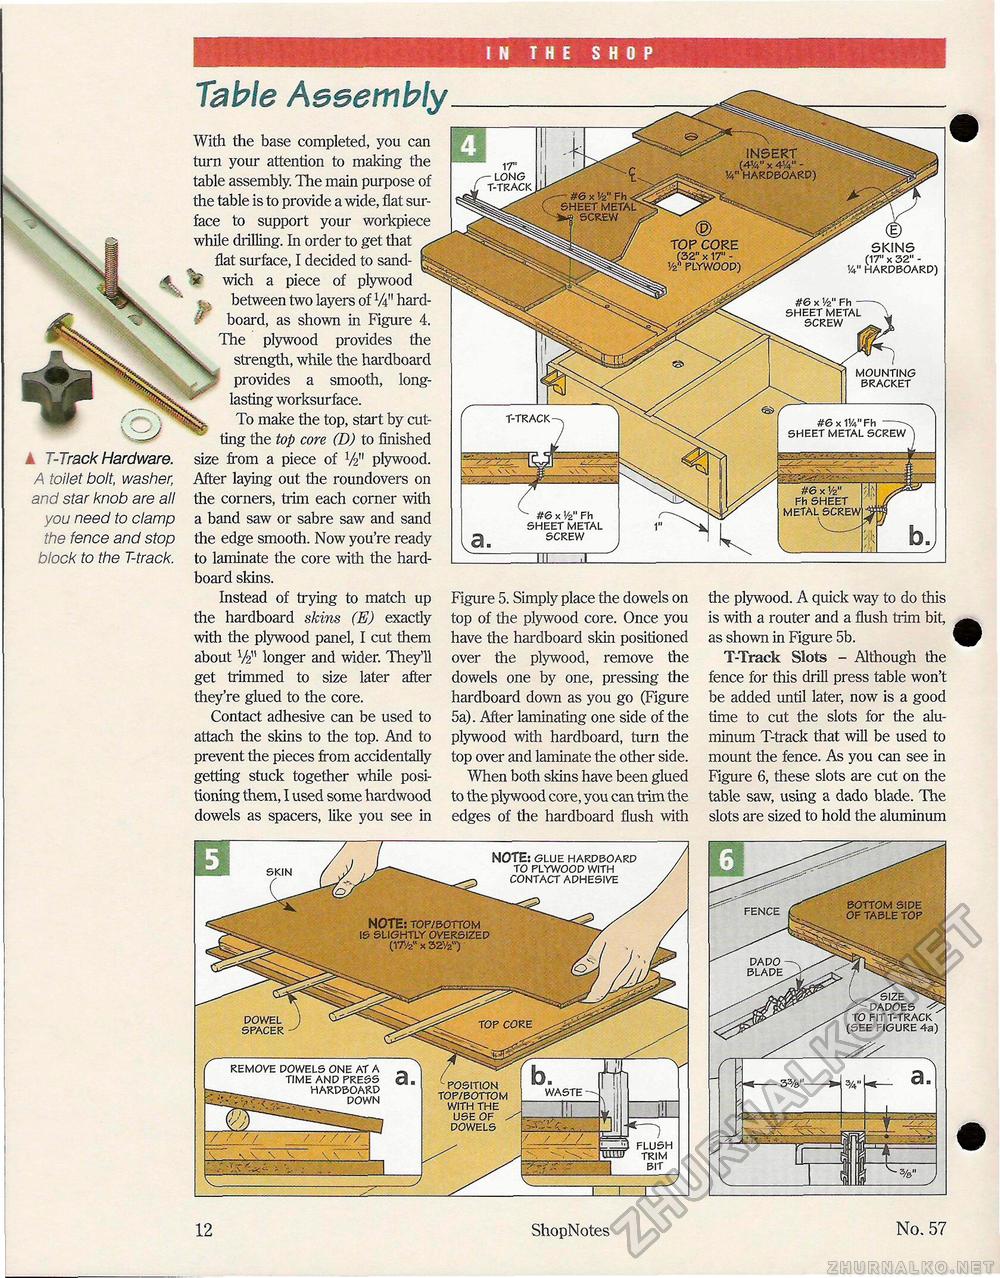
IN THE SHOP INSERT (41/4" x 414" -!4" hardboard) 17' - LONG T-TRACK - #6 x Vz" Fh < sheet metal m screw TOP CORE (32" x 17' -1/2 plywood) #6 x 1/2" Fh -SHEET METAL SCREW #6 x 114" Fh--- SHEET METAL SCREW Tab/e Assemblyk T-Track Hardware. A toilet bolt, washer, and star knob are all you need to clamp the fence and stop block to the T-track. With the base completed, you can turn your attention to making the table assembly. The main purpose of the table is to provide a wide, flat surface to support your workpiece while drilling. In order to get that flat surface, I decided to sandwich a piece of plywood between two layers of W hard-board, as shown in Figure 4. The plywood provides the strength, while the hardboard provides a smooth, long-lasting worksurface. To make the top, start by cutting the top core (D) to finished size from a piece of V2" plywood. After laying out the roundovers on the corners, trim each corner with a band saw or sabre saw and sand the edge smooth. Now you're ready to laminate the core with the hard- T-TRACK (E) SKINS (17' x 32" -V4" HARDBOARD) - #6 x Vz" Fh SHEET METAL SCREW MOUNTING BRACKET #6 x 114" Fh--- SHEET METAL SCREW
board skins. Instead of trying to match up the hardboard skins (E) exactly with the plywood panel, I cut them about V2" longer and wider. They'll get trimmed to size later after they're glued to the core. Contact adhesive can be used to attach the skins to the top. And to prevent the pieces from accidentally getting stuck together while positioning them, I used some hardwood dowels as spacers, like you see in Figure 5. Simply place the dowels on top of the plywood core. Once you have the hardboard skin positioned over the plywood, remove the dowels one by one, pressing the hardboard down as you go (Figure 5a). After laminating one side of the plywood with hardboard, turn the top over and laminate the other side. When both skins have been glued to the plywood core, you can trim the edges of the hardboard flush with the plywood. A quick way to do this is with a router and a flush trim bit, as shown in Figure 5b. T-Track Slots - Although the fence for this drill press table won't be added until later, now is a good time to cut the slots for the aluminum T-track that will be used to mount the fence. As you can see in Figure 6, these slots are cut on the table saw, using a dado blade. The slots are sized to hold the aluminum NOTE: GLUE HARDBOARD TO PLYWOOD WITH CONTACT ADHESIVE SKIN NOTE: top/bottom is slightly oversized (17/zw x 32V2") FLUSH TRIM bit POSITION TOP/BOTTOM WITH THE USE OF / DOWELS WASTE■ EH REMOVE DOWELS ONE AT A TIME AND PRESS HARDBOARD DOWN DOWEL SPACER BLADE bottom side of table top FIGURE 4a) 12 ShopNotes No. 57 |


