57 - A Shop-Built Pin Router, страница 13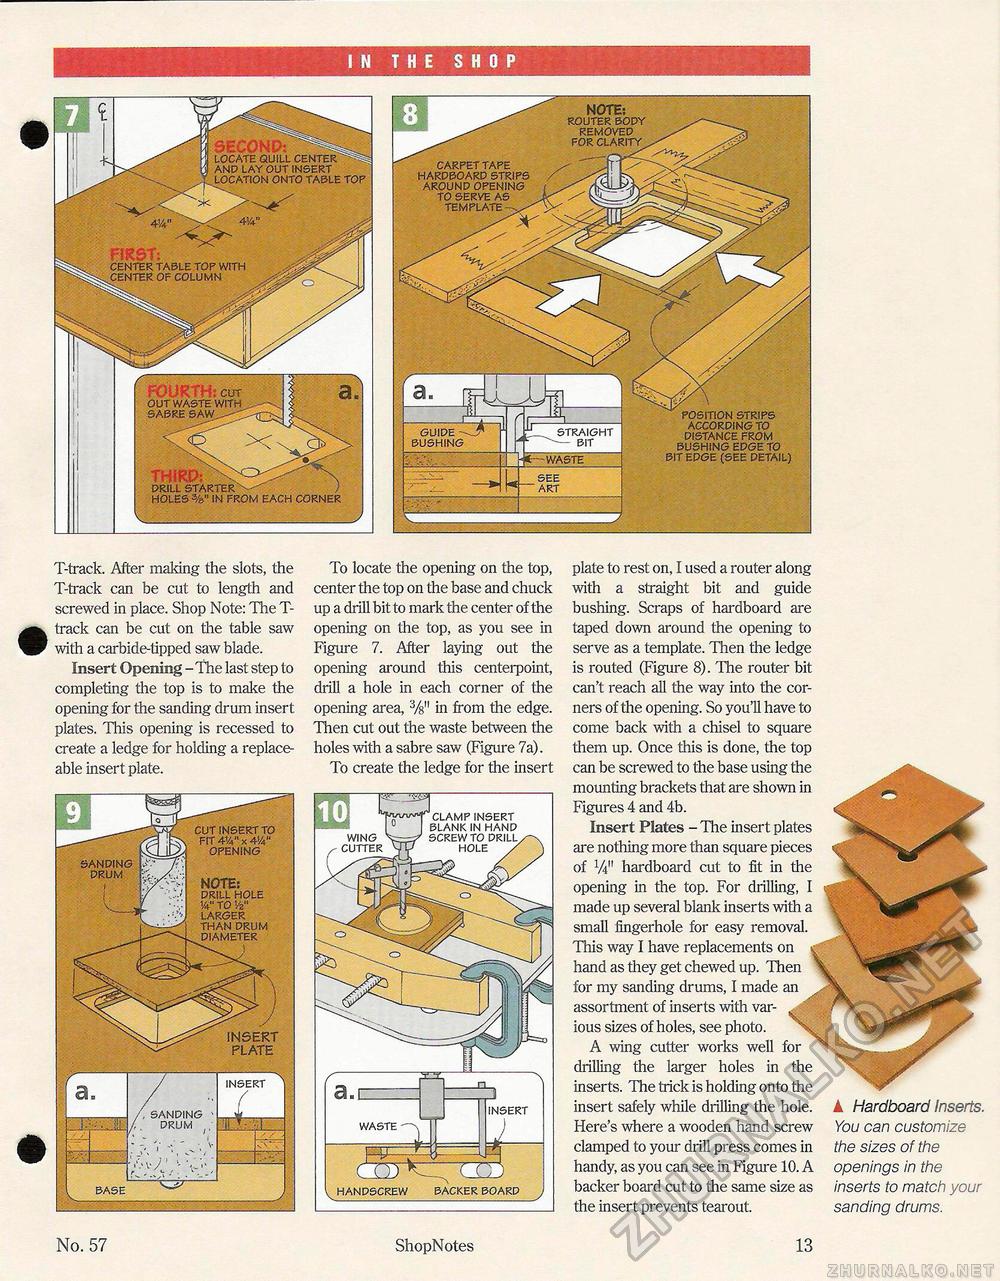
! N THE SHOP T-track. After making the slots, the T-track can be cut to length and screwed in place. Shop Note: The T-track can be cut on the table saw with a carbide-tipped saw blade. Insert Opening - The last step to completing the top is to make the opening for the sanding drum insert plates. This opening is recessed to create a ledge for holding a replaceable insert plate. To locate the opening on the top, center the top on the base and chuck up a drill bit to mark the center of the opening on the top, as you see in Figure 7. After laying out the opening around this centerpoint, drill a hole in each corner of the opening area, 3/8M in from the edge. Then cut out the waste between the holes with a sabre saw (Figure 7a). To create the ledge for the insert * No. 57 ShopNotes 13 and lay out insert location onto table top THiRP: DRILL STARTER HOLES %" IN FROM EACH CORNER guide tjr bushing straight -— bit -waste see art POSITION STRIPS ACCORDING TO DISTANCE FROM BUSHING EDGE TO BIT EDGE (SEE DETAIL) NOTE; router body removed for clarity CARPET TAPE HARDBOARD STRIPS AROUND OPENING TO SERVE AS TEMPLATE INSERT PLATE insert SANDING DRUM NOTE: drill hole w to vz" larger than drum diameter SUT INSERT TO FIT 414" x 414" OPENING clamp insert blank in hand insert backer board r a.t= waste Vhandscrew plate to rest on, I used a router along with a straight bit and guide bushing. Scraps of hardboard are taped down around the opening to serve as a template. Then the ledge is routed (Figure 8). The router bit can't reach all the way into the corners of the opening. So you'll have to come back with a chisel to square them up. Once this is done, the top can be screwed to the base using the mounting brackets that are shown in Figures 4 and 4b. Insert Plates - The insert plates are nothing more than square pieces of lAn hardboard cut to fit in the opening in the top. For drilling, I made up several blank inserts with a small lingerhole for easy removal. This way I have replacements on hand as they get chewed up. Then for my sanding drums, I made an assortment of inserts with various sizes of holes, see photo. A wing cutter works well for drilling the larger holes in the inserts. The trick is holding onto the insert safely while drilling the hole. Here's where a wooden hand screw clamped to your drill press comes in handy, as you can see in Figure 10. A backer board cut to the same size as the insert prevents tearout. A Hardboard Inserts. You can customize the sizes of the openings in the inserts to match your sanding drums. |


