62 - Box Joint Jig, страница 23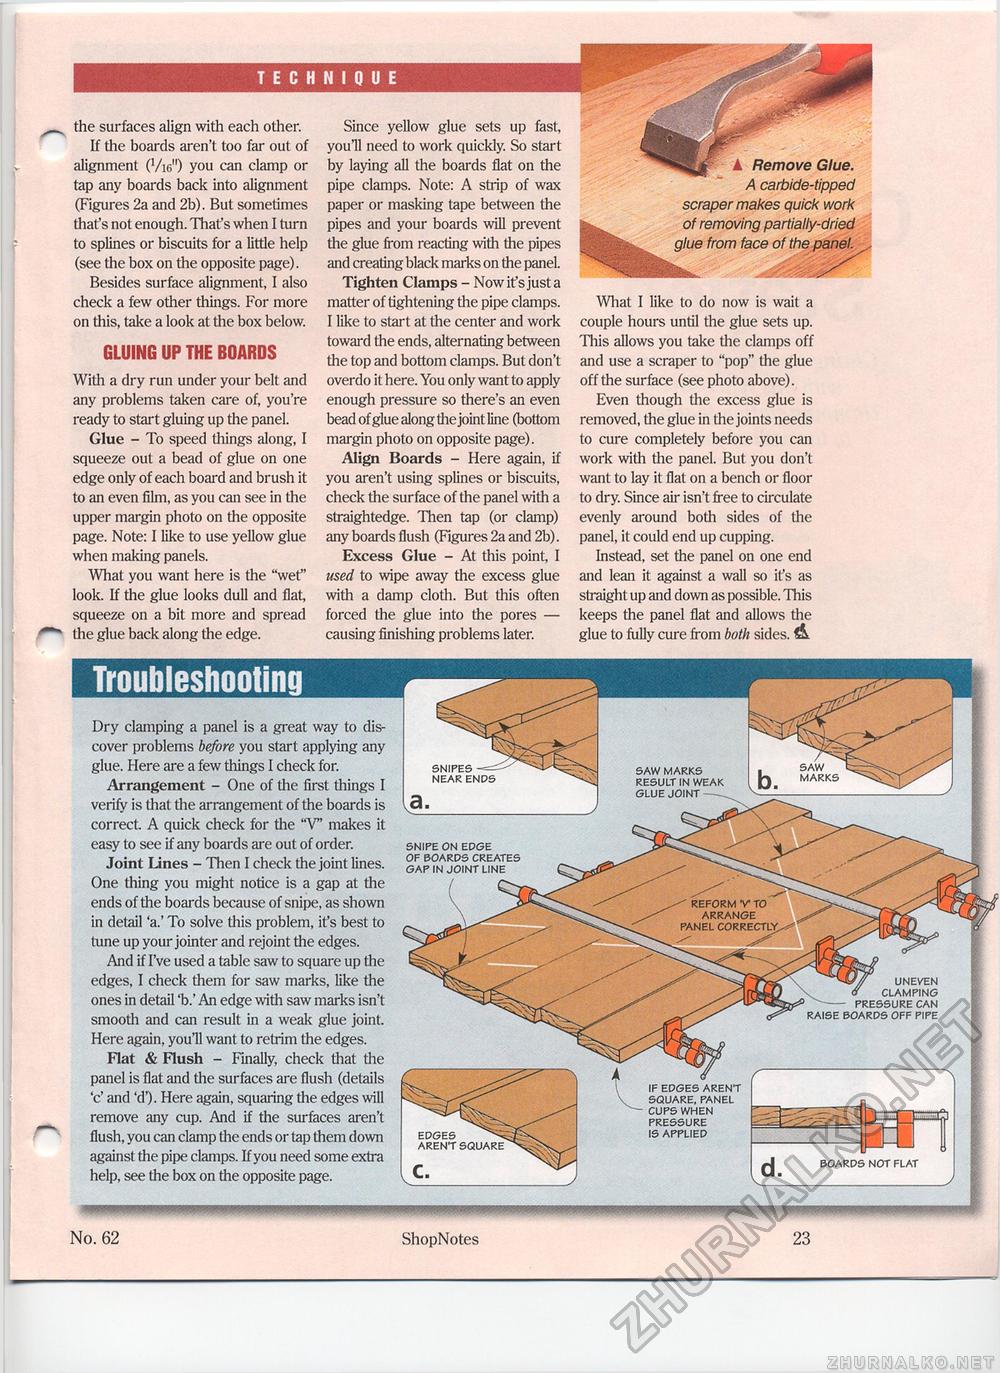
TECHNIQUE the surfaces align with each other. If the boards aren't too far out of alignment (Vie") you can clamp or tap any boards back into alignment (Figures 2a and 2b). But sometimes that's not enough. Thaf s when I turn to splines or biscuits for a little help (see the box on the opposite page). Besides surface alignment, I also check a few other things. For more on this, take a look at the box below. GLUING UP THE BOARDSWith a dry run under your belt and any problems taken care of, you're ready to start gluing up the panel. Glue - To speed things along, I squeeze out a bead of glue on one edge only of each board and brush it to an even film, as you can see in the upper margin photo on the opposite page. Note: I like to use yellow glue when making panels. What you want here is the "wet" look. If the glue looks dull and flat, squeeze on a bit more and spread the glue back along the edge. Since yellow glue sets up fast, you'll need to work quickly. So start by laying all the boards flat on the pipe clamps. Note: A strip of wax paper or masking tape between the pipes and your boards will prevent the glue from reacting with the pipes and creating black marks on the panel. Tighten Clamps - Nowifsjusta matter of tightening the pipe clamps. I like to start at the center and work toward the ends, alternating between the top and bottom clamps. But don't overdo it here. You only want to apply enough pressure so there's an even bead ofglue along die joint line (bottom margin photo on opposite page). Align Boards - Here again, if you aren't using splines or biscuits, check the surface of the panel with a straightedge. Then tap (or clamp) any boards flush (Figures 2a and 2b). Excess Glue - At this point, I used to wipe away the excess glue with a damp cloth. But this often forced the glue into the pores — causing finishing problems later. What I like to do now is wait a couple hours until the glue sets up. This allows you take the clamps off and use a scraper to "pop" the glue off the surface (see photo above). Even though the excess glue is removed, the glue in the joints needs to cure completely before you can work with the panel. But you don't want to lay it flat on a bench or floor to dry. Since air isn't free to circulate evenly around both sides of the panel, it could end up cupping. Instead, set the panel on one end and lean it against a wall so ifs as straight up and down as possible. This keeps the panel flat and allows the glue to fully cure from both sides. & A carbide-tipped scraper makes quick work of removing partially-dried glue from face of the panel. A Remove Glue. reform v to arrange panel correctly. Troubleshooting ^S// UNEVEN . <9 CLAMPING ^- PRESSURE CAN RAISE BOARDS OFF PIPE IF EDGES ARENT SQUARE, PANEL CUPS WHEN PRESSURE IS APPLIED EDGES ARENT SQUARE Dry clamping a panel is a great way to discover problems before you start applying any glue. Here are a few tilings I check for. Arrangement - One of the first things I verify is that the arrangement of the boards is correct. A quick check for the "V" makes it easy to see if any boards are out of order. Joint lines - Then I check the joint lines. One thing you might notice is a gap at the ends of the boards because of snipe, as shown in detail 'a.' To solve this problem, it's best to tune up your jointer and rejoint the edges. And if I've used a table saw to square up the edges, I check them for saw marks, like the ones in detail 'b.' An edge with saw marks isn't smooth and can result in a weak glue joint. Here again, you'll want to retrim the edges. Flat & Flush - Finally, check that the panel is flat and the surfaces are flush (details 'c' and 'd'). Here again, squaring the edges will remove any cup. And if the surfaces aren't flush, you can clamp the ends or tap them down against the pipe clamps. If you need some extra help, see the box on the opposite page. BOARDS NOT FLAT , SAW MARKS SAW MARKS RESULT IN WEAK GLUE JOINT--- SNIPES NEAR ENDS SNIPE ON EDGE OF BOARDS CREATES GAP IN JOINT LINE No. 62 ShopNotes 23 |


