65 - Our Best Bench Yet, страница 31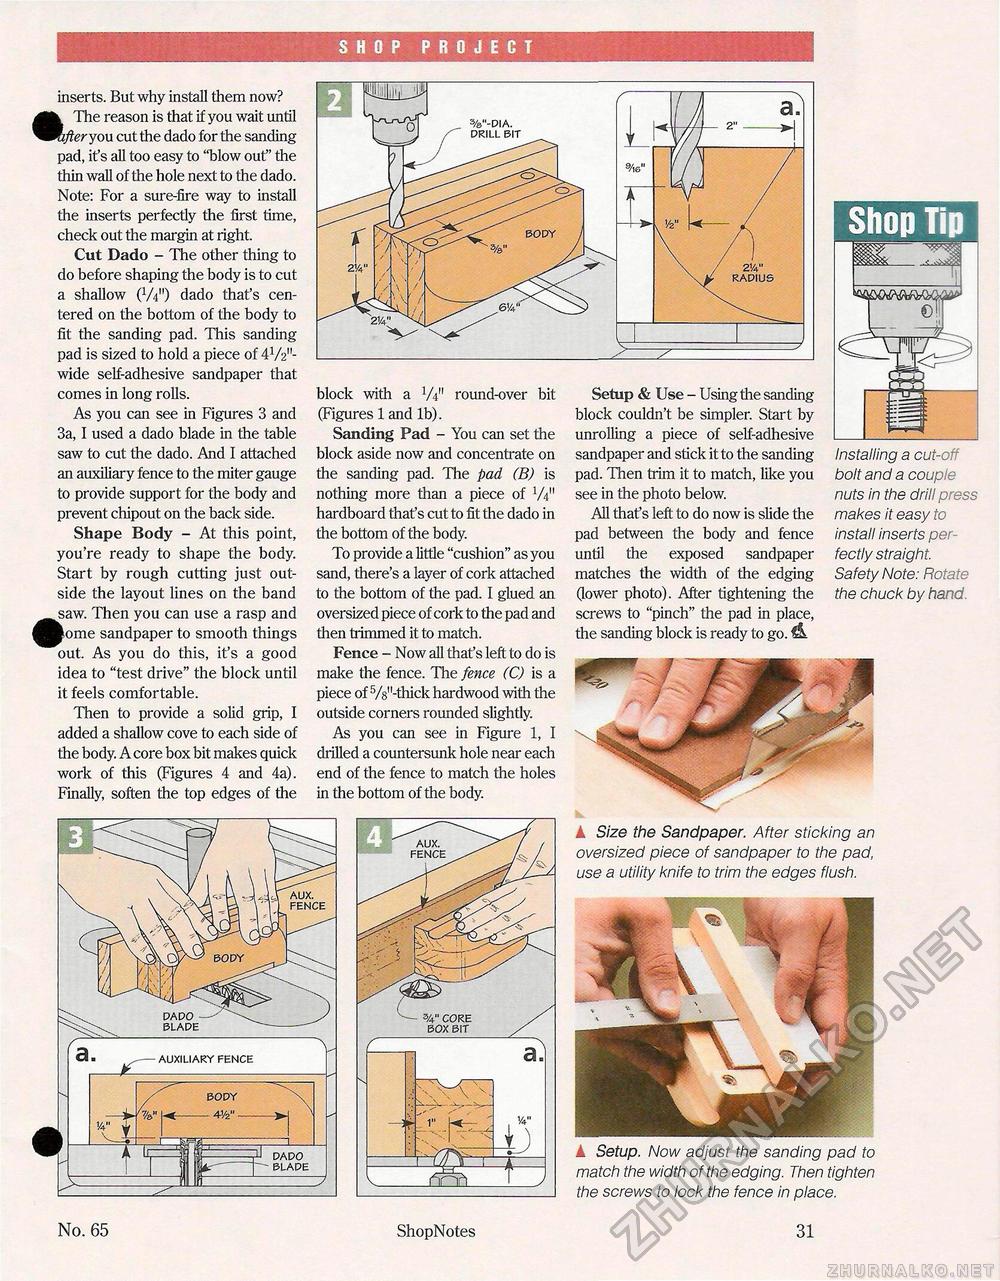
SHOP PROJECT A Setup. Now adjust the sanding pad to match the width of the edging. Then tighten the screws to lock the fence in place. inserts. But why install them now? The reason is that if you wait until ^Kifier you cut the dado for the sanding pad, it's all too easy to "blow out" the thin wall of the hole next to the dado. Note: For a sure-fire way to install the inserts perfectly the first time, check out the margin at right. Cut Dado - The other thing to do before shaping the body is to cut a shallow (V4") dado that's centered on the bottom of the body to fit the sanding pad. This sanding pad is sized to hold a piece of 4V2"-wide self-adhesive sandpaper that comes in long rolls. As you can see in Figures 3 and 3a, I used a dado blade in the table saw to cut the dado. And I attached an auxiliary fence to the miter gauge to provide support for the body and prevent chipout on the back side. Shape Body - At this point, you're ready to shape the body. Start by rough cutting just outside the layout lines on the band •saw. Then you can use a rasp and ^ome sandpaper to smooth things out. As you do this, it's a good idea to "test drive" the block until it feels comfortable. Then to provide a solid grip, I added a shallow cove to each side of the body. A core box bit makes quick work of this (Figures 4 and 4a). Finally, soften the top edges of the block with a W round-over bit (Figures 1 and lb). Sanding Pad - You can set the block aside now and concentrate on the sanding pad. The pad (B) is nothing more than a piece of TV1 hardboard that's cut to fit the dado in the bottom of the body. To provide a little "cushion" as you sand, there's a layer of cork attached to the bottom of the pad. I glued an oversized piece of cork to the pad and then trimmed it to match. Fence - Now all that's left to do is make the fence. The fence (C) is a piece of 5/8,Lthick hardwood with the outside corners rounded slightly. As you can see in Figure 1, I drilled a countersunk hole near each end of the fence to match the holes in the bottom of the body. A Size the Sandpaper. After sticking an oversized piece of sandpaper to the pad, use a utility knife to trim the edges flush. Setup & Use - Using the sanding block couldn't be simpler. Start by unrolling a piece of self-adhesive sandpaper and stick it to the sanding pad. Then trim it to match, like you see in the photo below. All that's left to do now is slide the pad between the body and fence until the exposed sandpaper matches the width of the edging (lower photo). After tightening the screws to "pinch" the pad in place, the sanding block is ready to go. Installing a cut-off bolt and a couple nuts in the drill press makes it easy to install inserts perfectly straight. Safety Note: Rotate the chuck by hand. %"-DIA. DRILL BIT BODY ZV4" RADIUS • AUXILIARY FENCE DADO BLADE AUX. FENCE DADO BLADE No. 65 ShopNotes 31 |


