69 - Bench Top Storage System, страница 23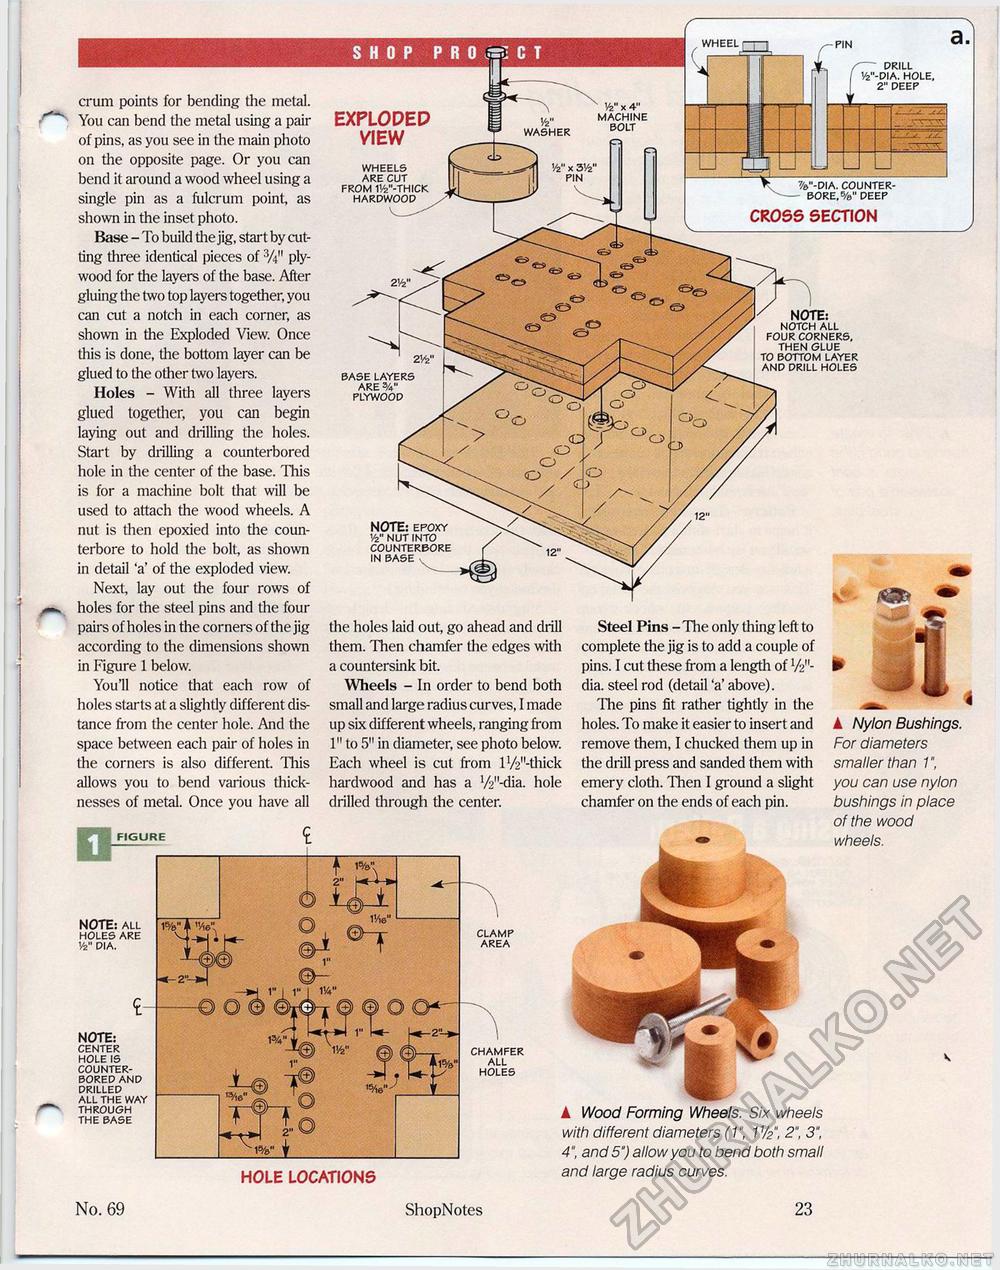
No. 69 ShopNotes 23 NOTE: all holes are y2" dia. crum points for bending the metal. You can bend the metal using a pair of pins, as you see in the main photo 011 the opposite page. Or you can bend it around a wood wheel using a single pin as a fulcrum point, as shown in the inset photo. Base - To build the jig, start by cutting diree identical pieces of plywood for die layers of the base. After gluing the two top layers together, you can cut a notch in each corner, as shown in the Exploded View. Once this is done, the bottom layer can be glued to the other two layers. Holes - With all three layers glued together, you can begin laying out and drilling the holes. Start by drilling a counterbored hole in the center of the base. This is for a machine bolt that will be used to attach the wood wheels. A nut is then epoxied into the coun-terbore to hold the bolt, as shown in detail *a' of the exploded view. Next, lay out the four rows of holes for the steel pins and the four pairs of holes in the corners of the jig according to the dimensions shown in Figure 1 below. You'll notice that each row of holes starts at a slightiy different distance from the center hole. And the space between each pair of holes in the corners is also different. This allows you to bend various tiiick-nesses of metal. Once you have all t- NOTE: center hole is counter-bored and drilled all the way through the base HOLE LOCATIONS ▲ Wood Forming Wheels. Six wheels with different diameters (V, V/2", 2\ 3", 4", and 5") allow you to bend both small and large radius curves. |ir^fy FIGURE _ i A Nylon Bushings. For diameters smaller than 1", you can use nylon bushings in place of the wood wheels. base layers are V plywood the holes laid out, go ahead and drill them. Then chamfer the edges with a countersink bit. Wheels - In order to bend both small and large radius curves, I made up six different wheels, ranging from 1" to 5" in diameter, see photo below. Each wheel is cut from lV^'-thick hardwood and has a V2n-dia. hole drilled through the center. Steel Pins - The only thing left to complete the jig is to add a couple of pins. I cut these from a length of V/-dia. steel rod (detail 'a' above). The pins fit rather tightly in the holes. To make it easier to insert and remove them, I chucked them up in the drill press and sanded them with emery cloth. Then I ground a slight chamfer on the ends of each pin. EXPLODED VIEW wheels are cut from w-thick hardwood V washer PIN L drill v-dia. hole, 2" deep %"-dia. counter-- bore. %" deep CROSS SECTION NOTE: notch all four corners, then glue to bottom layer and drill holes V2" x 4" machine bolt |


