69 - Bench Top Storage System, страница 21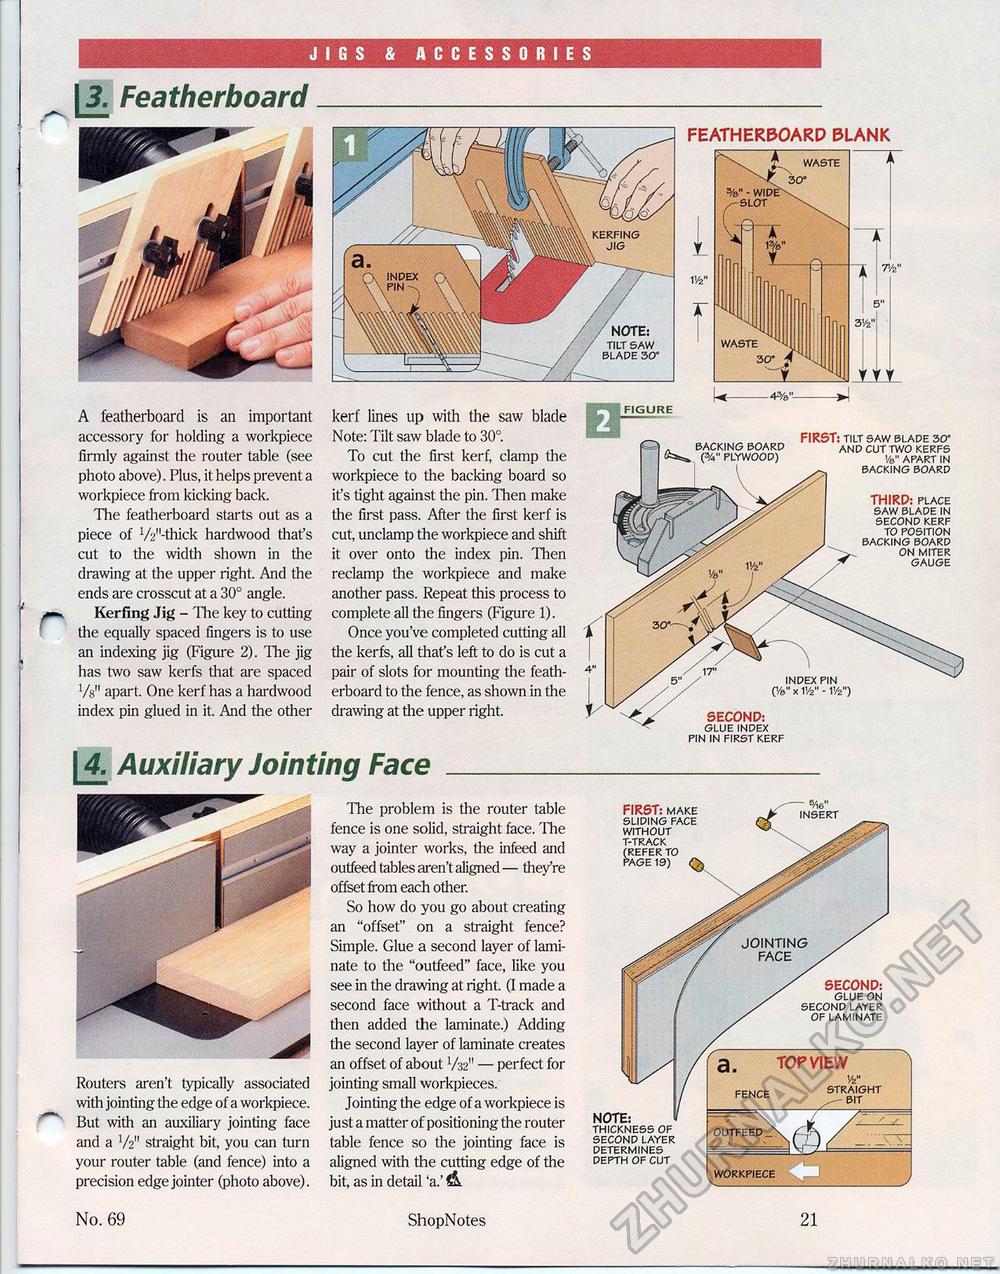
|3. FeatherboardACCESSORIES featherboard blank A featherboard is an important accessory for holding a workpiece firmly against the router table (see photo above). Plus, it helps prevent a workpiece from kicking back. The featherboard starts out as a piece of W'-thick hardwood that's cut to the width shown in the drawing at the upper right. And the ends are crosscut at a 30° angle. Kerfing Jig - The key to cutting the equally spaced fingers is to use an indexing jig (Figure 2). The jig has two saw kerfs that are spaced W apart. One kerf has a hardwood index pin glued in it. And the other kerf lines up with the saw blade Note: Tilt saw blade to 30°. To cut the first kerf, clamp the workpiece to the backing board so it's tight against the pin. Then make die first pass. After the first kerf is cut, unclamp the workpiece and shift it over onto die index pin. Then reclamp the workpiece and make another pass. Repeat this process to complete all die fingers (Figure 1). Once you've completed cutting all the kerfs, all that's left to do is cut a pair of slots for mounting the featherboard to the fence, as shown in the drawing at the upper right. \4. Auxiliary Jointing FaceRouters aren't typically associated with jointing the edge of a workpiece. But with an auxiliary jointing face and a V2" straight bit, you can turn your router table (and fence) into a precision edge jointer (photo above). No. 69 The problem is the router table fence is one solid, straight face, 'llie way a jointer works, the infeed and outfeed tables aren't aligned — they're offset from each other. So how do you go about creating an "offset" on a straight fence? Simple. Glue a second layer of laminate to the "outfeed" face, like you see in the drawing at right. (I made a second face without a T-track and then added the laminate.) Adding the second layer of laminate creates an offset of about V32" — perfect for jointing small workpieces. Jointing the edge of a workpiece is just a matter of positioning the router table fence so the jointing face is aligned with the cutting edge of the bit, as in detail 'a.' & ShopNotes NOTE: riLT SAW LADE 30" kerfing jig waste waste * * Y SECOND: glue index pin in first kerf -<-4%"->~ FIGURE FIRST: tilt saw blade 30" backing board and cut two kerfs (%" plywood) ./8" apart in backing board THIRD: place saw blade in second kerf to position backing board on miter gauge FIRST: make sliding face without t-track (refer to page 19) NOTE: thickness of second layer determines depth of cut TOP VIEW straight fence outfeed workpiece JOINTING FACE SECOND: glue on second layer of laminate |


