69 - Bench Top Storage System, страница 19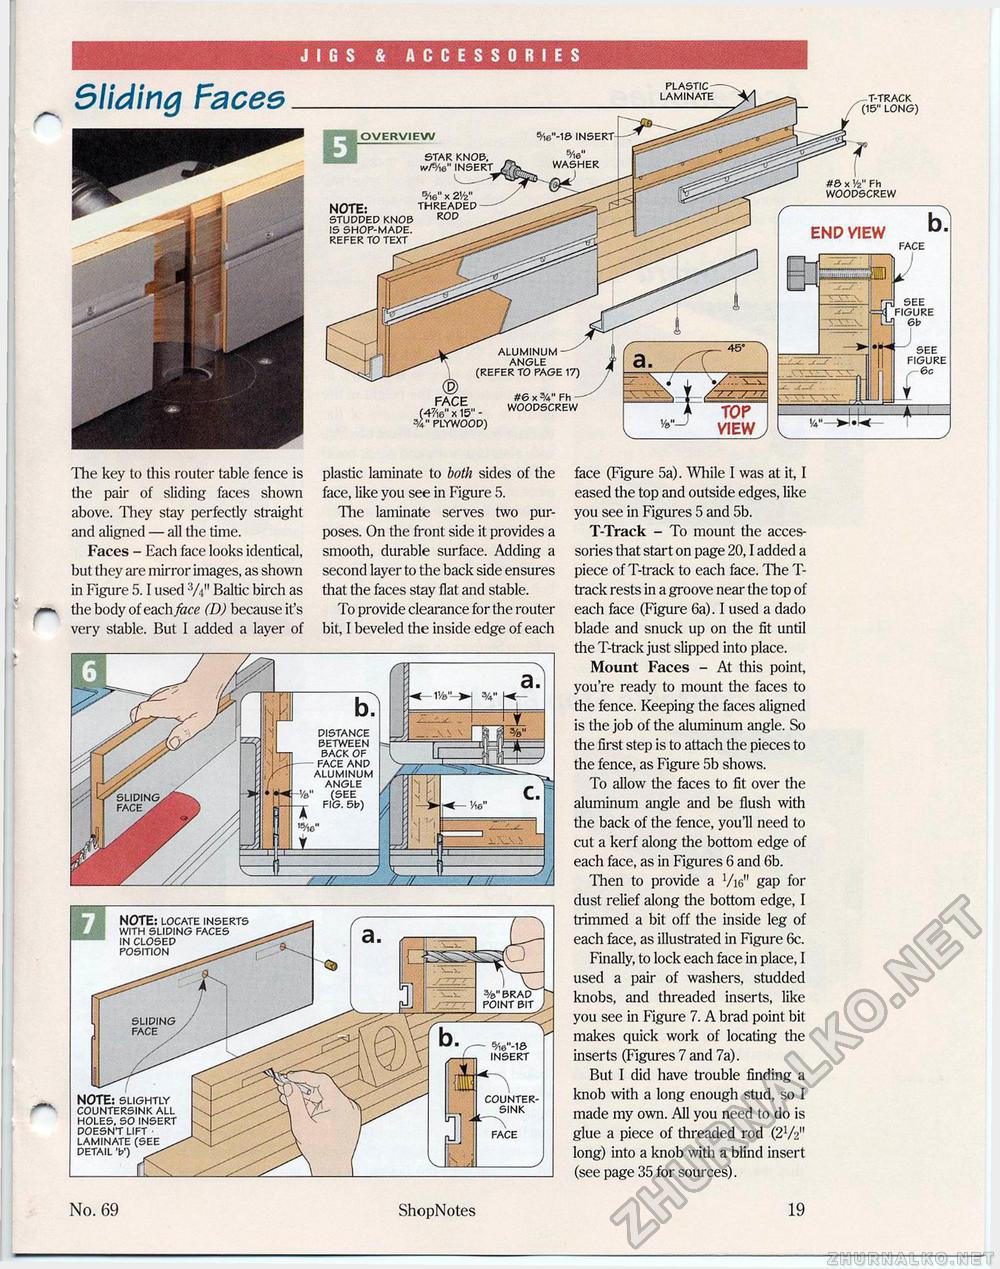
JIGS & ACCESSORIES Sliding Facee r The key to this router table fence is the pair of sliding faces shown above. They stay perfectly straight and aligned — all the time. Faces - Each face looks identical, but they arc mirror images, as shown in Figure 5.1 used 3/t" Baltic birch as the body of each face (D) because it's very stable. But 1 added a layer of plastic laminate to both sides of the face, like you see in Figure 5. The laminate serves two purposes. On the front side it provides a smooth, durable surface. Adding a second layer to the back side ensures that the faces stay flat and stable. To provide clearance for the router bit, I beveled the inside edge of each face (Figure 5a). While I was at it, I eased the top and outside edges, like you see in Figures 5 and 5b. T-Track - To mount the accessories that start on page 20,1 added a piece of T-track to each face. The T-track rests in a groove near the top of each face (Figure 6a). I used a dado blade and snuck up on the fit until the T-track just slipped into place. Mount Faces - At this point, you're ready to mount the faces to the fence. Keeping the faces aligned is the job of the aluminum angle. So the first step is to attach the pieces to the fence, as Figure 5b shows. To allow the faces to fit over the aluminum angle and be flush with the back of the fence, you'll need to cut a kerf along the bottom edge of each face, as in Figures 6 and 6b. Then to provide a Vi6" gap for dust relief along the bottom edge, I trimmed a bit off the inside leg of each face, as illustrated in Figure 6c. Finally, to lock each face in place, I used a pair of washers, studded knobs, and threaded inserts, like you see in Figure 7. A brad point bit makes quick work of locating the inserts (Figures 7 and 7a). But I did have trouble finding a knob with a long enough stud, so I made my own. All you need to do is glue a piece of threaded rod (2V2" long) into a knob with a blind insert (see page 35 for sources). PLASTIC LAMINATE T-TRACK (15" LONG) #0 x V2" Fh WOODSCREW OVERVIEW STAR KNOB, w/s/ie" INSERT 5/i6" x 2Vz" NOTE: THREADED STUDDED KNOB """ IS SHOP-MADE. REFER TO TEXT END VIEW FACE SEE FIGURE 6c DISTANCE BETWEEN BACK OF FACE AND ALUMINUM ANGLE (SEE FIG. 5b) NOTE: SLIGHTLY COUNTERSINK ALL HOLES, SO INSERT DOESNT LIFT LAMINATE (SEE DETAIL V) 5/i6"-1S INSERT COUNTERSINK FACE NOTE: LOCATE INSERTS WITH SLIDING FACES IN CLOSED POSITION No. 69 ShopNotes 19 |


