69 - Bench Top Storage System, страница 17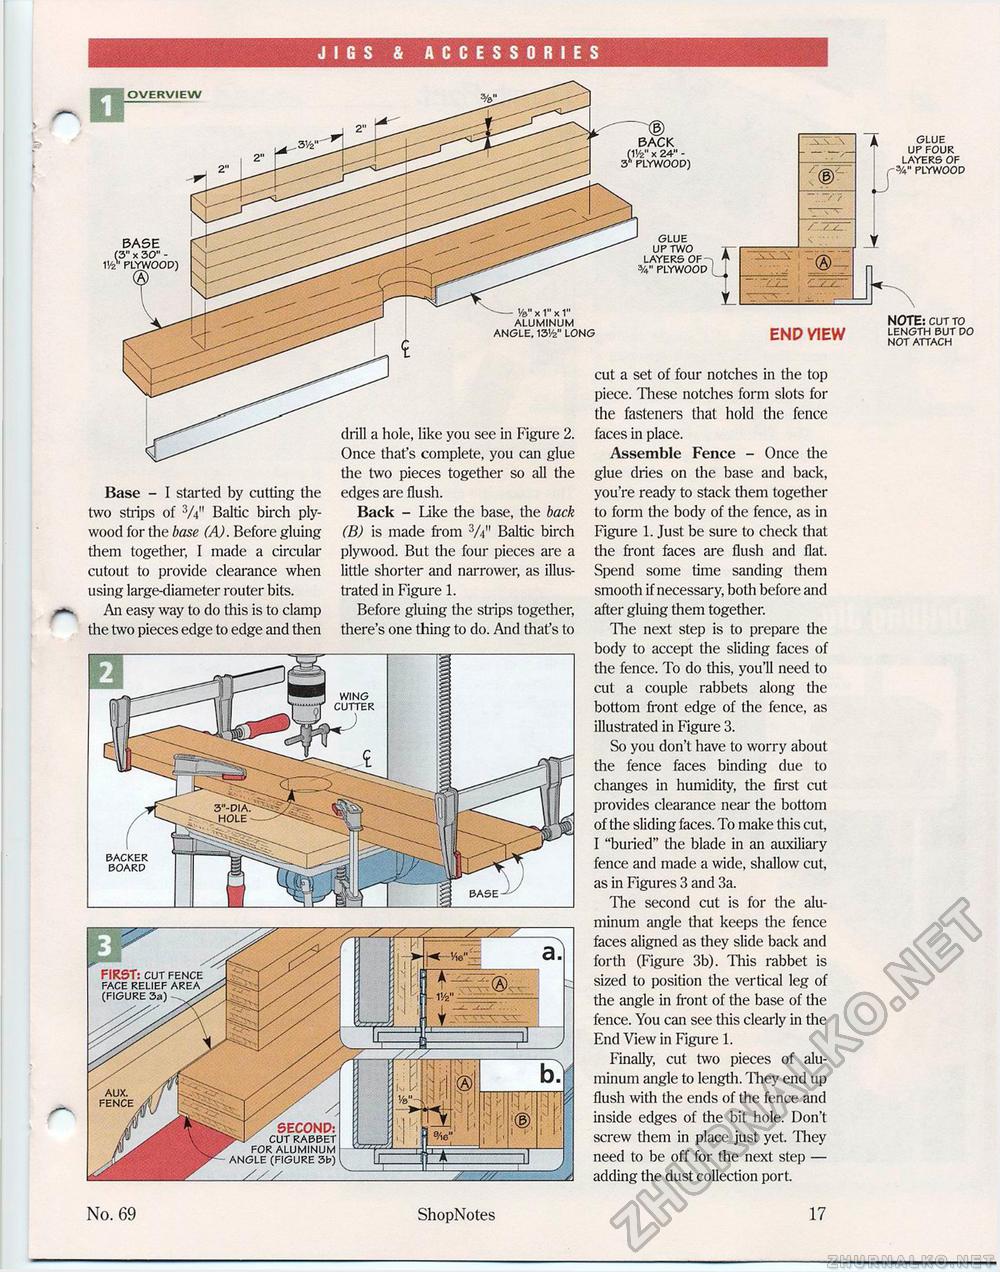
JIGS & ACCESSORIES OVERVIEW cut a set of four notches in the top piece. These notches form slots for the fasteners that hold the fence faces in place. Assemble Fence - Once the glue dries on the base and back, you're ready to stack them together to form the body of the fence, as in Figure 1. Just be sure to check that the front faces are flush and flat. Spend some time sanding them smooth if necessary, both before and after gluing them together. The next step is to prepare the body to accept the sliding faces of the fence. To do this, you'll need to cut a couple rabbets along the bottom front edge of the fence, as illustrated in Figure 3. So you don't have to worry about the fence faces binding due to changes in humidity, the first cut provides clearance near the bottom of the sliding faces. To make this cut, I "buried" the blade in an auxiliary fence and made a wide, shallow cut, as in Figures 3 and 3a. The second cut is for the aluminum angle that keeps the fence faces aligned as they slide back and forth (Figure 3b). This rabbet is sized to position the vertical leg of the angle in front of the base of the fence. You can see this clearly in the End View in Figure 1. Finally, cut two pieces of aluminum angle to length. They end up flush with the ends of the fence and inside edges of the bit hole. Don't screw them in place just yet. They need to be off for the next step — adding the dust collection port. '/£>" x 1" x 1" ALUMINUM ANGLE. 13'/2" LONG Base - I started by cutting the two strips of 3A" Baltic birch plywood for the base (A). Before gluing them together, I made a circular cutout to provide clearance when using large-diameter router bits. An easy way to do this is to clamp the two pieces edge to edge and then drill a hole, like you see in Figure 2. Once that's complete, you can glue the two pieces together so all the edges are flush. Back - Like the base, the back (B) is made from 3/i" Baltic birch plywood. But the four pieces are a little shorter and narrower, as illustrated in Figure 1. Before gluing the strips together, there's one thing to do. And that's to J GLUE UP FOUR LAYERS OF %" PLYWOOD NOTE: CUT TO LENGTH BUT DO NOT ATTACH GLUE UP TWO LAYERS OF-, %" PLYWOOD BACKER BOARD No. 69 ShopNotes 17 |


