69 - Bench Top Storage System, страница 27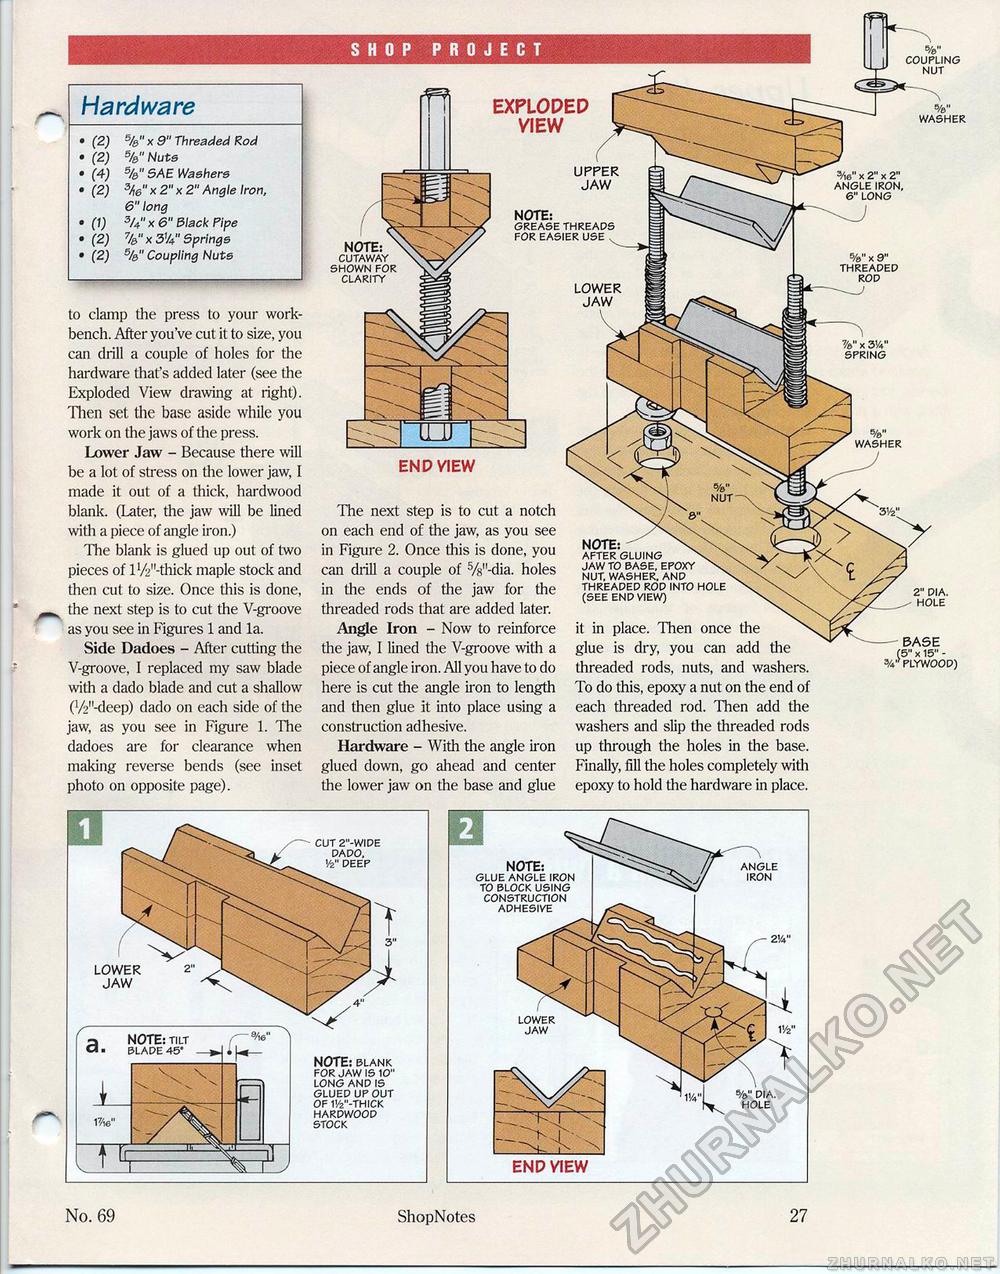
NOTE: cutaway shown for clarity to clamp the press to your workbench. After you've cut it to size, you can drill a couple of holes for the hardware that's added later (see the Exploded View drawing at right). Then set the base aside while you work on the jaws of the press. Lower Jaw - Because there will be a lot of stress on the lower jaw, I made it out of a thick, hardwood blank. (Later, the jaw will be lined with a piece of angle iron.) The blank is glued up out of two pieces of l'/V'-thick maple stock and then cut to size. Once this is done, the next step is to cut the V-groove as you see in Figures 1 and la. Side Dadoes - After cutting the V-groove, I replaced my saw blade with a dado blade and cut a shallow 0/2"-deep) dado on each side of the jaw, as you see in Figure 1. The dadoes are for clearance when making reverse bends (see inset photo on opposite page). washer EXPLODED VIEW s/e" coupling nut %" x 3'/4" spring END VIEW The next step is to cut a notch on each end of the jaw, as you see in Figure 2. Once this is done, you can drill a couple of Vs'-dia. holes in the ends of the jaw for the threaded rods that are added later. Angle Iron - Now to reinforce the jaw, I lined the V-groove with a piece of angle iron. All you have to do here is cut the angle iron to length and then glue it into place using a construction adhesive. Hardware - With the angle iron glued down, go ahead and center the lower jaw on the base and glue washer UPPER JAW 16" x 2" x 2" -)gle iron, 6" long NOTE: cutaway shown for clarity NOTE: after gluing jaw to base, epoxy nut, washer, and threaded rod into hole (see end view) it in place. Then once the glue is dry, you can add the threaded rods, nuts, and washers. To do this, epoxy a nut on the end of each threaded rod. Then add the washers and slip the threaded rods up through the holes in the base. Finally, fill the holes completely witii epoxy to hold the hardware in place. 2" dia. hole BASE (5" x 15" -plywood) NOTE: grease threads for easier use LOWER JAW cut 2"-wide dado, V2" deep a NOTE: tilt q . blade 45* NOTE: blank for jaw is 10" long and is glued up out of 1'/2"-thick hardwood stock END VIEW lower jaw angle iron NOTE: glue angle iron to block using construction adhesive No. 69 ShopNotes 27 |
||||||||||||||||||


