77 - Sliding Door Shop Cabinet, страница 27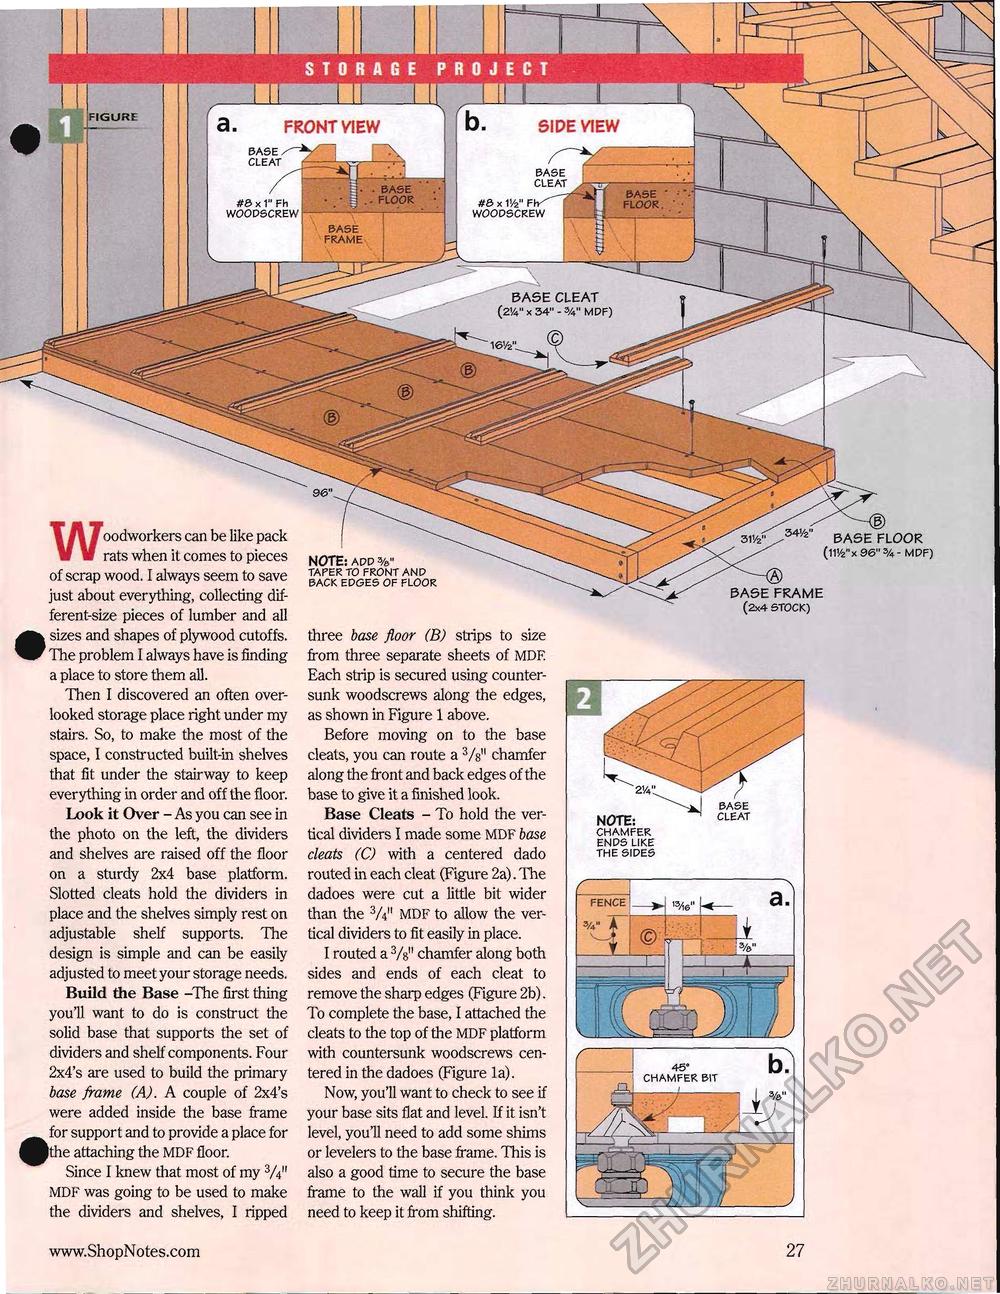
woodscrew BASE FRAME BASE CLEAT (254" x 34" - %" MDF) BASE FLOOR (11V2" x 96"%- MDF) BASE FRAME FIGURE STORAGE PROJECT Woodworkers can be like pack rats when it comes to pieces of scrap wood. I always seem to save just about everything, collecting different-size pieces of lumber and all , sizes and shapes of plywood cutoffs. The problem I always have is finding a place to store them all. Then I discovered an often overlooked storage place right under my stairs. So, to make the most of the space, I constructed built-in shelves that fit under the stairway to keep everything in order and off the floor. Look it Over - As you can see in the photo on the left, the dividers and shelves are raised off the floor on a sturdy 2x4 base platform. Slotted cleats hold the dividers in place and the shelves simply rest on adjustable shelf supports. The design is simple and can be easily adjusted to meet your storage needs. Build the Base -The first thing youll want to do is construct the solid base that supports the set of dividers and shelf components. Four 2x4's are used to build the primary base frame (A). A couple of 2x4's were added inside the base frame for support and to provide a place for pthe attaching the MDF floor. Since I knew that most of my 3A" MDF was going to be used to make the dividers and shelves, I ripped NOTE: add taper to front and back edges of floor three base floor (B) strips to size from three separate sheets of MDF Each strip is secured using countersunk woodscrews along the edges, as shown in Figure 1 above. Before moving on to the base cleats, you can route a Vs" chamfer along the front and back edges of the base to give it a finished look. Base Cleats - To hold the vertical dividers I made some MDF base cleats (C) with a centered dado routed in each cleat (Figure 2a). The dadoes were cut a little bit wider than the 3A" MDF to allow the vertical dividers to fit easily in place. I routed a 3/g" chamfer along both sides and ends of each cleat to remove the sharp edges (Figure 2b). To complete the base, I attached the cleats to the top of the MDF platform with countersunk woodscrews centered in the dadoes (Figure la). Now, you'll want to check to see if your base sits flat and level. If it isn't level, you'll need to add some shims or levelers to the base frame. This is also a good time to secure the base frame to the wall if you think you need to keep it from shifting. SIDE VIEW FRONT VIEW base cleat base cleat LLLAI . . x f/z" Fh . . BASE BASE FLOOR. FLOOR #S> X 1" Fh woodscrew ends like the sides 27 |


