77 - Sliding Door Shop Cabinet, страница 28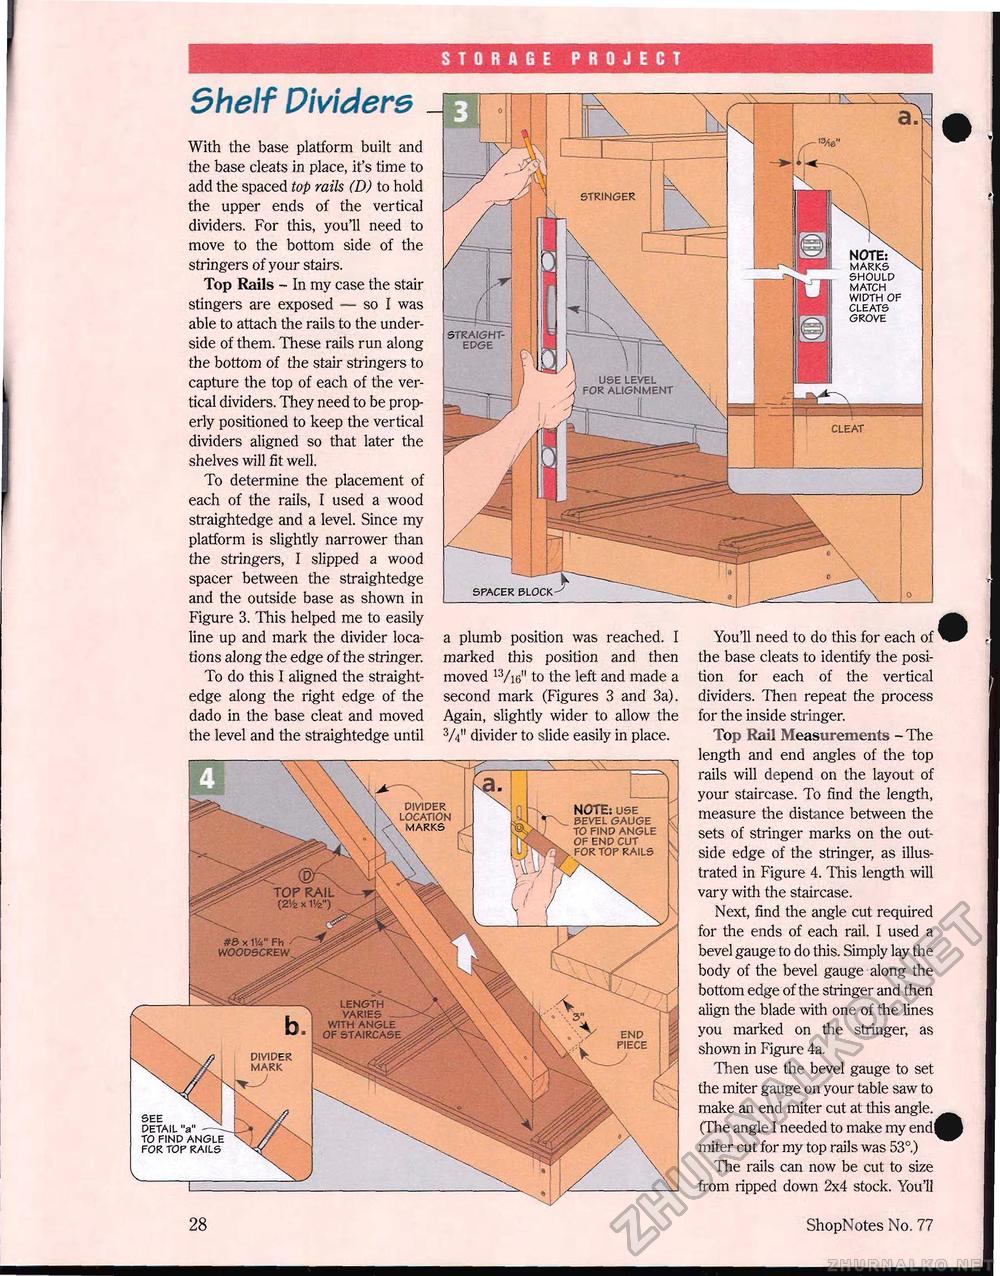
STORAGE PROJECT DMDER LOCATION MARKS NOTE: USE S. BEVEL GAUGE TO FIND ANGLE v OF END CUT > FOR TOP RAILS #6 * 114" Fh ■ WOOOSCRBW LENGTH Is VARIES . WITH ANGLE OF STAIRCASE DIVIDER MARK DETAIL "a"--- TO FIND ANGLE FOR TOP RAILS You'll need to do this for each of the base cleats to identify the position for each of the vertical dividers. Then repeat the process for the inside stringer. Top Rail Measurements - The length and end angles of the top rails will depend on the layout of your staircase. To find the length, measure the distance between the sets of stringer marks on the outside edge of the stringer, as illustrated in Figure 4. This length will vary with the staircase. Next, find the angle cut required for the ends of each rail. I used a bevel gauge to do this. Simply lay the body of the bevel gauge along the bottom edge of the stringer and then align the blade with one of the lines you marked on the stringer, as shown in Figure 4a. Then use the bevel gauge to set the miter gauge on your table saw to make an end miter cut at this angle. (The angle I needed to make my end| miter cut for my top rails was 53°) The rails can now be cut to size from ripped down 2x4 stock. You'll Shelf Dividers j With the base platform built and the base cleats in place, it's time to add the spaced top rails (D) to hold the upper ends of the vertical dividers. For this, you'll need to move to the bottom side of the stringers of your stairs. Top Rails - In my case the stair stingers are exposed — so I was able to attach the rails to the underside of them. These rails run along the bottom of the stair stringers to capture the top of each of the vertical dividers. They need to be properly positioned to keep the vertical dividers aligned so that later the shelves will fit well. To determine the placement of each of the rails, I used a wood straightedge and a level. Since my platform is slightly narrower than the stringers, I slipped a wood spacer between the straightedge and the outside base as shown in Figure 3. This helped me to easily line up and mark the divider locations along the edge of the stringer. To do this I aligned the straightedge along the right edge of the dado in the base cleat and moved the level and the straightedge until SPACER BLOCK SHOULD MATCH WIDTH OF CLEATS GROVE CLEAT a plumb position was reached. I marked this position and then moved 13/ie" to the left and made a second mark (Figures 3 and 3a). Again, slightly wider to allow the 3A" divider to slide easily in place. 28 ShopNotes No. 77 |


