77 - Sliding Door Shop Cabinet, страница 31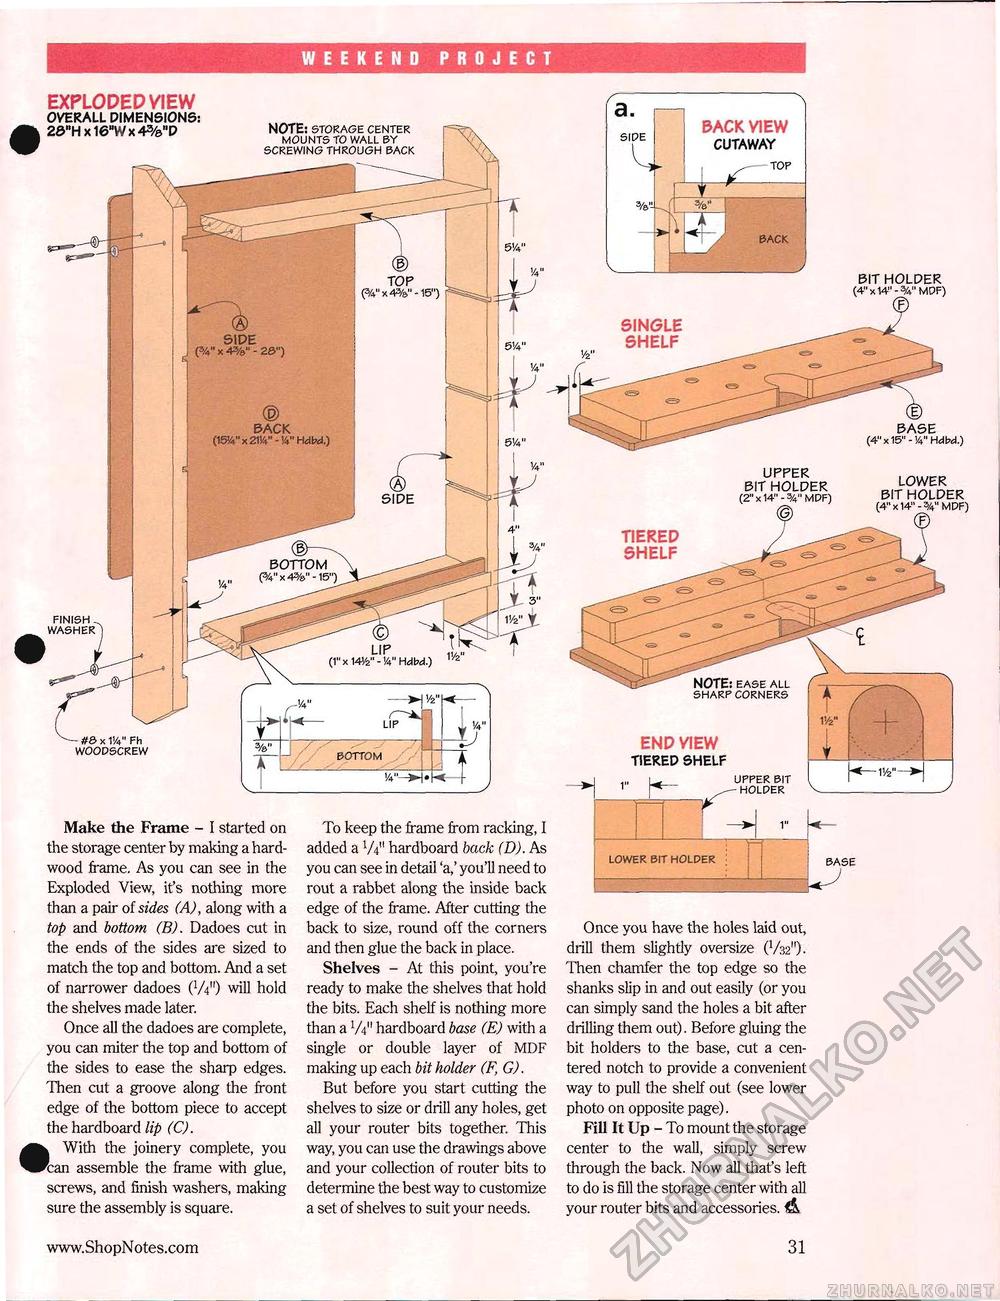
WEEKEND PROJECT EXPLODED VIEW OVERALL DIMENSIONS: 20"H x 16"W x 4%"D BACK VIEW CUTAWAY NOTE: STORAGE CENTER MOUNTS TO WALL BY SCREWING THROUGH BACK back BIT HOLDER (4"x14"-3A" MDF) SINGLE SHELF BACK (IW'jW-W'HW,) BASE (4"x15"-!4" Hdbd.) UPPER BIT HOLDER (2" x 14" - 3/4" MDF) LOWER BIT HOLDER (4" x 14" -W MDF) TIEREP SHELF BOTTOM P4"x4%"-15") FINISH-WASHER NOTE: EASE ALL SHARP CORNERS - #6 x VA" Fh WOODSCREW END VIEW TIERED SHELF BOTTOM UPPER BIT - HOLDER Make the Frame - I started on the storage center by making a hardwood frame. As you can see in the Exploded View, it's nothing more To keep the frame from racking, I added a W hardboard back (D). As you can see in detail 'a,' you'll need to rout a rabbet along the inside back LOWER BIT HOLDER than a pair of sides (A), along with a top and bottom (B). Dadoes cut in the ends of the sides are sized to match the top and bottom. And a set of narrower dadoes (W) will hold the shelves made later. Once all the dadoes are complete, you can miter the top and bottom of the sides to ease the sharp edges. Then cut a groove along the front edge of the bottom piece to accept the hardboard lip (C). With the joinery complete, you can assemble the frame with glue, screws, and finish washers, making sure the assembly is square. edge of the frame. After cutting the back to size, round off the corners and then glue the back in place. Shelves - At this point, you're ready to make the shelves that hold the bits. Each shelf is nothing more than a V4" hardboard base (E) with a single or double layer of MDF making up each bit holder (F, G). But before you start cutting the shelves to size or drill any holes, get all your router bits together. This way, you can use the drawings above and your collection of router bits to determine the best way to customize a set of shelves to suit your needs. Once you have the holes laid out, drill them slightly oversize (V^")-Then chamfer the top edge so the shanks slip in and out easily (or you can simply sand the holes a bit after drilling them out). Before gluing the bit holders to the base, cut a centered notch to provide a convenient way to pull the shelf out (see lower photo on opposite page). Fill It Up - To mount the storage center to the wall, simply screw through the back. Now all that's left to do is fill the storage center with all your router bits and accessories. 31 |


