79 - Slant Front Tool Cart, страница 20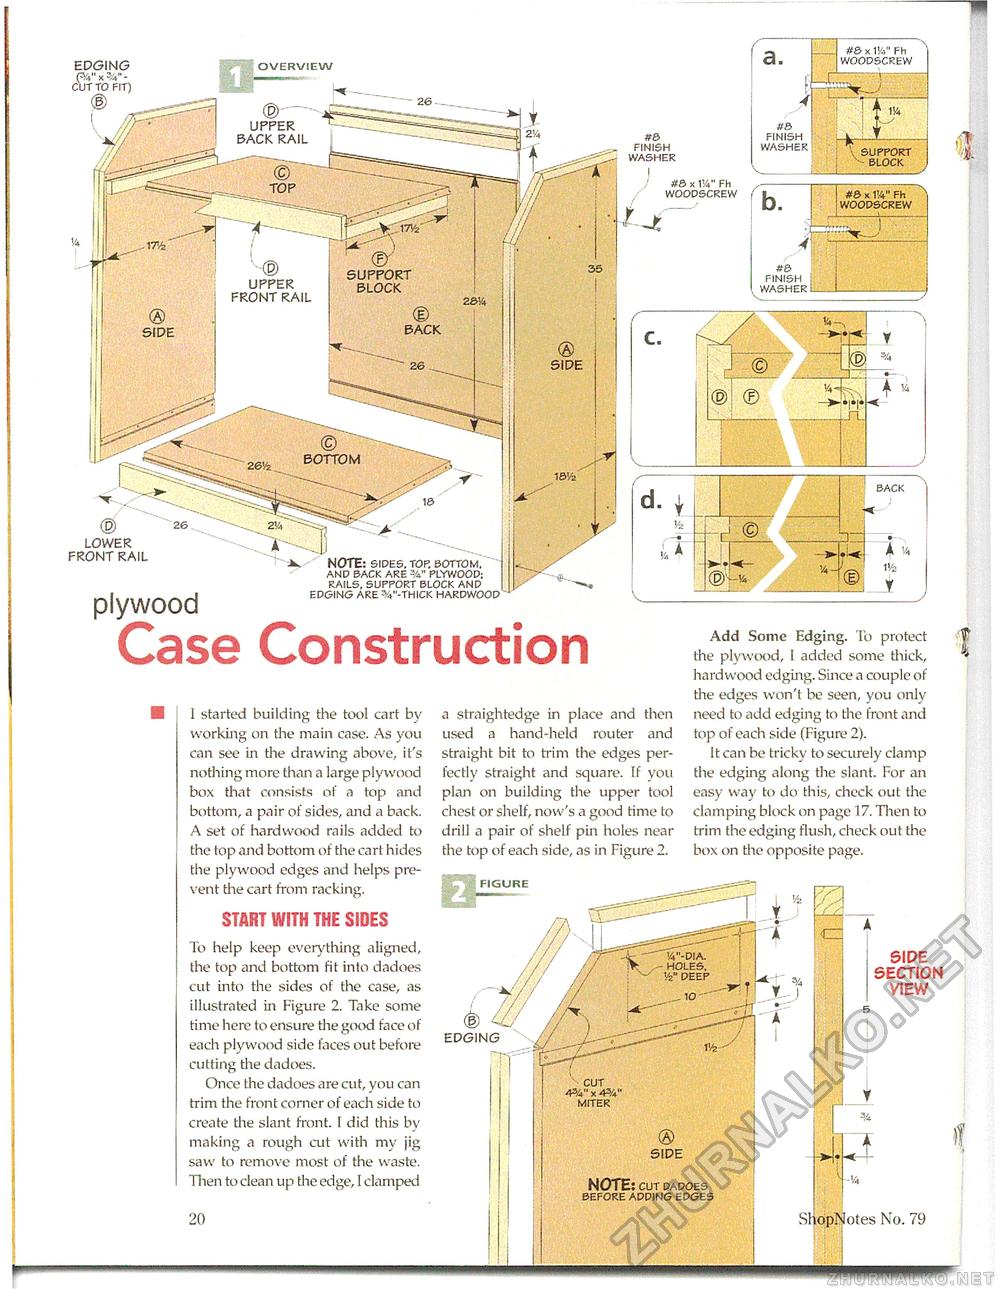
#e*.W Fh WOOPSCKEW overview UPPER BACK RAIL #e> FINISH WASHER #6 FINISH WASHER support block #0 x VA" Fh WOOPSCREW 4t& FINISH WASHER SUPPORT BLOCK UPPER FRONT RAIL BACK BOTTOM BACK LOWER FRONT RAIL NOTE: SIPE5. TOP, BOTTOM. AND BACK ARE %" PLYWOOD; RAILS, SUPPORT BLOCK ANP EPGING ARE%"-THICK HARPWOOP plywood Case Construction I started building the tool cart by working on the main case. As you can see in the drawing above, it's nothing more than a large plywood box that consists of a top and bottom, a pair of sides, and a back. A set of hardwood rails added to the top and bottom of the cart hides the plywood edges and helps prevent the cart from racking. a straightedge in place and then Lised a hand-held router and straight bit to trim the edges perfectly straight and square. If you plan on building the upper tool chest or shelf, now's a good time to drill a pair of shelf pin holes near the top of each side, as in Figure 2. Add Some Edging. To protect the plywood, I added some thick, hardwood edging. Since a couple of the edges won't be seen, you only need to add edging to the front and top of each side (Figure 2). It can be tricky to securely clamp the edging along the slant. For an easy way to do this, check out the clamping block on page 17. Then to trim the edging flush, check out the box on the opposite page. START WITH THE SIDES To help keep everything aligned, the top and bottom fit into dadoes cut into the sides of the case, as illustrated in Figure 2. Take some time here to ensure the good face of each plywood side faces out before cutting the dadoes. Once the dadoes are cut, you can trim the front comer of each side to create the slant front. 1 did this by making a rough cut with my jig saw to remove most of the waste. Then to clean up the edge, I clamped 20 SIPE SECTION VIEW ShopNotes No. 79 holes', w deep <s> SIDE NOTE: cut dadoes before apping edges CUT W x 43/*" MITER |


