79 - Slant Front Tool Cart, страница 22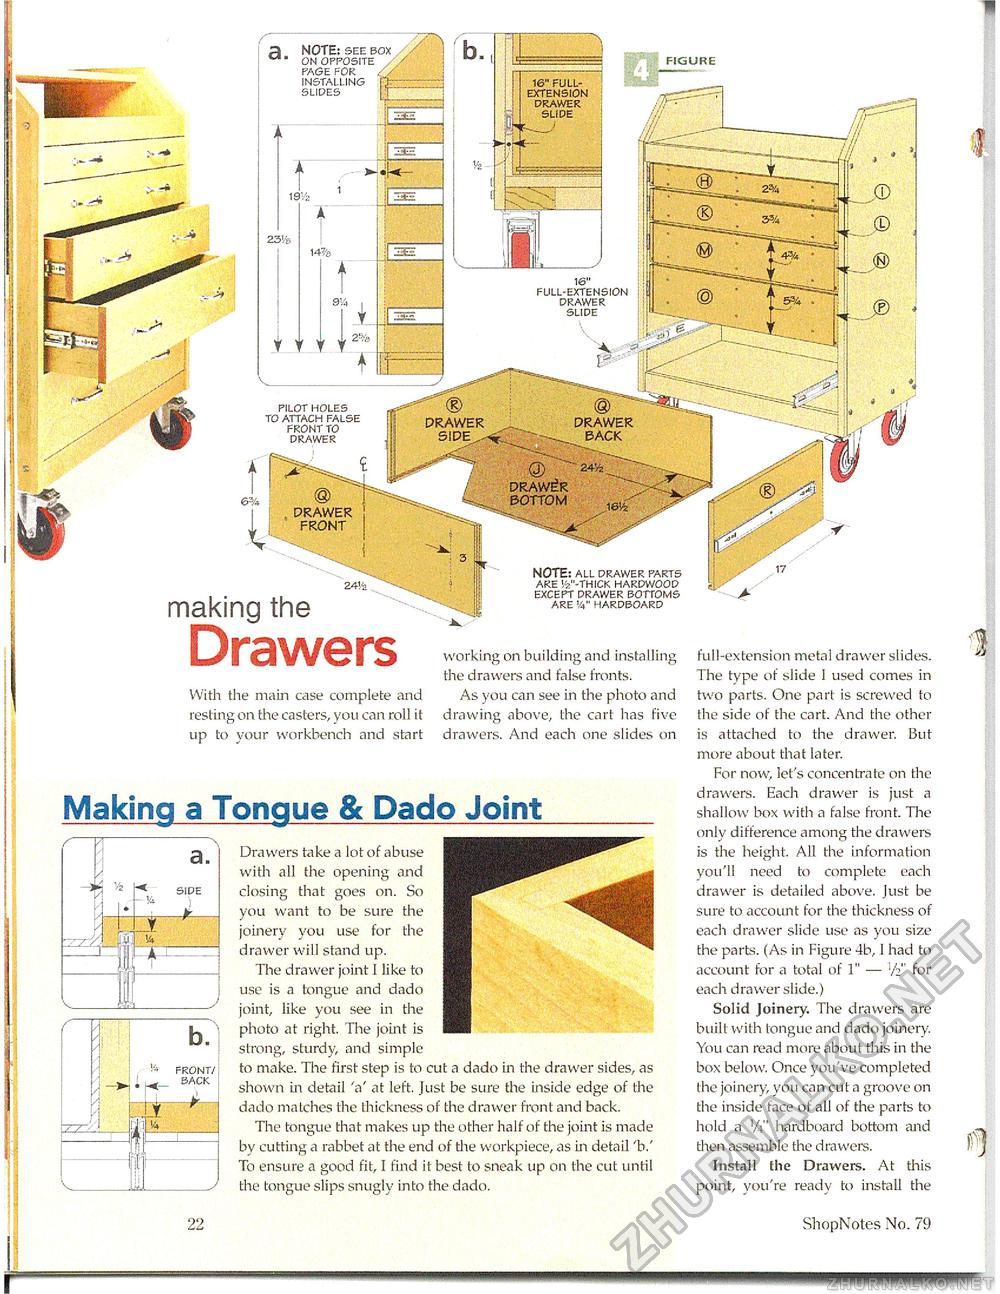
II PRAWER BACK DRAWER SiPE.^. If ' PRAWE-R BOTTOM a NOTE: see box on opposite PAGE FOR installing SLIDES FIGURE 36 FULL-EXTENSION DRAWER SLIDE 10" full-extension drawer slide pilot holes to attach false front to drawer PRAWER FRONT making the Drawers With the main case complete and resting on the casters, you can roll it up to your workbench and start NOTE: all drawer parts are iv'-thick hardwood except drawer bottoms are >/i" hardboard working on bLiilding and installing the drawers and false fronts. As you can see in the photo and drawing above, the cart has five drawers. And each one slides on Making a Tongue & Dado Joint Drawers abuse BHBflH9| with all the opening and ^ closing that goes on. So you want to be sure the ^H The drawer joint I like to ^H use is a tongue and dado ^H joint, like you see in the ^H photo at right. The joint is Hi strong, sturdy, and simple to make. The first step is to cut a dado in the drawer sides, as shown in detail 'a' at left. J List be siire the inside edge of the dado matches the thickness of the drawer front and back. The tongue that makes up the other half of the joint is made by cutting a rabbet at the end of the workpiece, as in detail'b.' To ensure a good fit, I find it best to sneak up on the cut until the tongue slips snugly into the dado. full-extension metal drawer slides. The type of slide 1 used comes in two parts. One part is screwed to the side of the cart. And the other is attached to the drawer. But more about that later. For now, let's concentrate on the drawers. Each drawer is just a shallow box with a false front. The only difference among the drawers is the height. All the information you'll need to complete each drawer is detailed above. Just be sure to account for the thickness of each drawer slide use as you size the parts. (As in Figure 4b, I had to account for a total of 1" — V2" for each drawer slide.) Solid Joinery. The drawers are built with tongue and dado joinery. You can read more about this in the box below. Once you've completed the joinery, you can cut a groove on the inside face of all of the parts to hold a W hardboard bottom and then assemble the drawers. Install the Drawers. At this point, you're ready to install the 1 4 ShopNotes No. 79 |


