79 - Slant Front Tool Cart, страница 23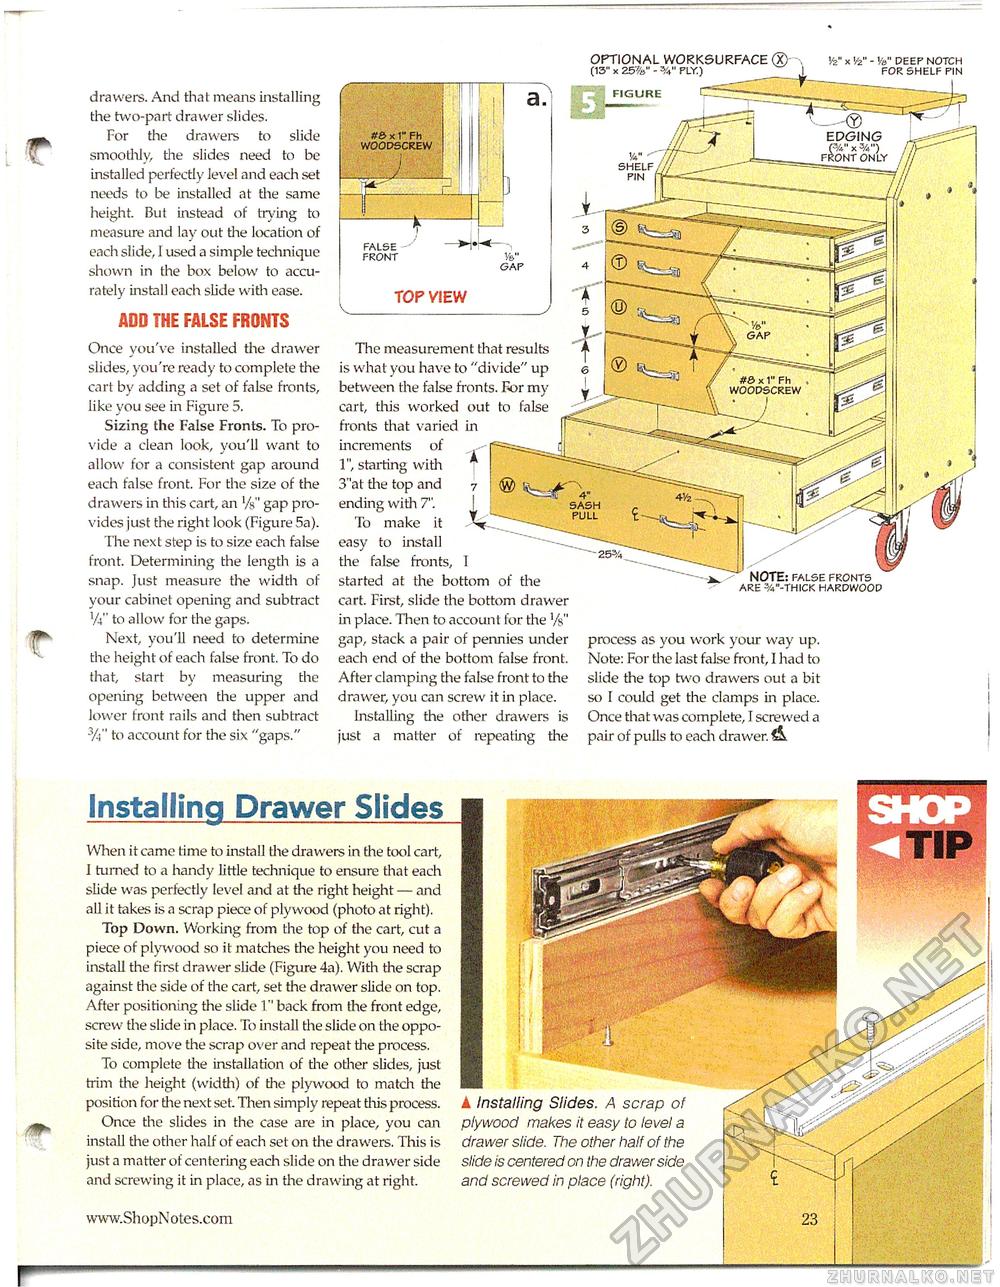
drawers. And that means installing the two-part drawer slides. For the drawers to slide smoothly, the slides need to be installed perfectly level and each set needs to be installed at the same height. But instead of trying to measure and lay out the location of each slide, I used a simple technique shown in the box below to accurately install each slide with ease. ADD THE FALSE FRONTS Once you've installed the drawer slides, you're ready to complete the cart by adding a set of false fronts, like you see in Figure 5. Sizing the False Fronts. To provide a clean look, you'll want to allow for a consistent gap around each false front. For the size of the drawrers in this cart, an '/s" gap provides just the right look (Figure 5a). The next step is to size each false front. Determining the length is a snap. Just measure the width of your cabinet opening and subtract V4" to allow for the gaps. Next, you'll need to determine the height of each false front. To do that, start by measuring the opening between the upper and lower front rails and then subtract 3/i" to account for the six "gaps." Installing Drawer Slides When it came time to install the drawers in the tool cart, I turned to a handy little technique to ensure that each slide was perfectly level and at the right height — and all it takes is a scrap piece of plywood (photo at right). Top Down. Working from the top of the cart, cut a piece of plywood so it matches the height you need to install the first drawer slide (Figure 4a). With the scrap against the side of the cart, set the drawer slide on top. After positioning the slide 1" back from the front edge, screw the slide in place. To install the slide on the opposite side, move the scrap over and repeat the process. To complete the installation of the other slides, just trim the height (width) of the plywood to match the position for the next set. Then simply repeat this process, ly Once the slides in the case are in place, you can install the other half of each set on the drawers. This is just a matter of centering each slide on the drawer side and screwing it in place, as in the drawing at right. r- OPTIONAL WORKSURFACE ^ (13" X 25%" - PLY.) Vz" x V2" - V DEEP NOTCH FOR SHELF PIN TOP VIEW The measurement that results is what you have to "divide" up between the false fronts. For my cart, this worked out to false fronts that varied in increments of 1", starting with 3"at the top and ending with 7". To make it easy to install the false fronts, 1 started at the bottom of the cart. First, slide the bottom drawer in place. Then to account for the Vs" gap, stack a pair of pennies under each end of the bottom false front. After clamping the false front to the drawer, you can screw it in place. Installing the other drawers is just a matter of repeating the T 5 f NOTE: FALSE FRONTS ARE 3V-THICK HARDWOOD process as you work your way Lip. Note: For the last false front, 1 had to slide the top two drawers out a bit so I could get the clamps in place. Once that was complete, I screwed a pair of pulls to each drawer. €5l Va" GAF it& x 1" Fh W00D5CREW FALSE FRONT A Installing Slides, A scrap of plywood makes it easy to level a drawer slide. The other half of the slide is centered on the drawer side and screwed in place (right). |


