79 - Slant Front Tool Cart, страница 25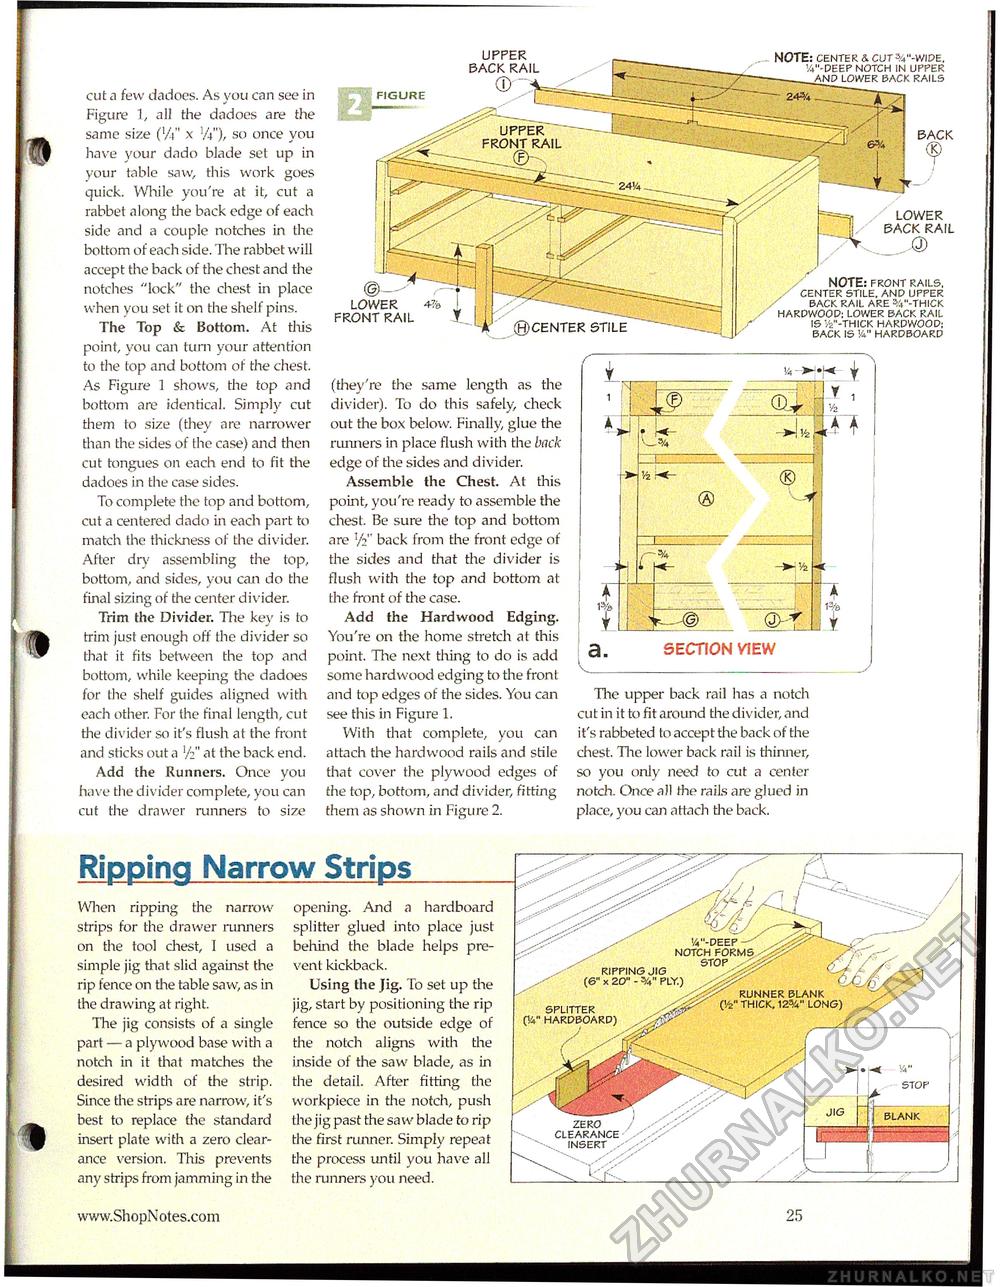
IV'-DEEP NOTCH FORt STOP RIPPING JIG (6" x 20" - V PLY.) RUNNER BLANK (V2" THICK, 12%" LONG) SPLITTER PA" HARDBOARD) zero clearance insert Ripping Narrow Strips When ripping the narrow strips for the drawer runners on the tool chest, I used a simple jig that slid against the rip fence on the table saw, as in the drawing at right. The jig consists of a single part — a plywood base with a notch in it that matches the desired width of the strip. Since the strips are narrow, it's best to replace the standard insert plate with a zero clearance version. This prevents any strips from jamming in the opening. And a hardboard splitter glued into place just behind the blade helps prevent kickback. Using the Jig. To set up the jig, start by positioning the rip fence so the outside edge of the notch aligns with the inside of the saw blade, as in the detail. After fitting the workpiece in the notch, push the jig past the saw blade to rip the first ninner. Simply repeat the process until you have all the runners you need. cut a few dadoes. As you can see in Figure 1, all the dadoes are the same size (W x Vi"), so once you have your dado blade set up in your table saw, this work goes quick. While you're at it, cut a rabbet along the back edge of each side and a couple notches in the bottom of each side. The rabbet will accept the back of the chest and the notches "lock" the chest in place when yoLi set it on the shelf pins. The Top & Bottom. At this point, you can turn your attention to the top and bottom of the chest. As Figure 1 shows, the top and bottom are identical. Simply cut them to size (they are narrower than the sides of the case) and then cut tongues on each end to fit the dadoes in the case sides. To complete the top and bottom, cut a centered dado in each part to match the thickness of the divider. After dry assembling the top, bottom, and sides, you can do the final sizing of the center divider. Trim the Divider. The key is to trim just enoLigh off the divider so that it fits between the top and bottom, while keeping the dadoes for the shelf guides aligned with each other. For the final length, cut the divider so it's flush at the front and sticks out a V2" at the back end. Add the Runners. Once you have the divider complete, you can cut the drawer runners to size FIGURE UPPER BACK RAIL LOWER FRONT RAIL (they're the same length as the divider). To do this safely check out the box below. Finally, glue the rLinners in place flush with the back edge of the sides and divider. Assemble the Chest. At this point, you're ready to assemble the chest. Be sure the top and bottom are V2" back from the front edge of the sides and that the divider is flush with the top and bottom at the front of the case. Add the Hardwood Edging. You're on the home stretch at this point. The next thing to do is add some hardwood edging to the front and top edges of the sides. You can see tills in Figure 1. With that complete, you can attach the hardwood rails and stile that cover the plywood edges of the top, bottom, and divider, fitting them as shown in Figure 2. The upper back rail has a notch cut in it to fit around the divider, and it's rabbeted to accept the back of the chest. The lower back rail is thinner, so you only need to cut a center notch. Once all the rails are glued in place, you can attach the back. NOTE: center & cutv-wide. !4"-deep notch in upper lower back rails NOTE: front rails, center stile, and upper back rail are ^v'-thick hardwood; lower back rail is v2"-thick hardwood; back is va" hardboard BLANK BACK LOWER BACK RAIL SECTION MEW V4 K- 25 |


