80 - Heirloom Tool Cabinet, страница 18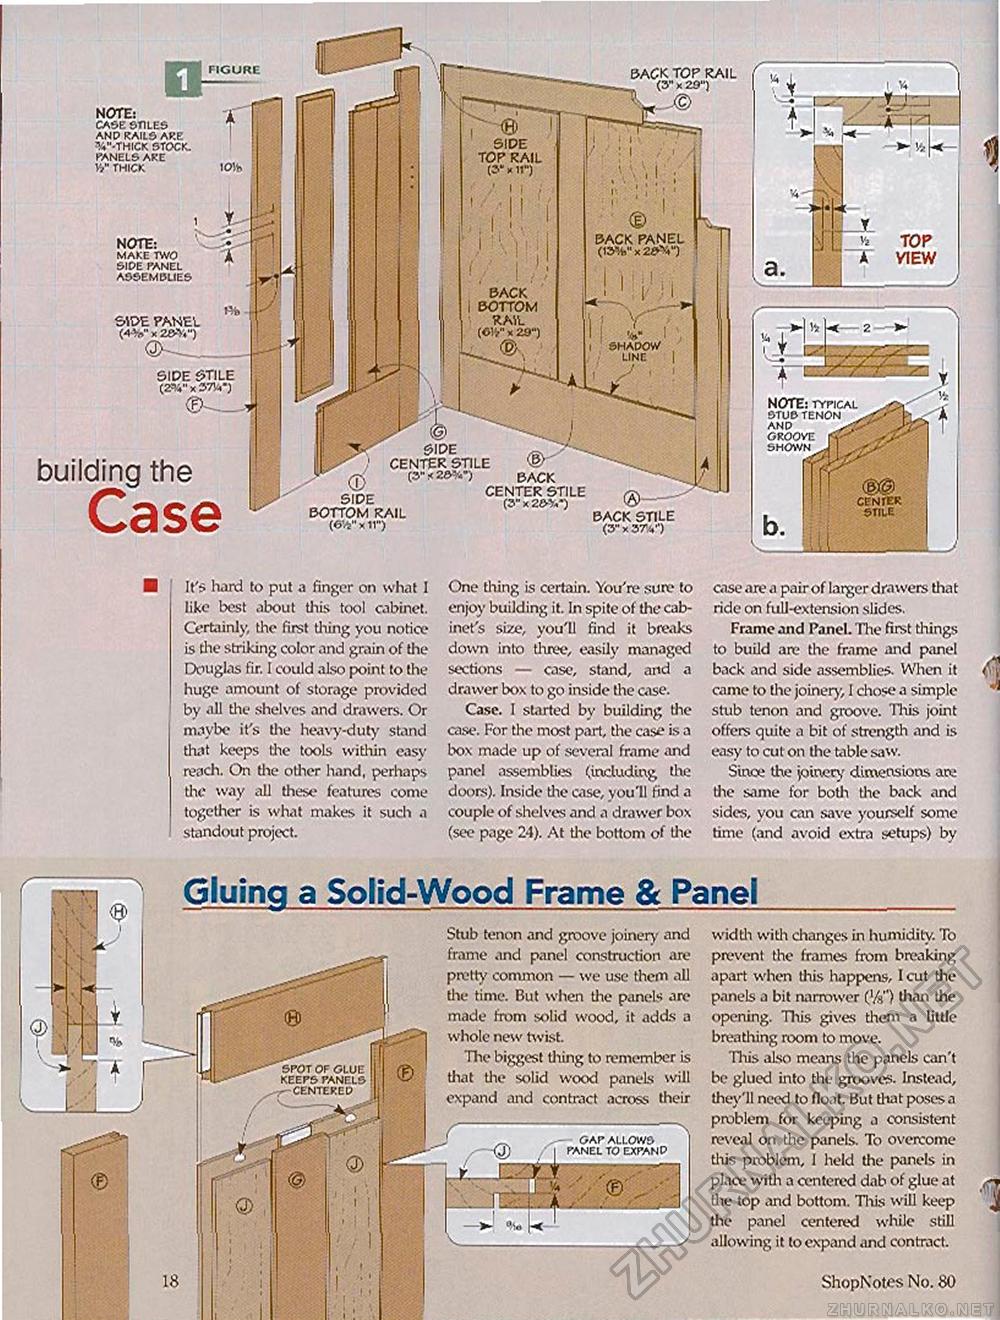
It's hard to put a finger on what I like best about this tool cabinet. Certainly, the first tiling you notice is die striking color and grain of the Douglas fir. I could also point to the huge amount of storage provided by all the shelves and drawers. Or maybe it's the heavy-duty stand that keeps the tools within easy reach. On the other hand, perhaps the way all these features come together is what makes it such a standout project. One thing is certain. You're sure to enjoy building it. In spite of the cabinet's size, you'll find it breaks down into tliree, easily managed sections — case, stand, and a drawer box to go inside the case. Case. I started by building the case. For the most part, the case is a box made up of several frame and panel assemblies (including the doors). Inside the case, you'll find a couple of shelves and a drawer box (see page 24). At the bottom of the case are a pair of larger drawers that ride on full-extension slides. Frame and Panel. The first things to build arc the frame and panel back and side assemblies. When it came to the joiner)', I chose a simple stub tenon and groove. This joint offers quite a bit of strength and is easy to cut on the table saw. Since the joinery dimensions arc the same for both the back and sides, you can save yourself some time (and avoid extra setups) by Gluing a Solid-Wood Frame & Panel Stub tenon and groove joinery and frame and panel constniction are pretty common — we use them all the time. But when the panels are made from solid wood, it adds a whole new twist The biggest tiling to remember is that the solid wood panels will expand and contract across their GAP ALLOWS PANEL TO EXPAND width with changes in humidity. To prevent the frames from breaking apart when this happens, I cut the panels a bit narrower i}/a") than the opening. This gives them a little breathing room to move. Tills also means the panels can't be glued into the grooves. Instead, they'll need to float. But that poses a problem for keeping a consistent reveal on the panels. To overcome this problem, I held the panels in place with a centered dab of glue at the top and bottom. This will keep the panel centered while still allowing it to expand and contract. 18 ShopNotes No. 80 BACK TOP RAIL (3" x 29") 5E SnLES 0 KAILS AP.E ■THICK STOCK. JELSAKE BACK PANEL (13%" x 2&v) NOTE: MAKE TWO SIDE PANEL ASSEMBLIES BACK | BOTTOM RAIL (o!'," * 29") SIDE PANEL (4-V x 202*4") I 'V l SHADOW LINE SIDE CENTER STILE <S> (3-X2&V-) BACK CENTER STILE P" x 2 SIDE BOTTOM RAIL (6Vxir) BACK STILE (3"x37V) TOP VIEW |


