80 - Heirloom Tool Cabinet, страница 20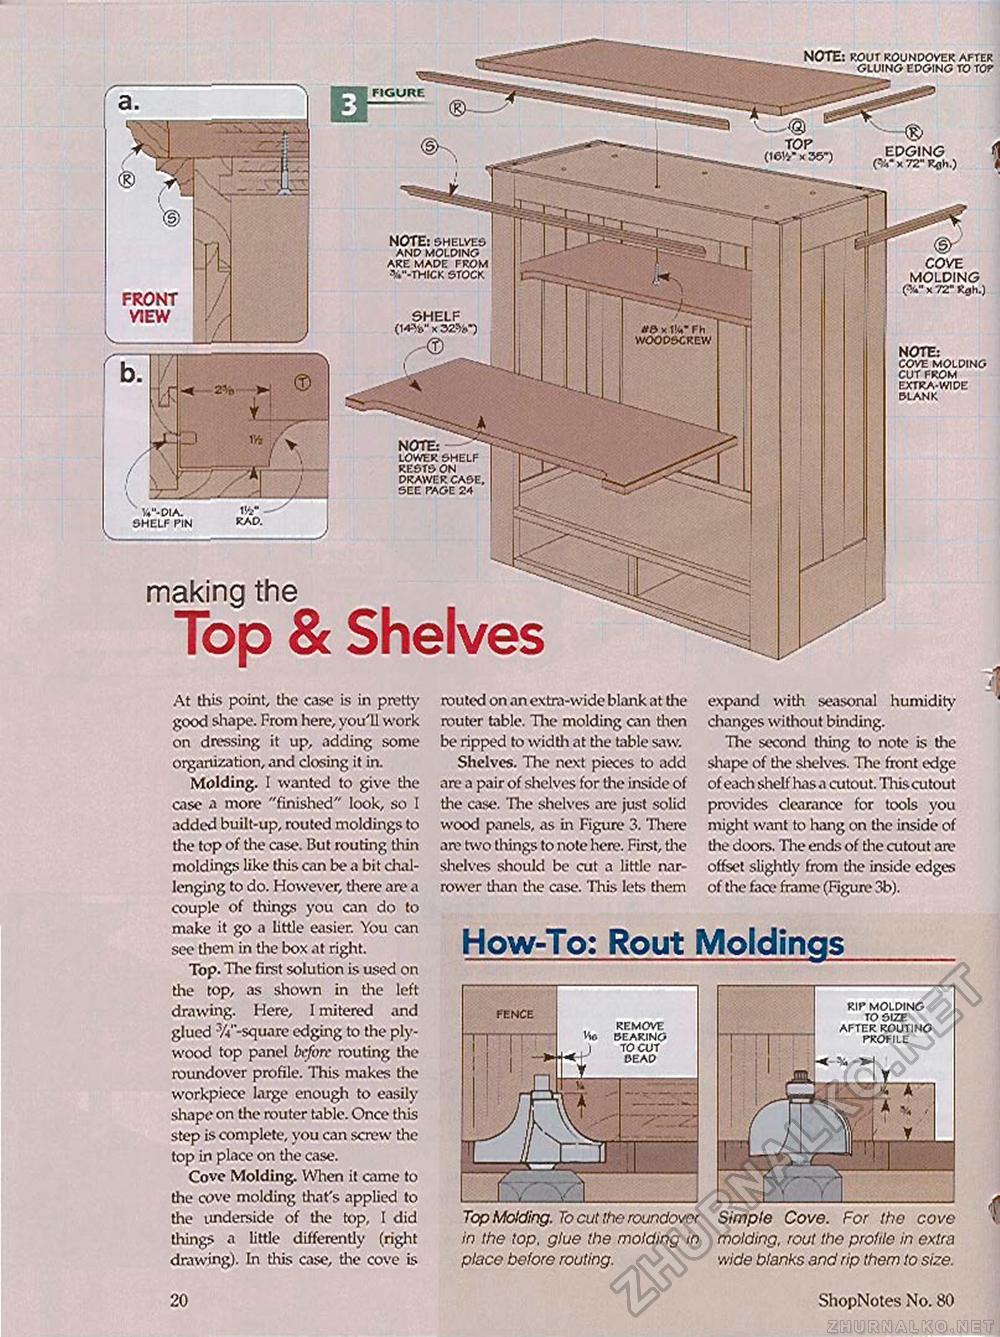
NOTE: ROUT ROUNDOVER AFTER -^__GLUING EDGING TO TOT COVE MOLDING CVx72-Rgh.) #0 x Fh WOODSCREW making the Top & ShelvesAt this point, the case is in prctty good shape. From here, you'll work ori dressing it up, adding some organization, and closing it in. Molding. I wanted to give the case a more "finished" look, so I added built-up, routed moldings to the top of the case. But routing thin moldings like this can be a bit challenging to do. However, there are a couple of things you can do to make it go a little easier. You can see them in the box at right. Top. The first solution is used on the top, as shown in the left drawing. Here, I mitered and glued TV'-square edging to the plywood top panel before routing the roundover profile. This makes the workpiece large enough to easily shape on the router table. Once this step is complete, you can screw the top in place on the case. Cove Molding. When it came to the cove molding that's applied to the underside of the top, I did things a little differently (right drawing). In this case, the cove is routed on an extra-wide blank at the router table. The molding can then be ripped to width at the table saw. Shelves. The next pieces to add an- a pair of shelves for the inside of the case. Tine shelves are just solid wood panels, as in Figure 3. There arc two tilings to note here. First, the shelves should be cut a little narrower than the case. This lets them expand with seasonal humidity changes without binding. The second thing to note is the shape of the shelves. The front edge of each shelf has a cutout. This cutout provides clearance for tools you might want to hang on the inside of the doors. The ends of the cutout arc offset slightly from the inside edges of the face frame (Figure 3b). How-To: Rout Moldings RIP MOLDING TO SIZE AFTER ROUTING PROFILE Top Molding. To cut the roundover in the top, glue the molding in place before routing. Simple Cove. For the cove molding, rout the profile in extra wide blanks and rip them to size. EDGING (-%" x 72" RflH.) FIGURE NOTE: SHELVES AND MOLDING ARE MADE FROM 3/4"-THICK STOCK SHELF (1-4-V x 32-%*) NOTE: COVE MOLDING CUT FROM EXTRA-WIDE PLANK V-DIA. SHELF PIN NOTE:- LOWER SHELF RESTS ON DRAWER CASE. SEE PAGE 24 20 ShopNotes No. 80 |


