80 - Heirloom Tool Cabinet, страница 23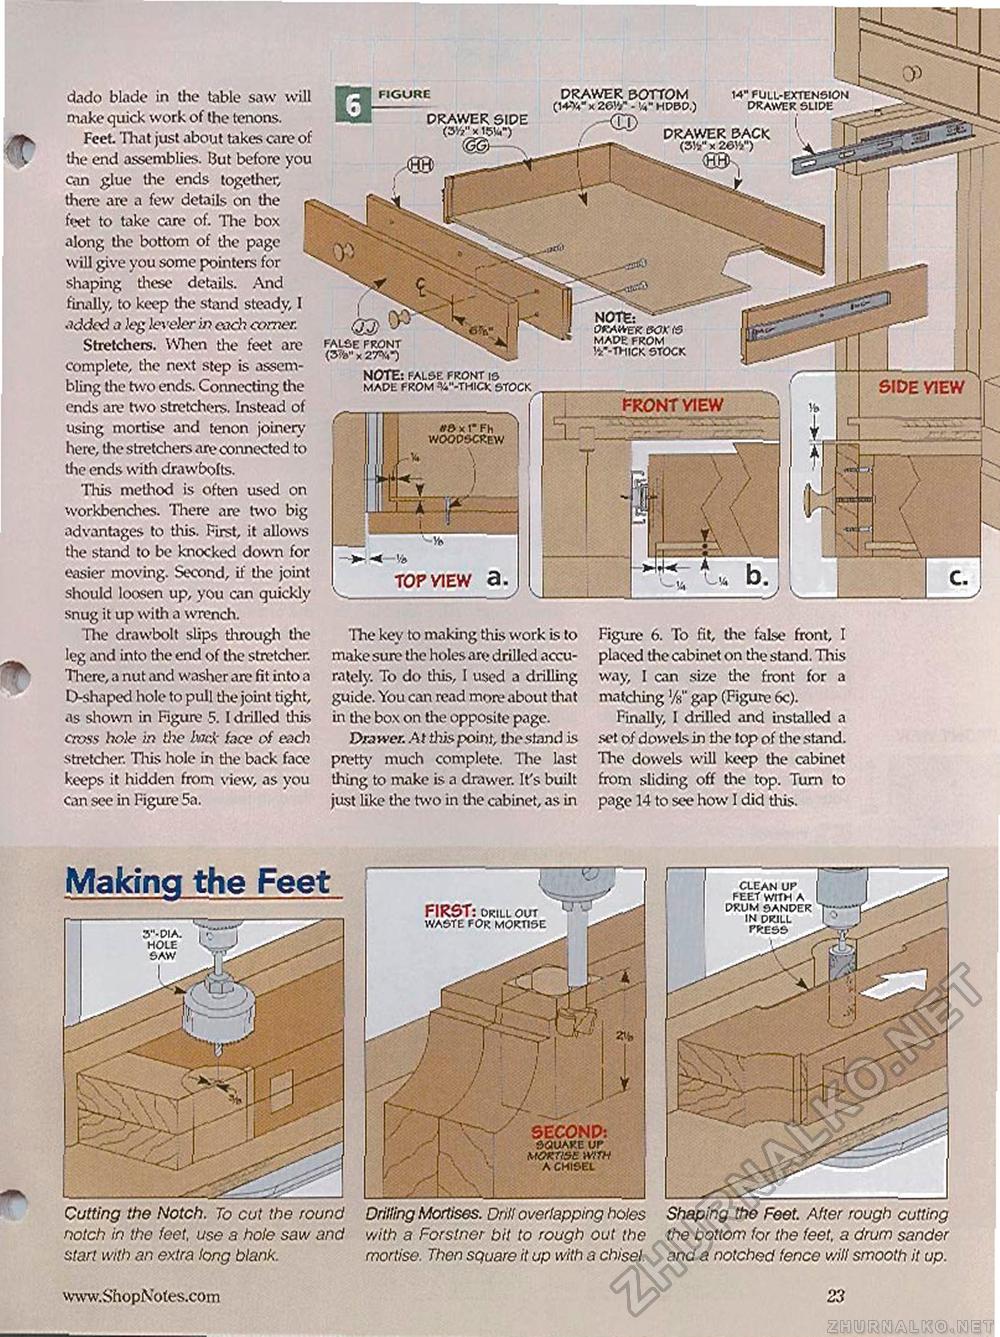
Making the Feet www.ShopNotcs.com 23 Cutting the Notch. To cut the round notch in the feet, use 3 hole saw and atari with an extra long blank. DRAWER BOTTOM (i4-v4- x 26V/ - '/*" hdbd.) x-KCD DRAWER SIDE (My'xUWT) DRAWER BACK (35V x 26V/') ^ <SBK false front is dado blade in the table saw will make quick work of the tenons. Feet That just about takes care of the end assemblies. But before you can glue the ends together, there are a few details on the feet to take aire of. The box along the bottom of the page will give you some pointers for shaping these details. And finally, to keep the stand steady, I .?cfc2od a feg ieveler in cjch comer. Stretchers. When the feet are complete, the next step is assembling the two ends. Connecting the ends are two stretchers. Instead of using mortise and tenon joinery here, the stretchers are connected to tine ends with drawbofts. This method is often used on workbenches. There are two big advantages to this. First, it allows the stand to be knocked down for easier moving. Second, if line joint should loosen up, you can quickly snug it up with a wrench. The drawbolt slips through the leg and into the end of the stretcher. There, a nut and washer arc fit into a D-shaped hole to pull the joint tight, as shown in Figure 5. I drilled this cross ho)e in the back face of each Stretcher. Tliis hole in the back face keeps it hidden from view, as you can see in Figure 5a. 14" full-extension drawer slide NOTE: ^ OftAUreK 0OK & made from mc"-thick stock & KJ false front <3%>" x 27=KO SIDE VIEW H& x 1* Fh WOODSCREW The key to making this work is to make sure the holes an? drilled accurately. To do this, I used a drilling guide. You can read more about that in the box on the opposite page. Drawer. At this point, the stand is pretty much complete. The last thing to make is a drawer. It's built just like tine two in the cabinet, as in Figure 6. To fit, the false front, I placed the cabinet on the stand. This way, I can size the front for a matching '/«" gap (Figure 6c). Finally, I drilled and installed a set 0/ dowels in the top of the stand. The dowels will keep the cabinet from sliding off the top. Turn to page 14 to see how I did this. Drilling Mortises. Drill overlapping boles with a Forstner bit to rough out the mortise. Then square it up with a chisel. FIRST: drill out waste for mortise SECOND: SQUARE up MOKVSE WITH A CHISEL Shaping the Feet. After rough cutting the bottom for the feet, a drum sander and a notched fence will smooth it up. |


