80 - Heirloom Tool Cabinet, страница 19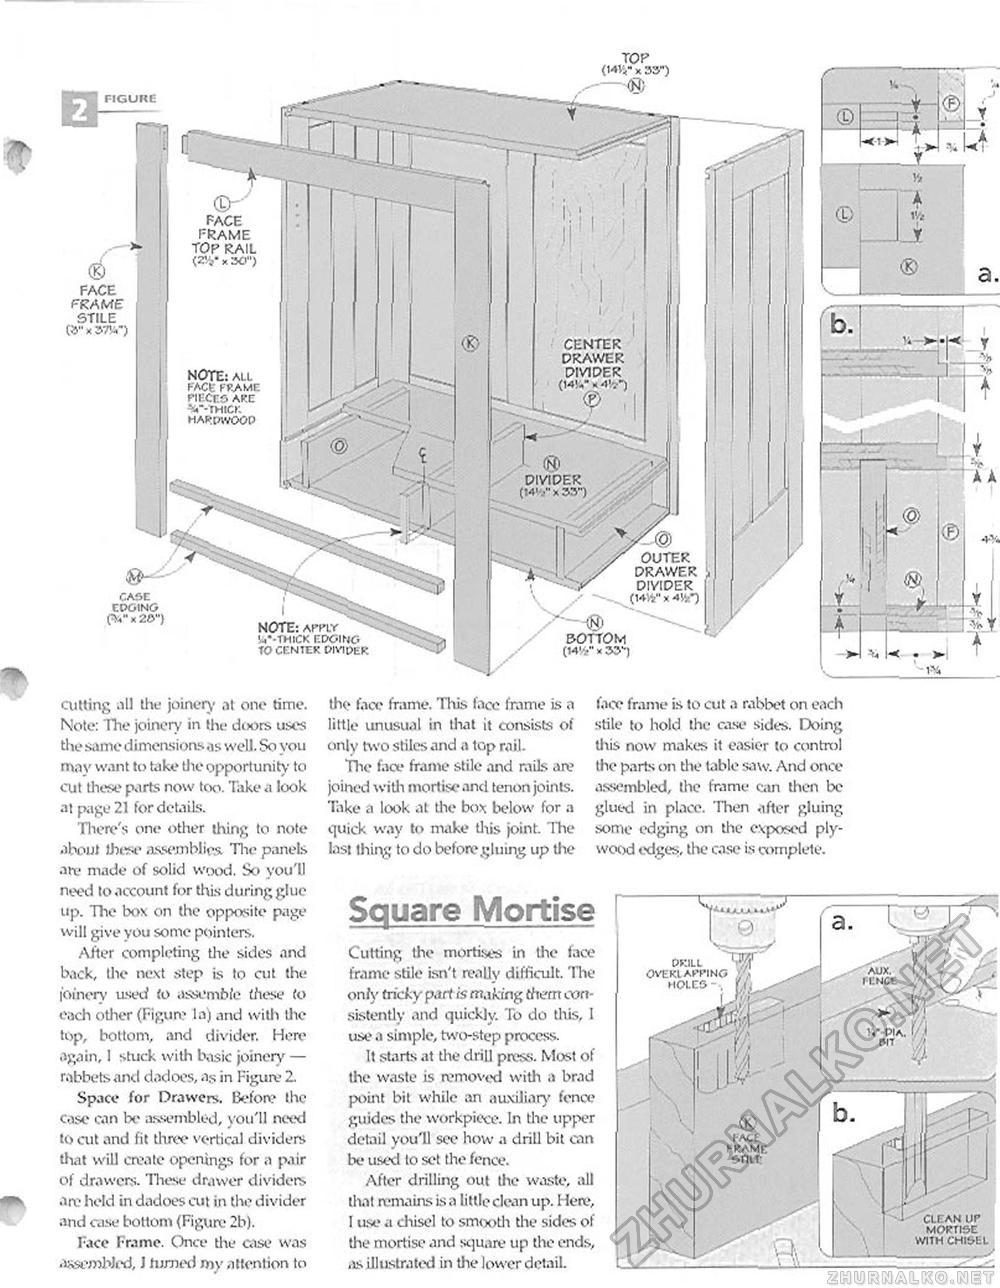
CENTER DRAWER DIVIDER (]4W x 454") DIVIDER OUTER DRAWER DIVIDER (14 ,v" x BOTTOM (MV x 33") FIGURE ® FACE FRAME STILE CASE EDGING TOR <14V<" x 33") — # CD"' FACE FRAME TOP RAIL (2Vx30") NOTE: ALL FACE FRAME PIECES AKC V-TMlCr. HARmvOOP NOTE: APPLY VM'-TMICK EDGING TO CENTER DIVIDER culling all the joinery at one time. Note: The joinery in the doors uses the same dimensk >ns as well. So you may want to take the opportunity to cut these parts now too. Take a look at page 21 for details. There's one other thing to note about these assemblies. The panels aix' made of solid wood. So you'll need to account for this during glue up. The box on the opposite page will give you some pointers. After completing the sides and back, the next step is to cut the I'oinerv used to assemble these to each other (Figure la) and with the top, bottom, and divider. Here again, 1 stuck with basic joinery — rabbets and dadoes, as in Figure 2. Space for Drawers. Before the case can be assembled, you'll need to cut and fit three vertical dividers that will create openings for a pair of drawers. These drawer dividers an- held in dadoes cut in the divider and case bottom (Figure 2b). Face Frame. Once the case was assembled, 1 turned my attention to the face frame. This face frame is a little unusual in that it consists of only two stiles and a top rail. The face frame stile and rails a a5 joined with mortise and tenon joints. Take a look at the box below for a quick way to make this joint. The last thing to do before .sluing up the face frame is to cut a rabbet on each stile to hold the case sides. Doing tliis now makes it easier to control the parts on the table saw. And once assembled, the frame can then be glued in place. Then after gluing some edging on the exposed plywood edges, the case is complete. Square Mortise Cutting the mortises in the face frame stile isn't really difficult. The only tricky part is making them consistently and quickly. To do this, I use a simple, two-step process. It starts at the drill press. Most of the waste is removed with a brad point bit while an auxiliary fence guides the workpiece. In the upper detail you'll see how a drill bit can be used to set the fence. After drilling out the waste, all that remains is a little clean up. Here, I use a chisel to smooth the sides of the mortise and square up the ends, as illustrated in the lower detail. face frame stiu» clean up mortise with chistl |


