80 - Heirloom Tool Cabinet, страница 31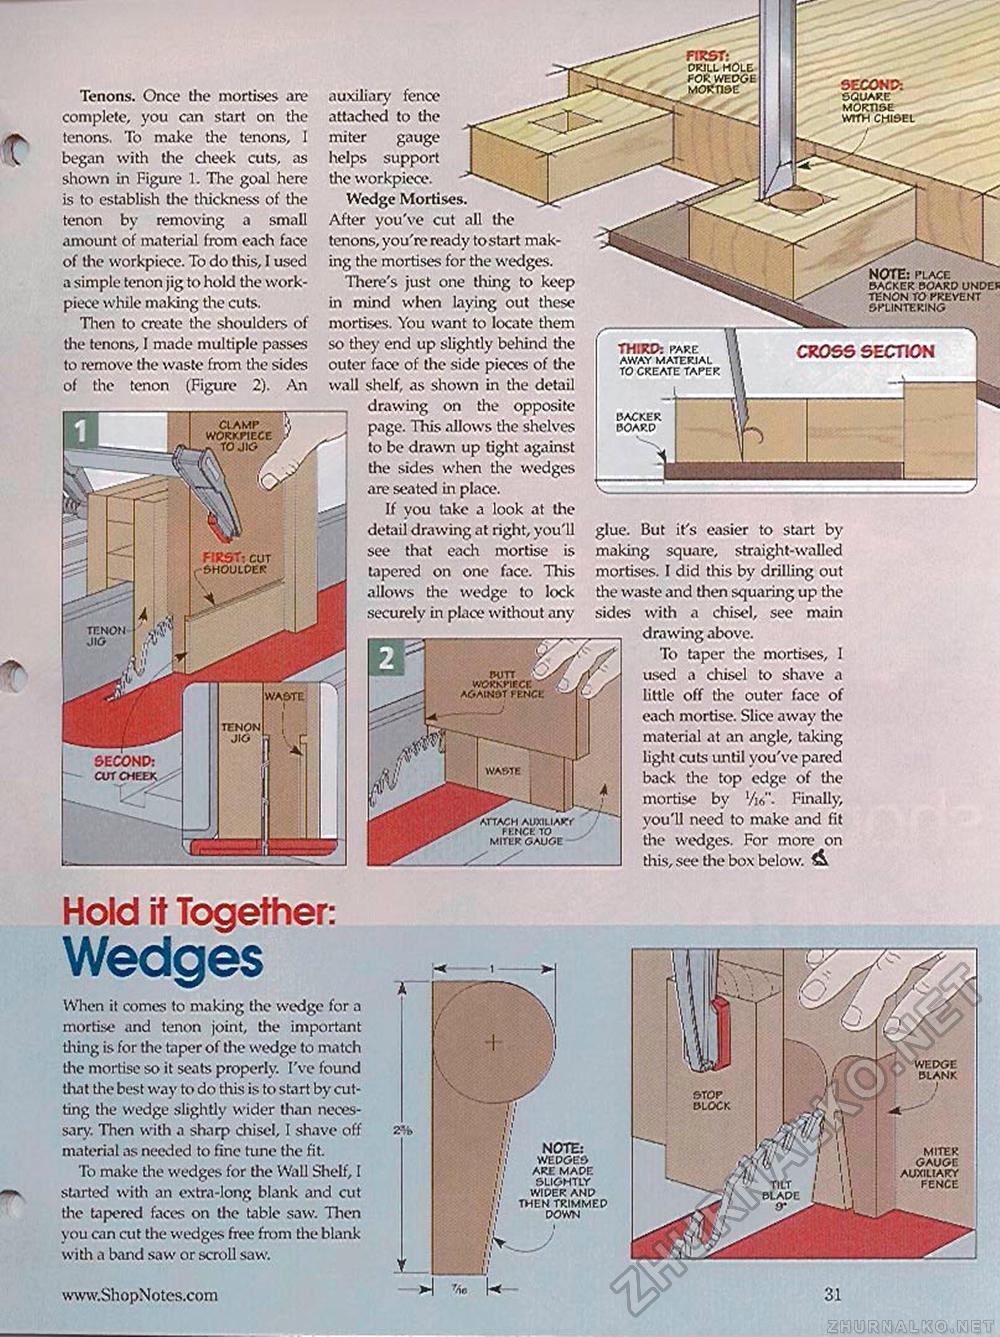
FIRST: . drill hole FOR WEDGE mo« t1se SECOND: square mortise wfth chisel NOTE: place backer board unde* tenon to prevent splintering FIRST: CUT SHOULDER tenon jig SECOND: cut cheek witt wokkviece * agatnftt fence waste attach auxiliary fence to miter gauge Tenons. Once the mortises are complete, you can start on the tenons. To make the tenons, 1 began with the cheek cuts, as shown in Figure 1. The goal here is to establish the thickness of the tenon by removing a small amount of material from each face of the workpiece. To do this, I used a simple tenon jig to hold the work-piece while making the cuts. Then to create the shoulders of the tenons, I made multiple passes to remove the waste from the sides of the tenon (Figure 2). An ClAMP WORKPIECE .'' -v TO JIG / tenon jig auxiliary fence attached to tine miter gauge helps support the workpiece. Wedge Mortises. After you've cut all the tenons, you're ready tostart making the mortises for the wedges. There's just one thing to keep in mind when laying out these mortises. You want to locate them so they end up slightly behind the outer face of the side pieces of the wall shelf, as shown in the detail drawing on the opposite page. This allows the shelves to be drawn up tight against the sides when the wedges are seated in place. If you take a look at the detail drawing at right, you'll see that each mortise is tapered on one face. This allows the wedge to lock securely in place without any THIRD: pare away material to create taper CROSS SECTION glue. But it's easier to start by making square, straight-walled mortises. I did this by drilling out the waste and then squaring up the sides with a chisel, see main drawing above. To taper the mortises, 1 used a chisel to shave a little off the outer face of each mortise. Slice away the material at an angle, taking light cuts until you've pared back the top edge of the mortise by VW'. Finally, you'll need to make and fit the wedges. For more on this, see the box below. & Hold it Together:WedgesWhen it comes to making the wedge for a mortise and tenon joint, the important tiling is for the taper of the wedge to match the mortise so it seats properly. I've found that the best way to do this is to start by cutting the wedge slightly wider than necessary. Then with a sharp chisel, I shave off material as needed to fine time the fit. To make the wedges for the Wall Shelf, I started with an extra-long blank and cut the tapered faces on the table saw. Then you can cut the wedges free from the* blank with a band saw or scroll saw. NOTE: wedges are made slightly wider and then trimmed down 31 |


