80 - Heirloom Tool Cabinet, страница 34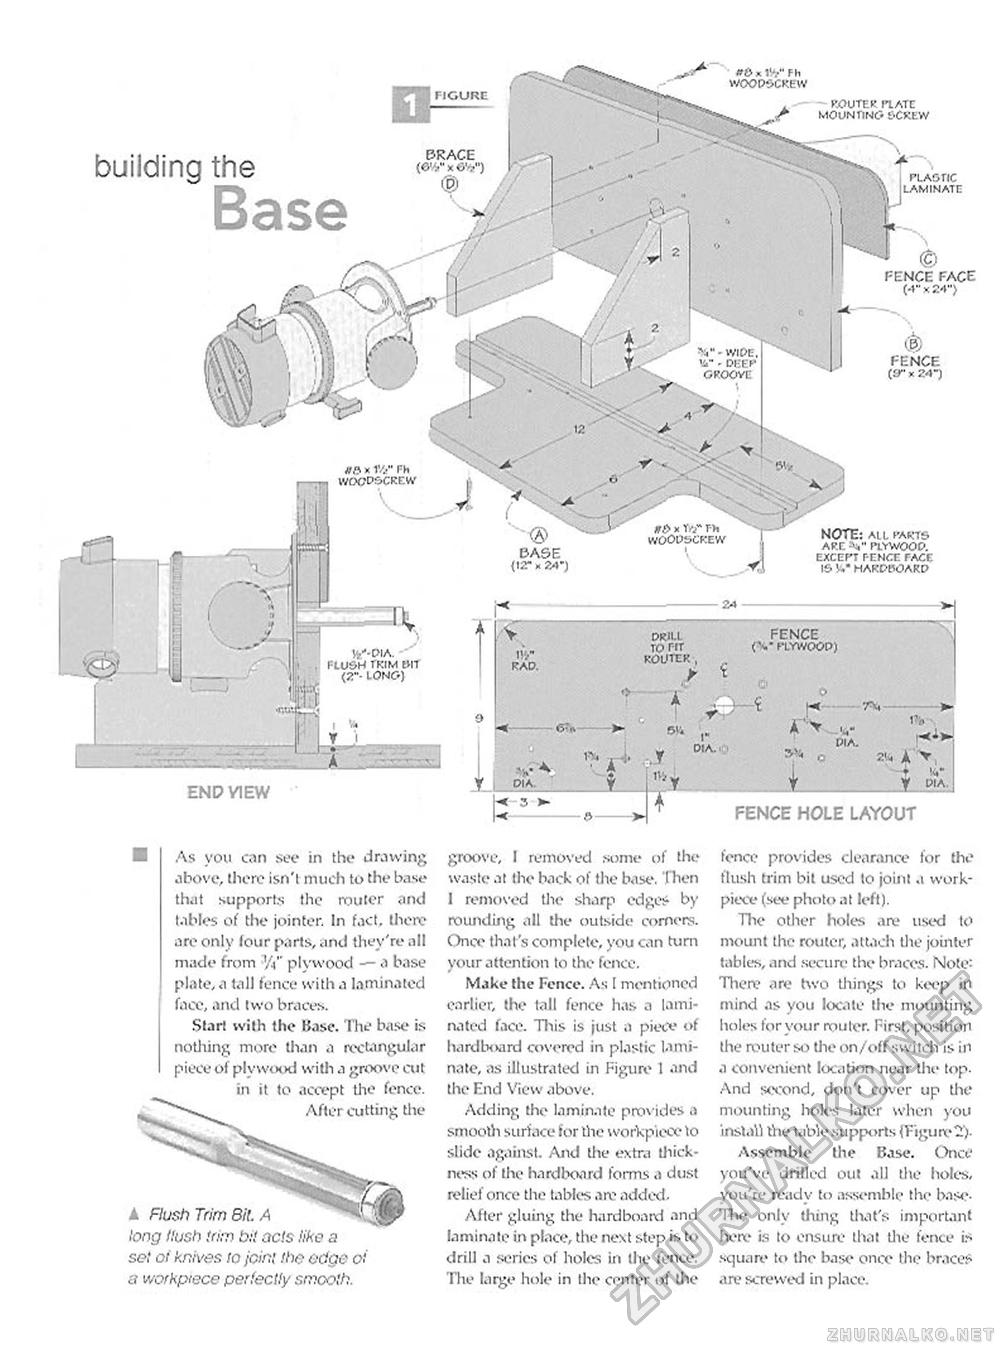
building the Base END VIEW BASE <12- K ?/»-) NOTE: AIL KARTS ARC V rnwooc. EXCEPT FENCE TAT.r IS V*" HARDPOARP
1?t> DIA. 1?t> FENCE HOLE LAYOUT FIGURE wOxi'.y Fh WOOPSCKEW ROUTE* PLATE MOUNTING t-CKtW * r/y Ph wrx;DS-CREw ( BASE <12- K ?/»-) NOTE: AIL KARTS ARC V rnwooc. EXCEPT FENCE TAT.r IS V*" HARDPOARP ^'-PIA. FLUSH TF'.IM tin IONC') <S PENCE FACE (-V X 24") 6 PENCE {'.r x 2A-) As you can see in the drawing above, there isn't much to the base that supports the router and tables of the jointer. In fact, there are only lour parts, and they're all made from '/)" plywood — a base plate, a tall fence with a laminated face, and two braces. Start with the Base. The base is nothing more than a rectangular piece of plywood with a groove cut in it to accept the fence. the long flush trim bit ads iike a set of knives lo join: .'he edge oi a workpiece perfectly smooth. groove, I removed some of the waste at the back of the base. I hen 1 removed the sharp edges* by rounding all the outside comers. Once that's complete, you can turn your attention to the fence. Make the Fence. As I mentioned earlier, the tall fence has a laminated face. This is just a piece of hard board covered in plastic laminate, as illustrated in Figure 1 and the End View above. Adding the laminate provides a smooth surface tor the workpiece to slide against. And the extra thickness of the hardboard forms a dust relief once the tables arc added. After gluing the hardboard and laminate in place, the next step is to drill a series of holes in the fence. The large hole in the center of the fence provides clearance for the flush trim bit used lo joint a work-piece (see photo at left). The other holes are used to mount the router, attach the jointer tables, and secure the braces. Note: There are two tilings to keep in mind as you locate the mounting holes for your router. First, position the router so the on/off switch is in a convenient location near the top. And second, don't cover up the mounting holes later when you install the table supports (Figures- Assemble the Base. Once you've drilled out all the holes, you're ready to assemble the base-The only thing that's important here is to ensure that the fence i:-square to the base once the brace? are screwed in place. |
|||||||||||||||


