80 - Heirloom Tool Cabinet, страница 37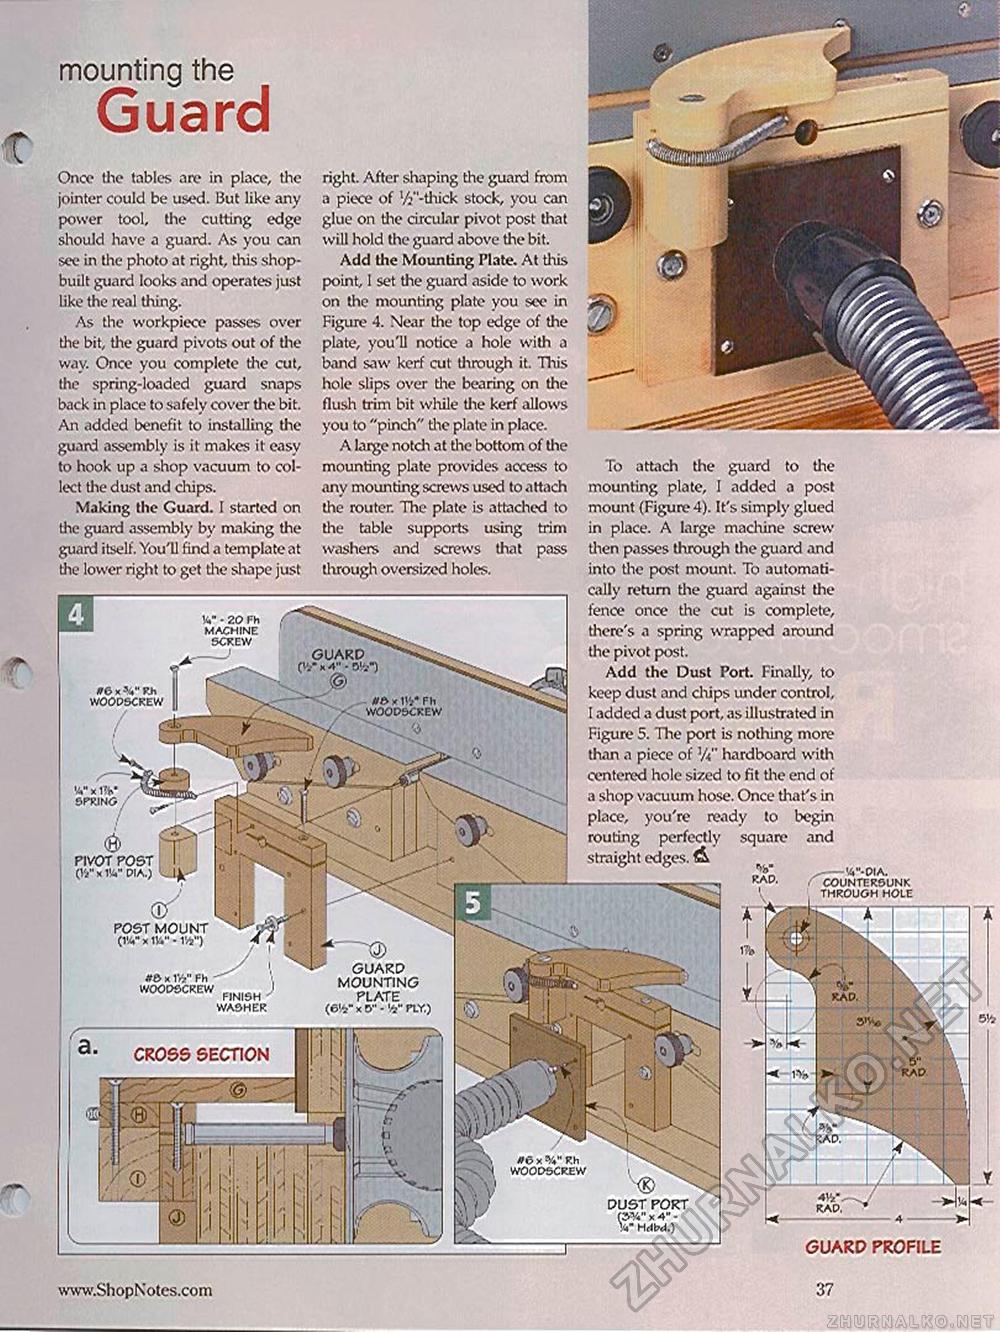
t r www.ShopNotcs.com 37 V - 20 Fh MACHINE 5CREW GUARD (VxT-Ofc") »6*VRh WOODSCREW x Hi* Fh WOOD&CREW PIVOT POST I (W x W DIA.) #6 x Rh WOODSCREW DUST PORT x 4" -Hrfbd.) Once the tables are in place, the jointer could be used. But like any power tool, the cutting edge should have a guard. As you can see in the photo at right, this shop-built guard looks and operates just like the real thing. As the workpiece passes over the bit, the guard pivots out of the way. Once you complete the cut, the spring-loaded guard snaps back in place to safely cover the bit. An added benefit to installing the guard assembly is it makes it easy to hook up a shop vacuum to collect the dust and chips. Making the Guard. I started on the guard assembly by making the guard itself. You'll find a template at the lower right to get the shape just right. After shaping the guard from a piece of l/?"-thick stock, you can glue on the circular pivot post that will hold the guard above the bit. Add the Mounting Plate. At this point, 1 set the guard aside to work on the mounting plate you see in Figure 4. Near the top edge of the plate, you'll notice a hole with a band saw kerf cut through it. This hole slips over tine bearing on the flush trim bit while the kerf allows you to "pinch" tine plate in place. A large notch at the bottom of the mounting plate provides access to any mounting screws used to attach the router. The plate is attached to the table supports using trim washers and screws that pass tlirough oversized holes. FINISH WASHER "A" x 1V SPRING . POST MOUNT x W - W) »e> x w Fh WOODSCREW To attach the guard to tine mounting plate, I added a post mount (Figure 4). It's simply glued in place. A large machine screw then passes through the guard and into the post mount. To automatically return the guard against the fence once the cut is complete, there's a spring wrapped around tine pivot post. Add the Dust Port. Finally, to keep dust and chips under control, I added a dust port, as illustrated in Figure 5. The port is nothing more than a piece of 3/<" hardboard with centered hole sized to fit tine end of a shop vacuum hose. Once that's in place, you're ready to begin routing perfectly square and straight edges. A -Q) GUARD MOUNTING PLATE <6'<j" x 0" - PLY.) CROSS SECTION GUARD PROFILE mounting the Guard |


